Tools / Drills
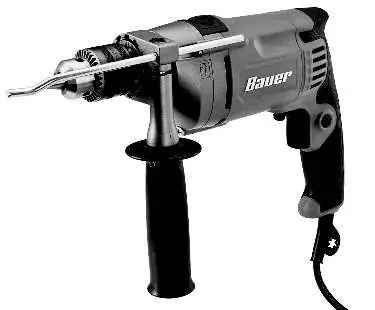
User Manual for Bauer 1992E-B Hammer Drill
Comprehensive user guide for the Bauer 1992E-B Heavy Duty Variable Speed Reversible Hammer Drill. Includes setup, drilling techniques for metal, wood, and masonry, maintenance, and troubleshooting.
Quick answers from the manual
Quick answer
- The Bauer 1992E-B is a heavy-duty hammer drill. This manual provides instructions for safe operation, bit installation, mode selection (drill/hammer), and maintenance. p. 1, 8, 9
Key actions
- Drill Bit Installation: Hold the ring behind the chuck collar, rotate counterclockwise to open, insert bit, hand tighten, then use the chuck key to secure. p. 9
- Mode Selection: Slide the switch to the right (drill symbol) for plain drilling or to the left (hammer symbol) for hammer drilling. p. 9
First start
- Ensure the trigger is in the off-position, plug in the tool, set the direction switch, and secure the workpiece before starting. p. 10
Problems and fixes
Tool will not start
Check power, circuit breaker, or thermal reset button.
p. 13Maintenance and reset
- If the tool has a thermal reset breaker, press the reset button on the tool after allowing it to cool. p. 13
Technical specifications
| Parameter | Value | Meaning | Pages |
|---|---|---|---|
| Electrical Rating | 120VAC / 60Hz / 7.5A | Power requirements | p. 8 |
Where to find it in the PDF
- Safety Information p. 2, 3, 4, 5
- Operating Instructions p. 9, 10, 11
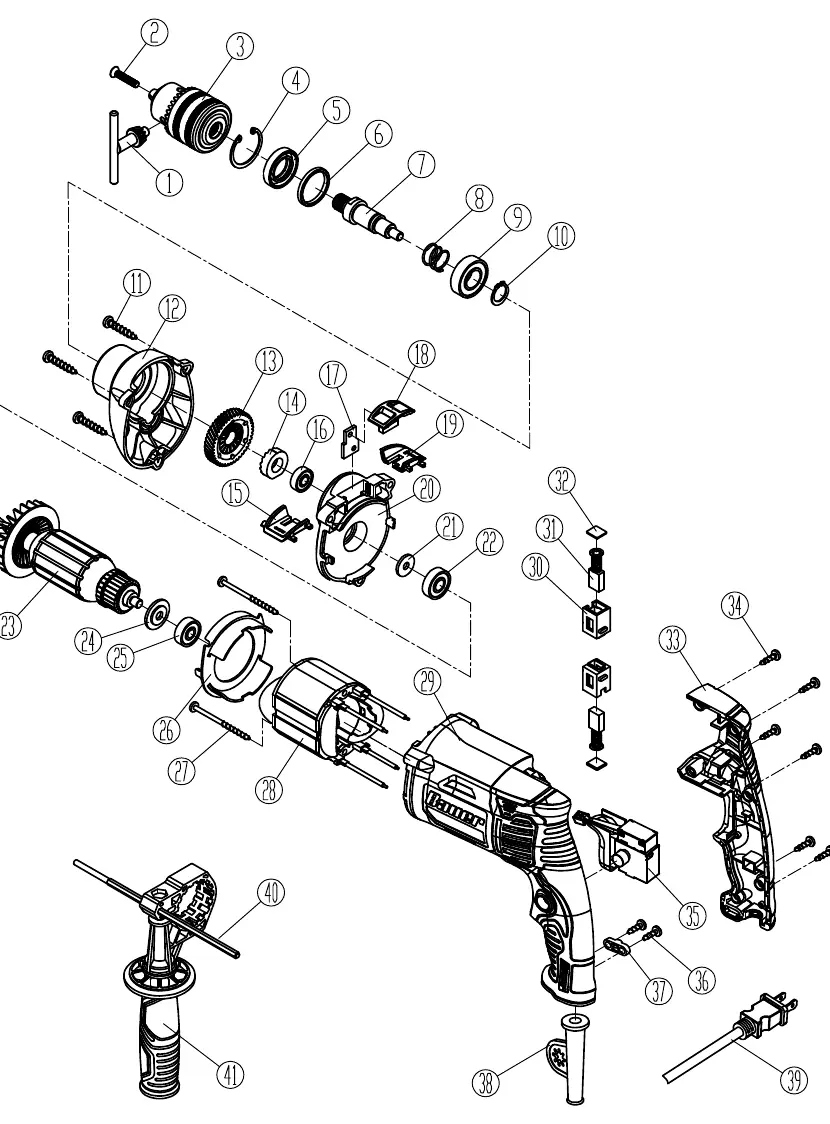
- Parts List and Diagram p. 14, 15
Table of contents
Manual images
Click an image to enlargeQuick Guide
The Bauer 1992E-B is a heavy-duty hammer drill designed for drilling into wood, metal, and masonry. Before use, ensure the trigger is in the off position and the tool is unplugged. Always wear ANSI-approved eye protection and secure your workpiece with clamps or a vise.
Safety Information
General Safety: Keep your work area clean and well-lit. Do not operate in explosive atmospheres. Keep children and bystanders away. Always wear eye protection and use the auxiliary handle to maintain control.

Vibration Safety: Prolonged use of vibrating tools can cause injury. Take regular breaks, wear suitable gloves, and grip the tool as lightly as possible while maintaining control.
Silicosis Prevention: When drilling masonry (concrete), use containment methods, wear a NIOSH-approved respirator, and practice good personal hygiene to avoid inhaling silica dust.
Setup
Drill Bit Installation: Hold the ring behind the chuck collar and rotate the collar counterclockwise to open the jaws. Insert the bit, hand-tighten the chuck, and then use the provided chuck key to secure the bit firmly.
Side Handle Setup: Loosen the side handle grip, slide the clamp over the chuck, rotate to the desired position, and tighten clockwise to secure.
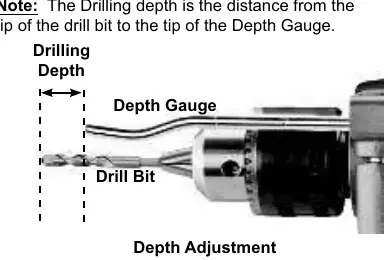
Depth Gauge: Insert the bit and tighten the chuck. Loosen the side handle, slide the depth gauge through the hole, set the desired depth, and tighten the handle to lock it in place.
Mode Selection: Use the switch on top of the tool. Slide to the right (drill symbol) for plain drilling. Slide to the left (hammer symbol) for hammer drilling.
Operation
General Use: Ensure the trigger is off before plugging in. Use the direction switch to select forward (left) or reverse (right) rotation. Do not change modes while the chuck is rotating.
Drilling Tips:
- Metal: Use high-speed steel or carbide bits. Start with a pilot hole for large holes. Use cutting oil to keep the bit cool.
- Wood: Use bits designed for wood. Clamp scrap material to the back of the workpiece to prevent breakout.
- Masonry: Do not add water to the hole. Clean bit flutes regularly and back the bit out frequently to clear debris.
Maintenance
Cleaning: Before each use, inspect for loose hardware, damaged cords, or cracked parts. After use, wipe external surfaces with a clean cloth. Periodically blow compressed air through motor housing slots to remove debris.
Service: If the plug or cord is damaged, it must be replaced by a qualified technician. Do not attempt internal repairs yourself.
Troubleshooting
If the tool will not start, check the power source, circuit breaker, or the thermal reset button on the tool. If the tool operates slowly, ensure you are not using an excessively long or thin extension cord. If the tool overheats, allow it to work at its own rate and ensure vents are not blocked.
Specifications
Electrical Rating: 120VAC / 60Hz / 7.5ARotational Speed: 0-2800 RPMImpact Rate: 0-45,000 BPMChuck Capacity: Up to 1/2 inchDrilling Capacities: Wood 1 inch, Concrete 5/8 inch, Steel 1/2 inch
Practical help
Common problems
Tool will not start
Check power connection, circuit breaker, or thermal reset button on the tool.
Tool operates slowly
Eliminate or shorten extension cord; ensure proper gauge is used.
Overheating
Allow tool to work at its own rate, check accessory alignment, and clean motor vents.
Excessive noise or rattling
Internal damage or wear; have the tool serviced by a technician.
Before use
- Inspect tool for loose hardware or damaged cord.
- Ensure switch is in OFF position before plugging in.
- Wear ANSI-approved eye protection.
- Secure workpiece with clamps or vise.
- Check that the drill bit is appropriate for the material.
Specs in practice
- Electrical Rating
- 120VAC / 60Hz / 7.5A
- Rotational Speed
- 0-2800 RPM (variable speed)
- Chuck Capacity
- Up to 1/2 inch
Images and diagrams
- The manual includes an assembly diagram on page 15, detailing parts like the chuck, motor, and trigger assembly.
- Page 8 provides a functional diagram identifying the mode selector, depth gauge, and trigger lock.
Model compatibility
- Use only identical replacement parts.
- Double insulated tool; does not require grounding.

Manual page author
Emily Carter
User documentation editor
Prepares concise manual descriptions and highlights the most useful setup, operation, and maintenance information for readers.