Lighting / Fixtures
Instruction Manual for BEGA 24 625 Ceiling-Mounted Downlight
Quick guide for the BEGA 24 625 ceiling-mounted downlight. Includes installation steps, technical specifications, maintenance instructions, and LED module replacement procedures.
PDF source: Français · summary: English
Quick answers from the manual
Quick answer
- The BEGA 24 625 is a ceiling-mounted downlight with IP65 protection. Installation requires a qualified electrician, proper gasket usage, and the insertion of the provided desiccant pouch. p. 1, 2
Key actions
- Install the desiccant pouch p. 2
- Connect DALI control p. 2
First start
- Mounting and wiring p. 2
Show 3 more answers Show less
Maintenance and reset
- Cleaning p. 3
- LED Module Replacement p. 3
Technical specifications
| Parameter | Value | Meaning | Pages |
|---|---|---|---|
| Luminaire connected wattage | 38.2 W | Total power consumption | p. 2 |
| Protection class | IP 65 | Dust-tight and water jet protection | p. 1 |
| Impact strength | IK09 | Mechanical impact resistance | p. 1 |
| Weight | 2.6 kg | Product weight | p. 1 |
Where to find it in the PDF
- Product Overview and Specs p. 1
- Installation and Safety p. 2
- Maintenance and Spare Parts p. 3
Table of contents
Quick guide from the manual
The BEGA 24 625 is a ceiling-mounted downlight designed for professional lighting applications. Installation must be performed by a qualified electrician in accordance with national safety regulations. Key requirements include using the supplied gasket rings, ensuring the desiccant pouch is inserted before final closure, and adhering to the specified cable diameter of 7-12 mm.
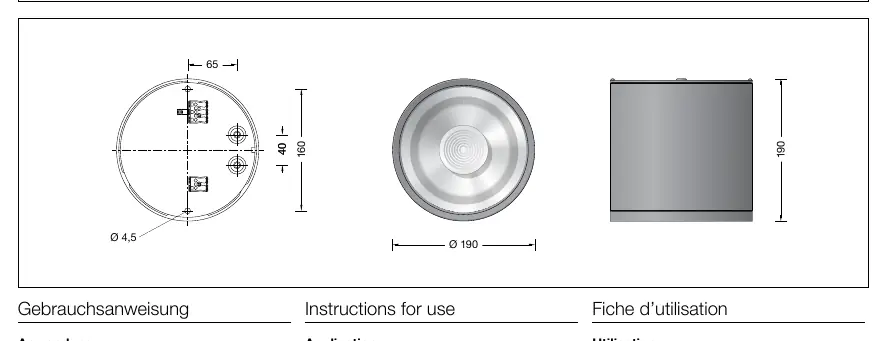
Product description
The luminaire is constructed from aluminium alloy, aluminium, and stainless steel with BEGA Unidure coating technology. It features a safety glass with an optical structure and an optical silicone lens (BEGA Hybrid Optics). The unit is DALI-controllable and includes BEGA Thermal Control for temperature regulation.
- Protection class: IP 65 (Dust-tight and protected against water jets)
- Impact strength: IK09 (Protection against mechanical impacts < 10 joules)
- Safety class: I
- Weight: 2.6 kg
Installation
Follow these steps for proper installation:
- Pass the power connecting cable through the cable entry in the mounting plate.
- Fix the mounting plate to the mounting surface using suitable fixing material. Ensure the supplied gasket rings are used.
- Make the earth conductor connection and the electrical connection.
- For digital control, use the connecting terminal marked DA, DA. If this terminal is not used, the luminaire will operate at full light output.
- Important: Remove the desiccant pouch from the foil packaging and place it in the position marked by the red information label immediately before finally closing the luminaire.
- Connect the earth conductor between the luminaire housing and the mounting plate.
- Push the plug into the coupler until it stops.
- Ensure the gasket is positioned correctly, then insert the luminaire housing into the mounting plate and turn it until it stops.
Cleaning and Maintenance
Clean the luminaire regularly using solvent-free cleansers to remove dirt and deposits. Do not use high-pressure cleaners. The LED module can be replaced by qualified persons using standard tools.
Replacing the LED module
- Disconnect the system from the power supply.
- Remove the luminaire housing from the mounting plate by turning it counter-clockwise.
- Disconnect the plug-in devices.
- Undo the retaining screw (wrench size 2.5 mm) in the luminaire housing.
- Remove the trim ring along with the glass and reflector by turning it counter-clockwise.
- Replace the LED module.
- Reassemble in reverse order, ensuring the gasket is correctly positioned and the retaining screw is tightened firmly.
Manufacturer information
BEGA
Practical help
Common problems
Luminaire not functioning
Check electrical connections and ensure the DALI terminal is correctly wired if digital control is intended.
Moisture inside the luminaire
Ensure the gasket is correctly positioned and the desiccant pouch was installed before closing the housing.
Before use
- Ensure power is disconnected before starting installation.
- Verify the mounting surface is suitable for the luminaire.
- Check that the cable diameter is between 7-12 mm.
- Have a 2.5 mm wrench ready for the retaining screw.
- Ensure the desiccant pouch is available for installation.
Show more Show less
Specs in practice
- Safety Class I
- Requires an earth conductor connection.
Images and diagrams
- Technical dimensions of the luminaire (190mm diameter, 160mm mounting hole distance).
- Mounting plate installation and wiring entry points.
- LED module replacement procedure involving the trim ring and retaining screw.
Model compatibility
- DALI-controllable (1 address).
- Suitable for through-wiring of mains supply cable.
- Max cable diameter: 7-12 mm.

Manual page author
Michael Turner
Technical manual editor