Lighting / Fixtures
Instruction Manual for BEGA 24911K3 Ceiling and Wall Luminaire
Quick guide for the BEGA 24911K3 ceiling and wall luminaire. Includes installation steps, maintenance instructions, technical specifications, and safety guidelines.
Quick answers from the manual
Quick answer
- The BEGA 24911K3 is an IP65 rated ceiling and wall luminaire. Installation must be performed by a qualified electrician, ensuring the desiccant pouch is inserted and the gasket is correctly positioned. p. 1, 2
Key actions
- Insert the desiccant pouch p. 2
- Ensure correct wall orientation p. 2
Maintenance and reset
- Clean with a soft, lint-free cloth dampened with water and mild detergent. Do not use solvents or high-pressure cleaners. p. 2
Show 2 more answers Show less
Technical specifications
| Parameter | Value | Meaning | Pages |
|---|---|---|---|
| Luminaire connected wattage | 6.8 W | Total power consumption | p. 1 |
| Colour temperature | 3000 K | Light color | p. 1 |
| Protection class | IP 65 | Ingress protection rating | p. 1 |
Where to find it in the PDF
- Product Overview and Specs p. 1
- Installation and Safety p. 2
- Maintenance and Spares p. 3
Table of contents
Quick Guide from the Manual
The BEGA 24911K3 is an IP65 rated ceiling and wall luminaire designed for interior and exterior use. Installation must be performed by a qualified electrician. Key requirements include ensuring the correct orientation for wall mounting (arrow down) and inserting the provided desiccant pouch to ensure the longevity of electrical components.
Product Description
The luminaire is constructed from die-cast aluminium and stainless steel with BEGA Unidure coating. It features an impact-resistant synthetic diffuser (BEGA NeoGlass) and is dust-tight and protected against water jets (IP65).
Installation
Important: Installation and commissioning must be carried out by a qualified electrician.
- Preparation: Undo screws and remove the luminaire top and polycarbonate diffuser.
- Wiring: Lead the mains supply cable through the cable entry of the luminaire base.
- Mounting: Fix the luminaire base to the mounting surface using the enclosed or suitable fixing material. Ensure the gasket rings supplied are used.
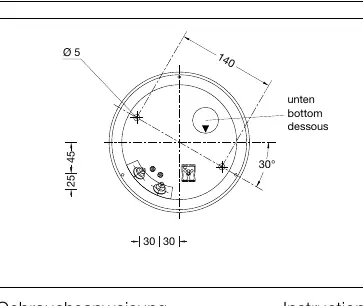
- Orientation: For wall installation, note the position of application marked with an arrow pointing down.
- Desiccant Pouch: To guarantee maximum service life, the enclosed desiccant pouch must be placed in the luminaire. Remove it from the foil packaging and place it in the position marked by the red information label immediately before closing the luminaire.
- Closing: Ensure the gasket is positioned correctly, insert the diffuser, and tighten the screws evenly.
Cleaning and Maintenance
Clean the luminaire regularly with a clean, soft, lint-free cloth dampened with water and a little commercial dishwashing detergent. Do not use solvents or high-pressure cleaners. For lacquered surfaces, BEGA Lacquer Care Set 71 179 is recommended.
Replacing the LED Module
The LED module can be replaced by qualified persons using standard tools. Disconnect the system from the power supply before opening. Follow the installation instructions provided with the replacement module. Inspect and replace gaskets if necessary. A defective glass cover must be replaced.
Technical Data
- Module connected wattage: 5.8 W
- Luminaire connected wattage: 6.8 W
- Colour temperature: 3000 K
- Colour rendering index (CRI): > 80
- Module luminous flux: 1220 lm
- Luminaire luminous flux: 870 lm
- Protection class: IP 65
Manufacturer information
BEGA
Practical help
Common problems
Moisture inside the luminaire
Ensure the gasket is positioned correctly and the luminaire is closed tightly. Verify that the desiccant pouch was inserted during installation.
Luminaire not working
Ensure the system is powered and the electrical connection is secure. If the LED module is faulty, it may need to be replaced by a qualified person.
Before use
- Ensure installation is performed by a qualified electrician.
- Verify the 'arrow down' position for wall mounting.
- Ensure the desiccant pouch is inserted before closing the luminaire.
- Check that the gasket is correctly positioned.
- Ensure the power supply is disconnected before any maintenance or replacement.
Show more Show less
Images and diagrams
- The diagram shows the dimensions (200mm x 90mm) and the 140mm mounting hole distance.
- The diagram indicates the 'arrow down' orientation required for wall mounting.
Model compatibility
- Compatible with BEGA 71320 electronic relay for overvoltage protection.
- Requires BEGA Lacquer Care Set 71 179 for cleaning lacquered surfaces.

Manual page author
Michael Turner
Technical manual editor