Lighting / Fixtures
User Manual for BEGA 24 501 Wall Luminaire
Comprehensive user guide for the BEGA 24 501 wall luminaire. Includes installation instructions, technical specifications, maintenance procedures, and LED module replacement steps.
Quick answers from the manual
Quick answer
- The BEGA 24 501 is a wall luminaire with directed light. Installation must be performed by a qualified electrician, ensuring the 'arrow down' orientation and proper use of the included desiccant pouch. p. 1, 2
Key actions
- Install the desiccant pouch p. 2
- Ensure 'arrow down' orientation p. 2
First start
- Ensure the luminaire is installed by a qualified electrician and the desiccant pouch is inserted before final closure. p. 1, 2
Show 3 more answers Show less
Maintenance and reset
- Clean regularly with solvent-free cleansers; do not use high-pressure cleaners. p. 2
Technical specifications
| Parameter | Value | Meaning | Pages |
|---|---|---|---|
| Voltage | 220-240 V, 0/50-60 Hz | Operating voltage | p. 1 |
| Protection Class | IP 64 | Dust-tight and splash-proof | p. 1 |
| Impact Strength | IK07 | Mechanical impact resistance | p. 1 |
| Weight | 0.4 kg | Product weight | p. 1 |
Where to find it in the PDF
- Product Description and Specs p. 1
- Installation and Maintenance p. 2
- LED Replacement and Spare Parts p. 3
Table of contents
Quick Guide
The BEGA 24 501 is a wall luminaire designed for directed light. Installation must be performed by a qualified electrician in accordance with national safety regulations. Key requirements include maintaining the 'arrow down' orientation, using the provided gasket rings, and inserting the included desiccant pouch before final closure to ensure the longevity of electrical components.
Installation
Preparation: Ensure the power supply is disconnected before starting. The luminaire must be installed by a qualified electrician.
Mounting:
- Lead the mains supply cable through the cable entry of the luminaire base.
- Fix the luminaire base onto the mounting surface using the provided or other suitable fixing material.
- Important: Ensure the 'arrow down' orientation is maintained.
- Use the supplied gasket rings to ensure proper sealing.
Electrical Connection:
- Make the earth conductor connection.
- Push the silicone sleeves over the lines and make the electrical connection.
- Ensure the earth conductor connection is made between the luminaire top and the luminaire base.
Finalizing:
- Remove the desiccant pouch from its foil packaging and place it in the position marked by the red information label immediately before closing the luminaire.
- Ensure the gasket is positioned correctly.
- Install the luminaire top, press it on, and manually tighten the screws evenly.
Maintenance and Cleaning
Clean the luminaire regularly with solvent-free cleansers to remove dirt and deposits. Do not use high-pressure cleaners, as this may damage the unit.
LED Module Replacement
The LED module designation is noted on a label inside the luminaire. Replacement modules correspond to the original in light color and output. To replace:
- Disconnect the system from the power supply and open the luminaire.
- Follow the specific installation instructions provided with the replacement LED module.
- Inspect the gaskets and replace them if necessary.
- If the glass is defective, it must be replaced.
- Close the luminaire after the replacement is complete.
Technical Specifications
The luminaire is designed for 220-240 V, 0/50-60 Hz operation. It features a protection class of IP 64 (dust-tight and splash-proof) and an impact strength of IK07 (protection against mechanical impacts < 2 joules). The luminaire is Safety Class I, requiring an earth connection.
Manufacturer information
BEGA
Practical help
Common problems
Luminaire not working
Check the power supply and ensure the electrical connections are secure. Verify that the LED module is properly installed.
Moisture inside the luminaire
Ensure the gasket is positioned correctly and the luminaire is closed tightly. Check that the desiccant pouch was installed.
Before use
- Ensure installation is performed by a qualified electrician.
- Verify the 'arrow down' orientation.
- Use the provided gasket rings.
- Insert the desiccant pouch before final closure.
- Ensure the earth conductor is connected.
Show more Show less
Specs in practice
- Safety Class I
- Requires an earth conductor connection.
Images and diagrams
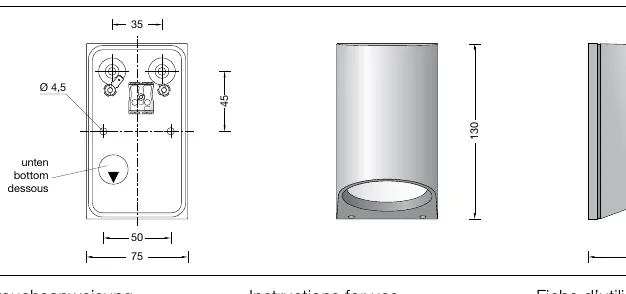
- The diagram on page 1 shows the mounting dimensions (75mm x 130mm) and the required 'arrow down' orientation.
Model compatibility
- Compatible with 220-240V 0/50-60Hz power supply.
- Requires LED-0734/830 (3000K) or LED-0734/840 (4000K) modules for replacement.

Manual page author
Emily Carter
User documentation editor