Home Appliances / Ovens
User Manual for Beko WML 15106NE Washing Machine
Comprehensive user guide for the Beko WML 15106NE washing machine. Includes installation instructions, operating procedures, maintenance tips, and troubleshooting steps.
Table of contents
Manual images
Click an image to enlargeImportant Information from the Manual
Before using your Beko WML 15106NE washing machine, it is essential to remove the transport safety bolts to prevent damage. Ensure the machine is placed on a firm, flat surface and leveled using the adjustable feet. For the first use, run a 'Cotton 90°C' program with a descaling agent to clean the drum.
Safety Instructions
- Keep children away from the machine during operation.
- Do not overload the machine; follow the program capacity limits.
- Always unplug the machine before cleaning or maintenance.
- Do not open the door or remove the filter while there is water in the drum.
- Use only detergents and softeners suitable for automatic washing machines.
Installation
Installation must be performed by authorized personnel. Ensure the water inlet and outlet hoses are not kinked or damaged.
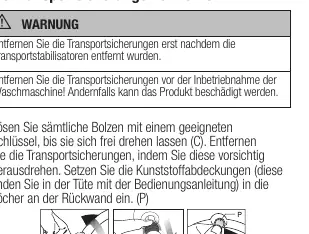
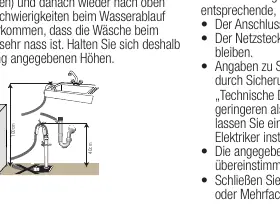
- Transport Bolts: Must be removed before the first use. Keep them for future transport.
- Water Connection: Requires water pressure between 1 and 10 bar. Connect the cold water hose (blue) and hot water hose (red) if applicable.
- Drainage: The drain hose must be installed at a height between 40 cm and 100 cm.
- Leveling: Adjust the feet until the machine stands stable and level to prevent vibration.
- Electrical: Connect to a grounded outlet protected by a 16A fuse.
Preparation and Operation
Sort laundry by type, color, and degree of soiling. Empty pockets and remove metal parts like buckles or pins.
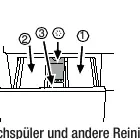
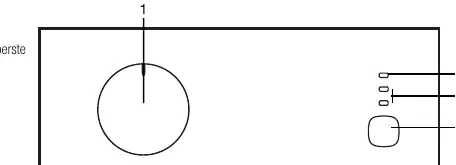
- Detergent Drawer: Compartment 1 is for pre-wash, 2 for main wash, and 3 for softener.
- Program Selection: Use the program selection knob to choose the appropriate cycle based on the laundry type (e.g., Cotton, Synthetic, Wool).
- Starting: Press the Start/Pause button to begin the selected program.
- Pausing: You can pause the machine to add or remove laundry if the water level is safe.
Cleaning and Maintenance
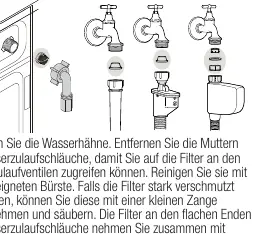
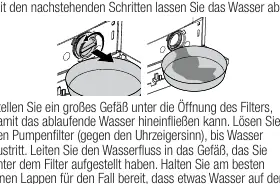
- Detergent Drawer: Clean regularly (every 4-5 washes) to prevent residue buildup.
- Drum: Clean the drum using a suitable stainless steel cleaner. Run a drum cleaning program or a hot wash cycle periodically.
- Pump Filter: Clean the pump filter at least every three months to remove foreign objects like coins or buttons.
- Water Inlet Filters: Clean the filters at the end of the inlet hoses to ensure proper water flow.
Troubleshooting
- Machine vibrates: Check leveling feet, ensure transport bolts are removed, and check for balanced laundry load.
- Machine stops: May be due to low voltage or water supply issues.
- Water in drum: This is normal due to factory testing.
- Foam from drawer: Too much detergent used; reduce amount.
Practical help
Common problems
Machine vibrates excessively
Ensure the machine is leveled using the adjustable feet, remove transport bolts, and ensure the laundry load is balanced.
Machine stops shortly after starting
Check for low voltage or water supply issues. The machine will resume when conditions are normal.
Foam leaking from detergent drawer
Too much detergent was used. Mix a teaspoon of softener with half a liter of water and pour into the main wash compartment.
Laundry is still wet after the cycle
The automatic foam suppression system may have activated due to excess detergent, or the load was unbalanced.
Before use
- Remove all transport safety bolts from the back of the machine.
- Place the machine on a firm, flat, and level surface.
- Connect the water inlet and outlet hoses securely.
- Level the machine using the adjustable feet.
- Run a 'Cotton 90°C' cycle with a descaling agent before the first wash.
Show more Show less
Specs in practice
- Water Pressure
- 1-10 bar (0.1-1 MPa) required for proper operation.
Images and diagrams
- Transport bolts: Located on the rear panel, must be removed before use.
- Detergent drawer: Compartment 1 (Pre-wash), 2 (Main wash), 3 (Softener).
Model compatibility
- Requires a 16A fuse for electrical connection.
- Not intended for commercial use.
- Do not use extension cords or multi-socket adapters.

Manual page author
David Miller
Documentation analyst