Lighting / Emergency Lighting
Emergency Bulkhead Bell Lighting 09040V2 User Manual
Quick guide for the Bell Lighting 09040V2 Emergency Bulkhead. Includes installation wiring diagrams, routine testing procedures, LED status indicators, and maintenance instructions.
Table of contents
Manual images
Click an image to enlargeQuick guide from the manual
The Bell Lighting 09040V2 is an emergency bulkhead luminaire designed for professional installation. Key requirements include a 24-hour initial charge before use and adherence to BS7671:2018 wiring regulations. The unit features self-testing capabilities and requires regular routine testing to ensure safety compliance.
Installation
Installation must be performed by a competent electrician. Always switch off the mains supply before beginning work.


Wiring Configurations:
- Non-maintained: Connect L (Live) and N (Neutral) to the supply.
- Maintained: Connect L (Live), N (Neutral), and a Link cable.
- Switchable maintained: Connect L (Live), N (Neutral), and Ls (Switched Live).
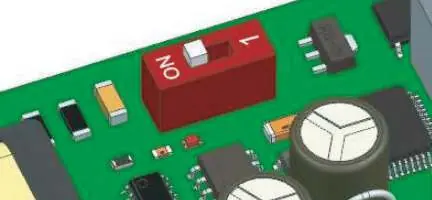
Ensure the PCB switch is set correctly before installation: position 0 indicates standard mode, and position 1 indicates self-test mode.
Testing and Commissioning
After installation, allow the unit to charge for 24 hours. A mains failure should be simulated to ensure the fitting operates for its specified time.
Test Button Functions:
- Press for 1 second: Emergency mode for 1 second.
- Press for 5 seconds: Function test for 30 seconds.
- Press for 7 seconds: 3-hour duration test.
- Press for 10 seconds: End the duration test.
Maintenance and Routine Testing
Regular testing is essential for safety:
- Daily: Inspect the battery charge LED.
- Monthly: Energize the unit from the battery to simulate a power failure and ensure the emergency mode functions correctly.
- Yearly: Perform a full duration test to ensure the battery meets the specified time period.
Troubleshooting
The bi-colour LED indicator provides status updates:
- Green solid: Mains on / No fault.
- Green flashing: Function test in progress (slow flash) or 3-hour duration test (fast flash).
- Red flashing: Fault detected. 1 flash cycle indicates a battery fault, 2 flashes indicate a lamp fault, and 3 flashes indicate a duration test fault.
Technical Specifications
- Operating Temperature: 0°C to +35°C
- Relative Humidity: Less than 90%
- Voltage: 220-240V 50/60Hz
- Wattage: 3.3W
- Battery: LiFePO4 3.2V 1500mAh
- Emergency Duration: Over 180 minutes
- Recharge Time: 24 hours
Manufacturer information
BELL Lighting
Practical help
Common problems
LED indicator flashing red
Indicates a fault. 1 flash = battery fault, 2 flashes = lamp fault, 3 flashes = duration test fault.
Emergency duration too short
Ensure the unit has been charged for 24 hours. If the issue persists, the battery may need replacement.
Before use
- Ensure installation is performed by a competent electrician.
- Verify mains supply is switched off before starting.
- Confirm wiring configuration (Non-maintained, Maintained, or Switchable).
- Set the PCB switch to the desired mode (0 for standard, 1 for self-test).
- Charge the unit for 24 hours before initial use.
Specs in practice
- Emergency Duration
- The unit provides over 180 minutes of light during a power failure.
- Recharge Time
- Requires 24 hours to fully charge the battery.
- Operating Temperature
- Suitable for environments between 0°C and +35°C.
Images and diagrams
- Wiring diagrams show connections for Non-maintained, Maintained, and Switchable maintained modes.
- The PCB switch controls standard mode (0) and self-test mode (1).
Model compatibility
- Must be installed in accordance with BS7671:2018 and local building control regulations.

Manual page author
David Miller
Documentation analyst
Organizes user manual content into clear summaries, with attention to model details, product context, and everyday usability.