Lighting / Emergency Lighting
Installation Guide for Bell Lighting 09088V2 Emergency Twin Spot
Quick installation and operation guide for the Bell Lighting 09088V2 and 09128 Spectrum 12W Emergency Twin Spot. Includes wiring instructions, self-test procedures, and LED status indicator meanings.
Table of contents
Manual images
Click an image to enlargeQuick guide from the manual
This equipment must be installed by a competent electrician in accordance with current IEE wiring regulations BS7671:2018 and local building control. The unit features a self-test function that performs automatic tests to ensure reliability. After initial installation, the unit requires a 36-hour charge to ensure the battery is fully charged for its specified duration.
Installation
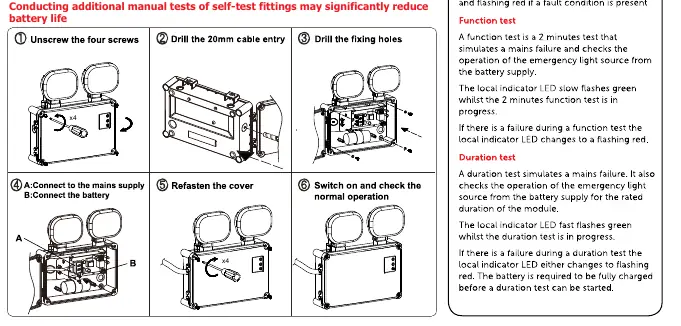

- Unscrew the four screws on the unit housing.
- Drill the 20mm cable entry point.
- Drill the necessary fixing holes for mounting.
- Connect the mains supply wiring (L and N) and connect the battery wires.
- Refasten the cover securely.
- Switch on the mains supply and check for normal operation.
Self-Test and Operation
The unit performs a self-commissioning test at first power-on. It automatically conducts function tests every 30 days and duration tests every 52 weeks. Conducting additional manual tests may significantly reduce battery life.
LED Status Indicators
The unit features a bi-colour LED indicator to show the status of the fitting:
- Green solid: Mains on / No fault.
- Green slow flash: Function test in progress (2 minutes).
- Green fast flash: 3-hour duration test in progress.
- Red flash (1 flash cycle): Battery fault.
- Red flash (2 flash cycles): Lamp fault.
- Red flash (3 flash cycles): Duration test fault.
Specifications
- Input Voltage: AC 220-240V 50/60Hz
- Wattage: 2x5W
- Lumens: 550lm
- Battery: LiFePO4 3.2V 6000mAh
- Emergency Duration: More than 3 hours
- Recharge Time: 24 hours
- Operating Temperature: 0°C to 35°C
Manufacturer information
BELL Lighting
Practical help
Common problems
Red LED flashing (1 flash cycle)
Battery fault detected. Check battery connections or replace the battery.
Red LED flashing (2 flash cycles)
Lamp fault detected. Check the lamp connections.
Red LED flashing (3 flash cycles)
Duration test fault. Check battery and lamp status.
Before use
- Ensure installation is performed by a competent electrician.
- Verify mains supply is 220-240V 50/60Hz.
- Ensure adequate free air ventilation around the fitting.
- Charge the unit for 36 hours before initial use.
- Switch off mains supply before installing.
Specs in practice
- Emergency Duration
- The unit will provide light for more than 3 hours during a power failure.
- Recharge Time
- The time required to fully recharge the battery after a discharge is 24 hours.
- Operating Temperature
- The unit is designed to operate between 0°C and 35°C.
Images and diagrams
- Step 1: Unscrew the four screws to open the housing.
- Step 2: Drill the 20mm cable entry.
- Step 3: Drill the fixing holes for wall mounting.
- Step 4: Connect the mains supply and battery wires.
- Step 5: Refasten the cover.
Model compatibility
- Must be installed in accordance with BS7671:2018 and local building control.
- Light source is not replaceable; the whole luminaire must be replaced at end of life.

Manual page author
Michael Turner
Technical manual editor
Reviews PDF manuals for structure, safety notes, and practical product details so readers can find the right information quickly.