Lighting / Emergency Lighting
Installation Guide for Bell Lighting 09094V2 High Power Emergency Bulkhead
Quick installation and operation guide for the Bell Lighting 09094V2 High Power Emergency Bulkhead. Includes wiring instructions, testing procedures, and fault diagnosis.
Table of contents
Manual images
Click an image to enlargeImportant Information
This equipment must be installed by a qualified electrician in accordance with EN 50172:2004 and local building regulations. The light source is not replaceable; if it fails, the entire unit must be replaced. Ensure the ambient temperature does not exceed 30°C and that there is adequate free air ventilation around the fitting. Always switch off the mains supply before installing.
Specifications
- Rated voltage: 220-240V 50/60Hz
- Wattage: 10W
- Lumens: 1200lm
- Emergency duration: More than 180 minutes
- Battery: LiFePO4 3.2V 12000mAh
- Recharge time: 24 hours
Installation
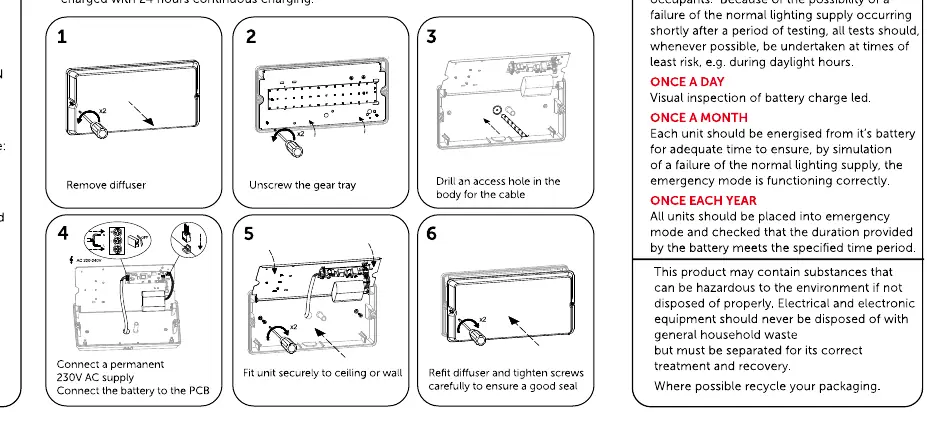

- Remove the diffuser.
- Unscrew the gear tray.
- Drill an access hole in the body for the cable.
- Connect the permanent 230V AC supply and connect the battery to the PCB.
- Fit the unit securely to the ceiling or wall.
- Refit the diffuser and tighten screws carefully to ensure a good seal.
Testing and Operation
The unit performs a self-commissioning test at first power-on. After charging for 24 hours, a full 3-hour duration test is performed. Subsequent tests are performed automatically every 30 days for function tests and every 52 weeks for duration tests.
Manual Test Button Functions:
- Press for approx 1 second: Emergency mode for 1 second.
- Press for approx 5 seconds: Function test for 30 seconds.
- Press for approx 7 seconds: 3-hour duration test.
- Press for approx 10 seconds: End the duration test.
Troubleshooting and Fault Indication
The local indicator LED provides status updates:
- Green solid: Mains on / No fault.
- Green slow flash: Function test in progress (2 minutes).
- Green fast flash: 3-hour duration test in progress.
- Red 1 flash cycle: Battery fault.
- Red 2 flash cycle: Lamp fault.
- Red 3 flash cycle: Duration test fault.
Manufacturer information
BELL Lighting
Practical help
Common problems
Battery fault
Indicated by 1 flash cycle on the LED.
Lamp fault
Indicated by 2 flash cycles on the LED.
Duration test fault
Indicated by 3 flash cycles on the LED.
Before use
- Ensure installation is performed by a qualified electrician.
- Verify ambient temperature does not exceed 30°C.
- Allow 24 hours for initial battery charge.
- Ensure adequate free air ventilation around the fitting.
- Switch off mains supply before starting installation.
Images and diagrams
- The installation process involves removing the diffuser, unscrewing the gear tray, drilling cable access, connecting mains and battery, mounting the unit, and refitting the diffuser.
Model compatibility
- The light source is not replaceable.
- Must comply with BS7671:2018 and local building regulations.

Manual page author
David Miller
Documentation analyst
Organizes user manual content into clear summaries, with attention to model details, product context, and everyday usability.