Furniture / Chairs Seating
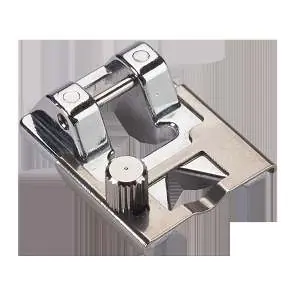
Bernette Ribbon-couching Foot User Guide
Learn how to use the Bernette Ribbon-couching Foot for sewing satin and soutache ribbons. Follow our step-by-step guide for setup, adjustment, and sewing techniques.
Table of contents
Quick guide from the manual
The Bernette Ribbon-couching Foot is designed to guide and sew satin or soutache ribbons onto fabric. It supports ribbons up to a maximum width of 5 mm. Before starting, ensure you have selected the appropriate stitch type (straight, zigzag, or decorative) and adjusted the stitch width to match your ribbon.
Application
Follow these steps to set up and use the Ribbon-couching Foot:
- Set your sewing machine to a straight, zigzag, or decorative stitch.
- Select the desired stitch length and adjust the stitch width to match the ribbon.
- Loosen the screw on the presser foot and insert the tape through the opening under the foot.
- Adjust the ribbon guide position based on the ribbon width:
- For narrow ribbons, push the guide backwards.
- For wide belts, push the guide towards the front.
- Tighten the screw to secure the guide.
- Attach the Ribbon-couching Foot to your machine.
- Place the fabric beneath the presser foot and begin sewing slowly.
- Guide the tape under the groove as you sew.
- Sew a few securing stitches at the beginning and end of your seam.
Safety
Before using this accessory, carefully read the instruction manual provided with your sewing machine to ensure proper installation and operation.
Practical help
Common problems
Ribbon does not feed smoothly
Adjust the ribbon guide position; push backwards for narrow ribbons or towards the front for wide belts.
Stitch width does not match ribbon
Ensure the stitch width setting on your machine is adjusted to accommodate the specific width of the ribbon being used.
Before use
- Read the machine's instruction manual
- Verify ribbon width is 5 mm or less
- Select a compatible stitch type (straight, zigzag, or decorative)
- Ensure the presser foot screw is tightened after adjustment
Specs in practice
- Maximum ribbon width
- 5 mm
Images and diagrams
- Fig 1: Inserting the tape through the presser foot opening.
- Fig 2: Adjusting the ribbon guide position.
- Fig 3: Sewing process with the tape guided under the groove.
Model compatibility
- Designed for satin and soutache ribbons.
- Compatible with machines supporting standard Bernette presser feet.

Manual page author
Emily Carter
User documentation editor
Prepares concise manual descriptions and highlights the most useful setup, operation, and maintenance information for readers.