Garden / Pool Equipment
User Manual for Bestway 10ft. Xtreme Air™ Trampoline
Quick guide for the Bestway 10ft. Xtreme Air™ Trampoline. Includes assembly instructions, safety warnings, maintenance tips, and fundamental jumping skills.
Table of contents
Manual images
Click an image to enlargeQuick guide from the manual
This trampoline is designed for domestic, outdoor use only. It requires assembly by an adult and should be checked before every use. The maximum user weight is 90 kg (200 lbs). Always ensure the enclosure net is closed before jumping and keep the area around the trampoline clear of obstructions like fences, trees, or electrical wires.
Safety Warnings
- Only one user at a time to prevent collision hazards.
- Do not jump with shoes; use bare feet or non-slip socks.
- No somersaults.
- Do not use the mat when wet.
- Empty pockets and hands before jumping.
- Do not eat while jumping.
- Do not exit by jumping.
- Limit continuous usage time and take regular breaks.
- Do not use in strong wind conditions; secure the trampoline.
- Not intended to be buried in the ground.
- Do not install over concrete, asphalt, or other hard surfaces.
Parts & Tools Needed
Before starting, verify all parts are present. Key components include Vertical Legs (A, B), Base Rails (F), Trampoline Mat with Enclosure Netting (G), Frame Pad (H), Springs (I), and the QuickSpring™ Trampoline Tool (J). Ensure you have the Screw Set (M) and Anchors (N) for final assembly.
Assembly Instructions
We recommend assembly with at least two people. Use gloves to avoid injury.

Base Assembly
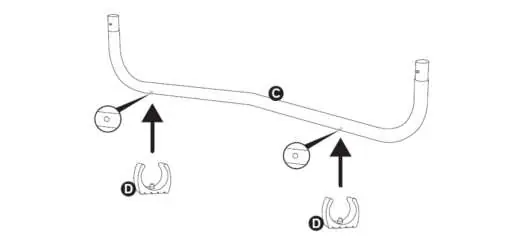
Connect the Base Rails (F) with the T-connectors (E). Ensure the spring slots are facing upward. Insert the Foot Pads (D) onto the bottom of the Leg Base (C). Connect the Vertical Legs (A, B) to the Leg Base (C) and insert this structure into the T-connectors (E).
Spring Assembly
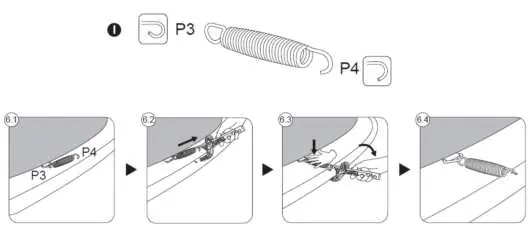
The Trampoline Mat (G) features metal rings with red markings. Connect these first using the springs. Use the QuickSpring™ Trampoline Tool (J) to hook the P4 end of the spring, align it with the frame, and pull it into the slot. Cross-install the remaining springs to ensure even tension. Position the Frame Pad (H) over the springs and secure it with the provided strings.
Enclosure Net Assembly
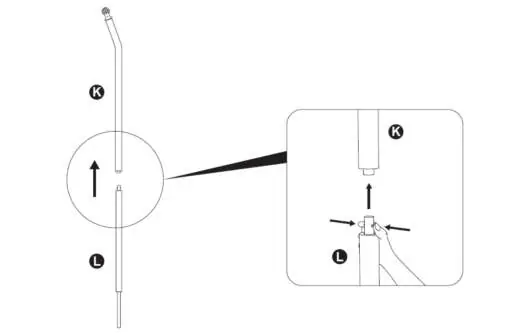
Insert the Lower Frame Support with Foam (L) into the Upper Frame Support with Support Cap (K). Attach the Support Cap to the top of the enclosure netting. Secure the frames to the vertical legs using the Screw Set (M) and the QuickSpring™ tool.
Use Instructions
Before jumping, the supervisor should demonstrate proper body mechanics and posture. Practice mounting and dismounting the enclosure netting safely. The manual outlines fundamental skills including Feet Drop, Hand and Knee Drop, Knee Drop, Seat Drop, Front Drop, and Back Drop. Always maintain shoulder-width distance between feet when landing.
Maintenance & Storage
Before every use, check springs, legs, and the enclosure net for damage or tears. Replace the net every 2 to 3 years. If moving the trampoline, lift it with two or more people; do not drag it. Clean the mat with a soft, cotton cloth; avoid abrasive brushes. Store the trampoline and net indoors during harsh weather, extreme wind, or freezing temperatures.
Manufacturer information
Bestway
Practical help
Common problems
Missing or damaged parts
Visit bestwaycorp.com/support for assistance.
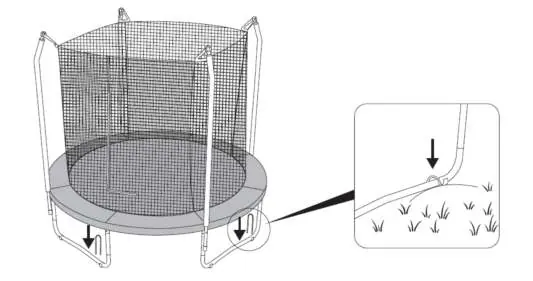
Trampoline movement in wind
Use the provided Anchors (N) to secure the trampoline to the ground.
Damaged mat or enclosure net
Stop using the trampoline immediately and replace the part with authorized Bestway parts.
Before use
- Check all nuts and bolts for tightness.
- Ensure all spring-loaded joints are intact.
- Verify mat, padding, and enclosure are free of defects.
- Clear debris from the jumping mat.
- Ensure the net opening is closed.
- Check that the trampoline is on a level surface.
Specs in practice
- Max User Weight
- 90 kg (200 lbs).
Images and diagrams
- Base Assembly: Connect Base Rails (F) to T-Connectors (E) and attach Foot Pads (D).
- Spring Assembly: Use the QuickSpring™ Tool (J) to attach springs from the mat to the frame.
- Enclosure Assembly: Attach Support Caps (K) to the net and secure frames to legs using Screw Set (M).
Model compatibility
- For domestic, outdoor use only.
- Not for children under 6 years.
- Do not install over concrete or asphalt.

Manual page author
Emily Carter
User documentation editor
Prepares concise manual descriptions and highlights the most useful setup, operation, and maintenance information for readers.