Home Appliances / Vacuum Cleaners
User Guide for Bissell CleanView Lift-Off Pet Vacuum 2043U Series
Comprehensive user guide for the Bissell CleanView Lift-Off Pet Vacuum 2043U Series. Includes step-by-step assembly, operation instructions, maintenance procedures for filters and brush rolls, and troubleshooting solutions.
Quick answers from the manual
Quick answer
- The Bissell CleanView Lift-Off Pet Vacuum (2043U Series) is an upright vacuum designed for household use. This guide covers assembly, operation, filter maintenance, and troubleshooting. p. 1, 3
Key actions
- Assemble the vacuum by attaching the handle, hose, and tool holders. p. 5
- Empty the dirt tank by pressing the release button and then the empty button over a trash bin. p. 7
- Clean filters by removing the tank, lifting the filter cover, and washing the foam/fiber filters. p. 8
First start
- Assemble the unit, ensure all filters are installed, and connect to a polarized outlet. p. 2, 5
Show 3 more answers Show less
Problems and fixes
Vacuum won't turn on
Check power cord, fuse, or breaker.
p. 10
No power at rotating brush
Check pod seating, brush switch, and recline position.
p. 10Maintenance and reset
- The post-motor filter is not washable and must be replaced when dirty. p. 8
Where to find it in the PDF
- Safety Instructions p. 2
- Assembly p. 5
- Maintenance p. 8, 9
Table of contents
Manual images
Click an image to enlargeQuick guide from the manual
Before using your Bissell CleanView Lift-Off Pet Vacuum, ensure all filters are properly installed and the dirt tank is locked in position. Do not plug the vacuum into an electrical outlet until it is fully assembled. Always turn off the power switch and unplug the unit before performing any maintenance or troubleshooting.
What's in the box
- Base Unit
- Upper Handle
- Hose
- Pet TurboEraser Tool
- Pet Hair Fabric Tool
- Crevice Tool/Extension Wand
- Tool Holders
- Screw (taped to handle)
Assembly
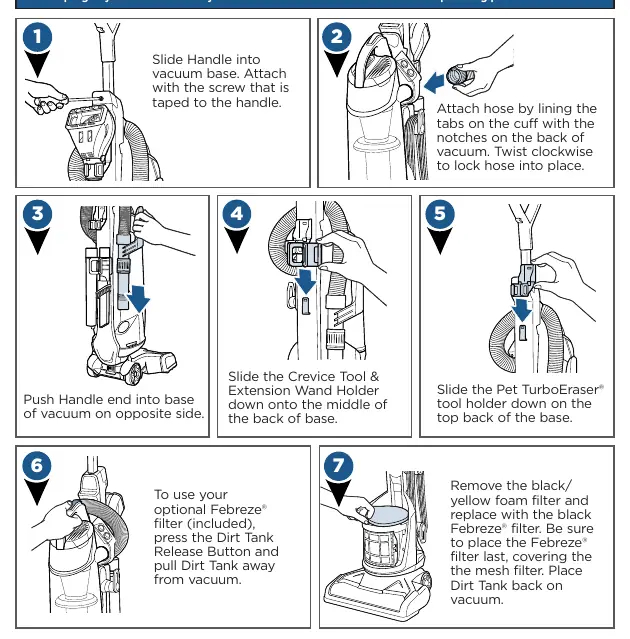
- Slide the handle into the vacuum base and secure it with the provided screw.
- Attach the hose by aligning the tabs on the cuff with the notches on the back of the vacuum and twisting clockwise to lock.
- Push the handle end into the base of the vacuum on the opposite side.
- Slide the Crevice Tool & Extension Wand Holder down onto the middle of the back of the base.
- Slide the Pet TurboEraser tool holder onto the top back of the base.
Operation
PowerBrush Switch
Turn the vacuum on using the Power Switch (I - ON, O - OFF). Press the Brush Roll switch to activate the PowerBrush for carpet cleaning. The light on the switch will illuminate when the Brush Roll is ON. Note that the Brush Roll automatically shuts off when the vacuum is locked in the upright position.
Adjusting Variable Suction
Locate the Variable Suction Control Valve on the Hose Wand Base. To decrease suction for delicate carpets, curtains, or rugs, twist the valve counter-clockwise.
Above Floor Cleaning
You can clean stairs or furniture using the removable canister. Press the green button to remove the canister, then attach the desired tool (such as the Pet TurboEraser tool or Extension Wand with Combination Dusting/Crevice Tool) for extended reach.
Maintenance and Care
Emptying the Dirt Tank
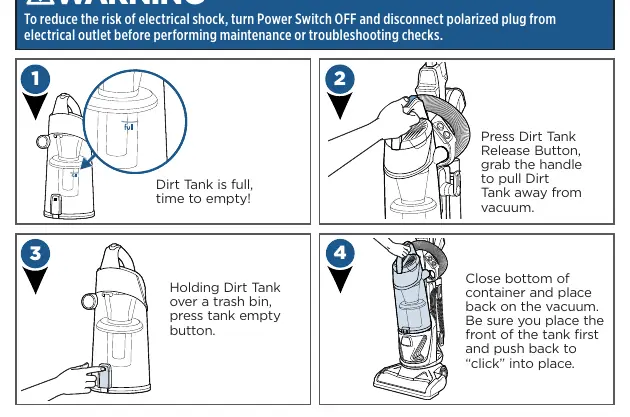
- Press the Dirt Tank Release Button and pull the tank away from the vacuum.
- Hold the tank over a trash bin and press the tank empty button.
- Close the bottom of the container and push it back onto the vacuum until it clicks.
Cleaning the Filters
With the vacuum unplugged, remove the tank and lift the tab on the filter cover. There are two filters: a foam filter on top and a thinner fiber filter; both are washable. The post-motor filter is located on the front of the vacuum underneath the filter cover. If it appears dirty, remove it and gently tap it against a waste basket. Note: The post-motor filter is a pleated filter and is not washable; it must be replaced when dirty.
Replacing the Belt and Brush
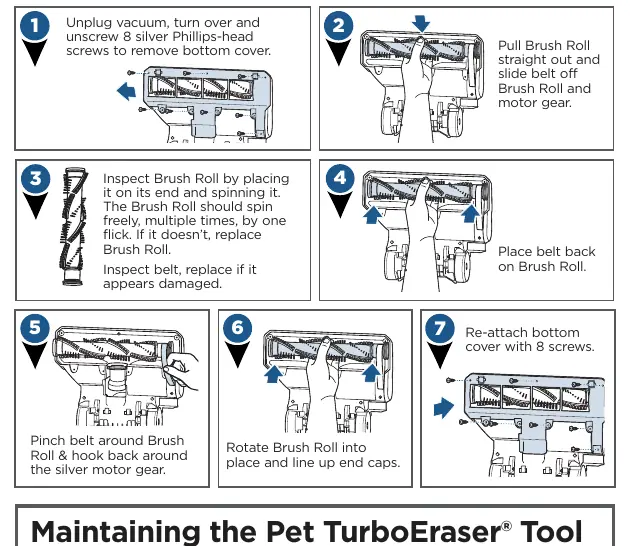
- Unplug the vacuum, turn it over, and unscrew the 8 silver Phillips-head screws to remove the bottom cover.
- Pull the Brush Roll out and slide the belt off the motor gear.
- Inspect the Brush Roll and belt for damage.
- To reassemble, pinch the belt around the Brush Roll, hook it around the motor gear, rotate the Brush Roll into place, and re-attach the bottom cover with the 8 screws.
Manufacturer information
Bissell Inc.
Practical help
Common problems
Vacuum cleaner won't turn on
Check if the power cord is plugged in, check for a blown fuse, or reset the circuit breaker.
No power at rotating floor brush
Ensure the pod is securely seated, the brush switch is in the ON position, and the vacuum is reclined.
Vacuum cleaner won't pick up dirt
Check for clogs in the hose or foot, ensure the dirt tank is full, check if filters are dirty, or inspect the drive belt for breakage.
Visible dirt escaping from cleaner
Empty the dirt tank, check that filters and the secondary cyclone are installed correctly, and ensure the dirt tank is locked in place.
Before use
- Ensure the dirt tank is locked in position.
- Verify that all filters (pre-motor and post-motor) are in place.
- Check that the power cord is not damaged.
- Ensure the vacuum is not used on wet surfaces.
Show more Show less
Images and diagrams
- Assembly steps show handle insertion and hose connection.
- Maintenance diagrams illustrate filter removal and brush roll replacement.
- Troubleshooting section provides a clear table of causes and remedies.
Model compatibility
- For household use only.
- Use only manufacturer's recommended attachments.

Manual page author
David Miller
Documentation analyst