Home Appliances / Vacuum Cleaners
User Guide for BISSELL PowerForce Helix Turbo Rewind Vacuum 2261F
Quick guide for the BISSELL PowerForce Helix Turbo Rewind vacuum (2261F). Learn how to assemble, operate, maintain filters, replace the brush and belt, and troubleshoot common issues.
Quick answers from the manual
Quick answer
- The BISSELL 2261F is a vacuum cleaner. This guide covers assembly, operation, maintenance (filters, brush, belt), and troubleshooting. p. 1, 3
Key actions
- Assemble the vacuum p. 5
- Empty the dirt container p. 8
- Replace the brush and belt p. 10
First start
- Assemble handle, wand, and hose p. 5
Show 4 more answers Show less
Problems and fixes
Vacuum won't run
Check electrical plug, fuse, or breaker.
p. 11
Vacuum won't pick up dirt
Empty container, clean filters, check hose, check for clogs.
p. 11Maintenance and reset
- Clean filters regularly p. 8, 9
Technical specifications
| Parameter | Value | Meaning | Pages |
|---|---|---|---|
| Voltage | 220-240V | Operating voltage | p. 2 |
| Frequency | 50-60Hz | Operating frequency | p. 2 |
Where to find it in the PDF
- Assembly p. 5
- Maintenance p. 8, 9, 10
Table of contents
Manual images
Click an image to enlargeQuick Guide
The BISSELL PowerForce Helix Turbo Rewind (2261 Series) is a household vacuum cleaner. Before first use, ensure the unit is fully assembled, the dirt container is locked, and all filters are in place. Always unplug the unit before performing any maintenance.
Assembly
Follow these steps to assemble your vacuum:
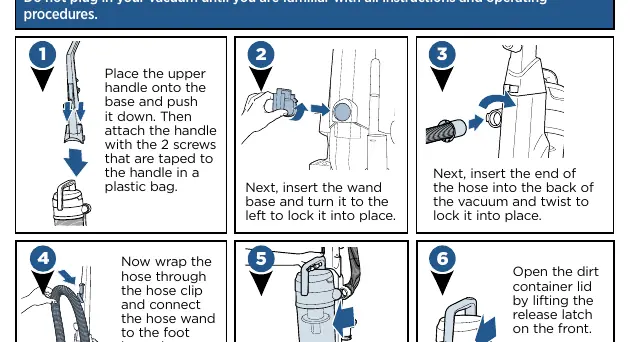
- Handle: Place the upper handle onto the base and push it down. Secure it with the 2 provided screws.
- Wand: Insert the wand base into the unit and turn it to the left to lock it into place.
- Hose: Insert the end of the hose into the back of the vacuum and twist to lock. Wrap the hose through the hose clip and connect the hose wand to the foot hose at the bottom.
- Tools: Attach accessory tools as needed. The crevice tool is stored inside the extension wand.
Operation
- Power: Press the red power switch pedal with your foot to turn the unit on or off.
- Cord Rewind: Gently pull the cord out to the yellow mark (do not pull past the red mark). To retract, unplug the unit, hold the plug, and press the automatic cord rewind button.
- Recline: Press the recline pedal to lean the vacuum back for cleaning. Press it a second time to recline further.
- Height Adjustment: Turn the knob on the floor nozzle to adjust for different flooring types.
Maintenance and Care
Emptying the Dirt Container
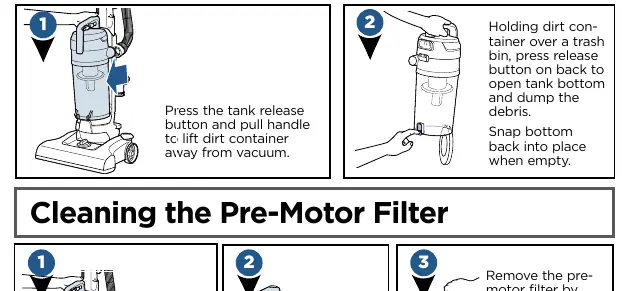
Press the tank release button and pull the handle to lift the container away. Hold over a trash bin, press the release button on the back to open the bottom, and dump debris.
Cleaning Filters
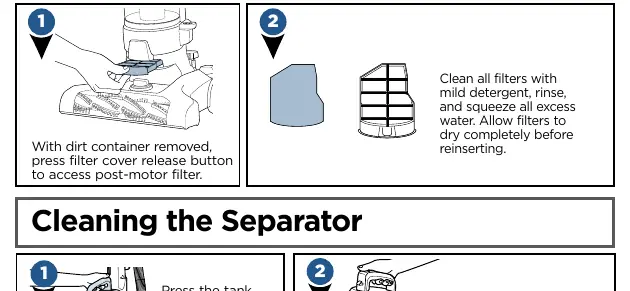
- Pre-Motor Filter: Remove the dirt container, open the lid, and pull out the filter. Clean with warm water and allow to dry completely before reinserting.
- Post-Motor Filter: With the dirt container removed, press the filter cover release button to access the filter. Clean with mild detergent, rinse, and dry completely.
Maintaining the TurboBrush Tool
If the paddle wheel gets dislodged, align the two clips on each side and pop it back into place. If the faceplate does not close, ensure all parts are aligned correctly.
Replacing the Brush and Belt
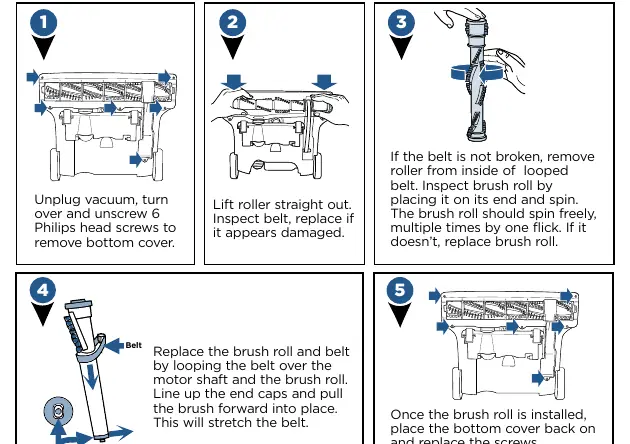
- Unplug the vacuum, turn it over, and remove the 6 Philips head screws to take off the bottom cover.
- Lift the roller out. Inspect the belt; replace if damaged.
- If the belt is intact, remove the roller from the loop. Spin the brush roll to ensure it spins freely.
- Loop the belt over the motor shaft and brush roll. Line up the end caps and pull the brush forward into place.
- Replace the bottom cover and screws.
Troubleshooting
If the vacuum won't run, check the power cord, fuse, or circuit breaker. If it won't pick up dirt, check if the dirt container is full, filters are dirty, the hose is loose, or the vacuum path is clogged. If the cord won't retract, check for knots or twists.
Manufacturer information
Bissell Inc.
Practical help
Common problems
Vacuum cleaner won't run
Check if the power cord is plugged in, or check for a blown fuse/tripped breaker.
Vacuum cleaner won't pick up dirt
Empty the dirt container, clean or replace filters, ensure the hose is secure, and check for clogs in the vacuum path.
Cord will not retract
Check the power cord for knots or twists.
Before use
- Ensure dirt container is in the locked position
- Ensure all filters (pre and post) are in place
- Check that the hose is securely connected
- Ensure the power cord is not damaged
- Check for clogs in the air passageway
Show more Show less
Images and diagrams
- Assembly steps for handle, wand, and hose connection
- Filter removal and cleaning process
- Brush roll and belt replacement procedure
- Clog removal locations
Model compatibility
- For household use only
- Do not use on wet surfaces
- Not for use outdoors

Manual page author
Michael Turner
Technical manual editor