Home Appliances / Vacuum Cleaners
User Manual for Bissell CrossWave Pet 2306Y Multi-Surface Cleaner
Quick guide for the Bissell CrossWave Pet 2306Y. Learn how to assemble, fill, operate, and maintain your multi-surface cleaner, including troubleshooting tips.
Quick answers from the manual
Quick answer
- The Bissell CrossWave Pet 2306Y is a multi-surface cleaner. To start, assemble the handle and body, fill the clean water tank with warm water and formula, and select your cleaning mode (Hard Floor or Area Rug). p. 4, 5, 6, 7
Key actions
- Assemble the unit by inserting the handle into the body until it clicks. p. 5
- Fill the clean water tank with warm tap water and Bissell formula. p. 6
- Select cleaning mode (Hard Floor or Rug) and recline the machine to start. p. 7, 8
First start
- Assemble the unit, fill the clean water tank, and prime the system by holding the trigger for 10-15 seconds. p. 5, 6, 7
Show 4 more answers Show less
Problems and fixes
Reduced spray or no spray
Prime the system by holding the trigger for 10-15 seconds or clean spray tips.
p. 14
Brush roll not turning
Recline the machine to start the brush roll.
p. 14Maintenance and reset
- Clean the dirty water tank and brush roll after each use. p. 11, 13
Technical specifications
| Parameter | Value | Meaning | Pages |
|---|---|---|---|
| Max Water Temperature | 140°F / 60°C | Maximum temperature for water used in the tank. | p. 6 |
Where to find it in the PDF
- Assembly p. 5
- Filling Tank p. 6
- Cleaning p. 7, 8
- Maintenance p. 9, 10, 11, 12
- Troubleshooting p. 14
Table of contents
Manual images
Click an image to enlargeQuick Guide from the Manual
The Bissell CrossWave Pet 2306Y is designed for cleaning hard floors and area rugs. Before first use, ensure the unit is fully assembled. Always use warm tap water (maximum 140°F/60°C) and Bissell cleaning formulas to avoid damaging internal components. Do not use boiling water or heat water in a microwave.
What's In The Box
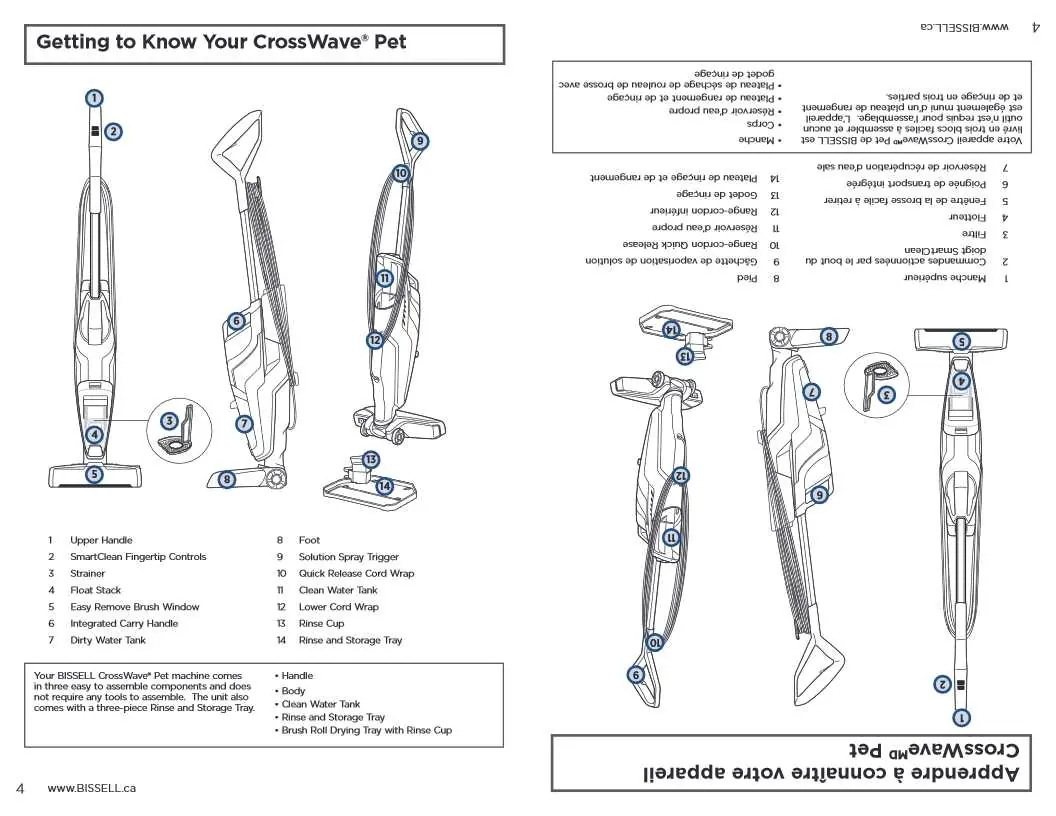
- Handle
- Body
- Clean Water Tank
- Rinse and Storage Tray
- Brush Roll Drying Tray with Rinse Cup
- Multi-Surface Pet with Febreze Formula
Assembly
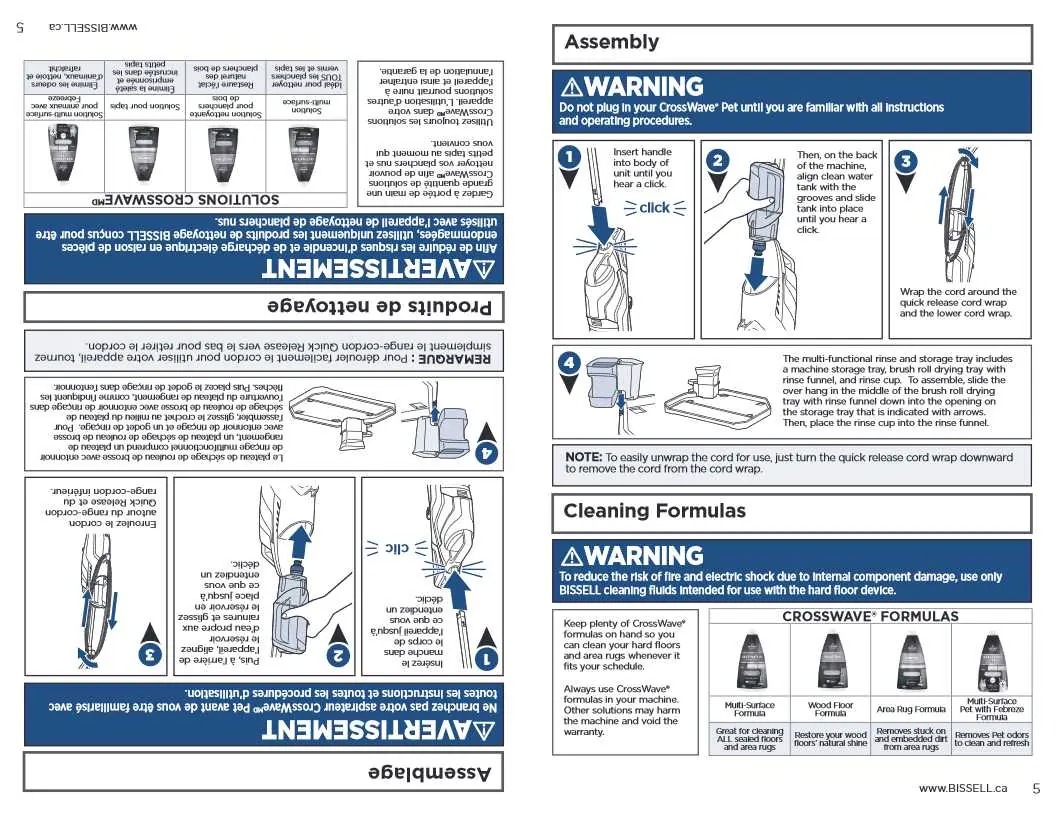
- Insert the handle into the body of the unit until you hear a click.
- On the back of the machine, align the clean water tank with the grooves and slide it into place until it clicks.
- Wrap the cord around the quick release cord wrap and the lower cord wrap.
Filling the Clean Water Tank
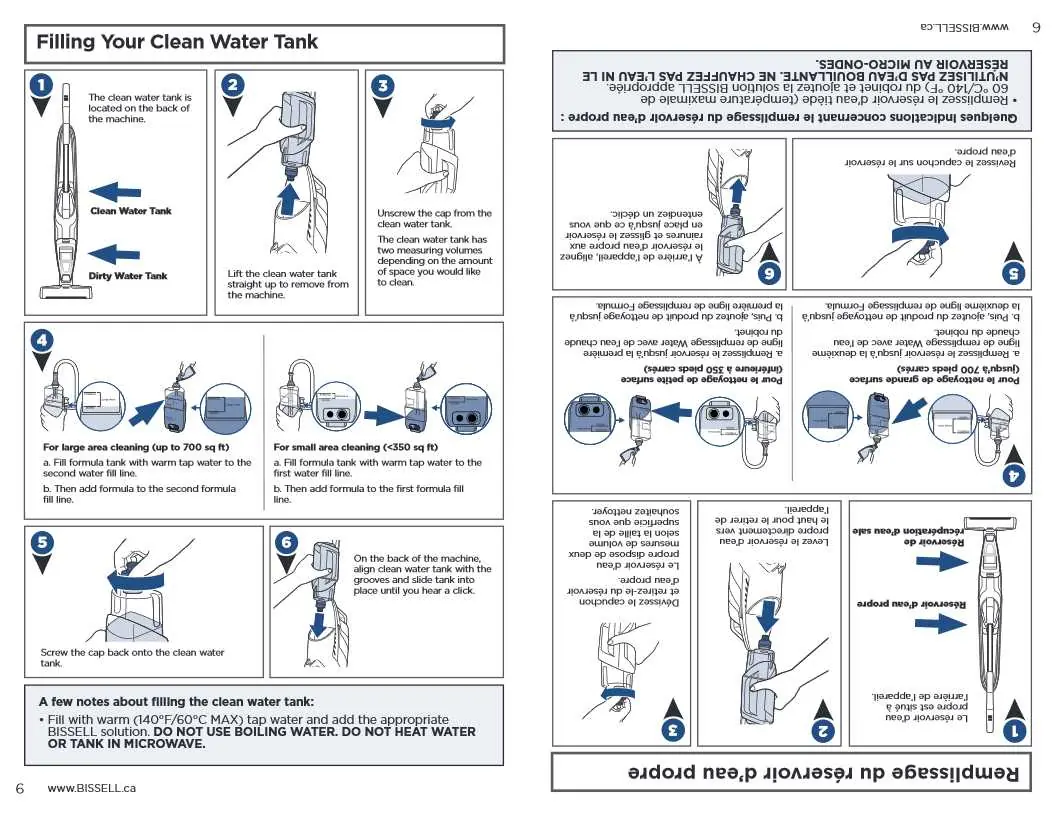
- Lift the clean water tank straight up to remove it from the machine.
- Unscrew the cap.
- Fill with warm tap water to the appropriate fill line (Large area up to 700 sq ft or Small area up to 350 sq ft).
- Add the appropriate Bissell formula to the formula fill line.
- Screw the cap back on and slide the tank back onto the machine until it clicks.
Cleaning Hard Floors and Area Rugs
Hard Floors: Plug in the machine, press the HARD FLOOR button, and recline the body to start the brush roll. Hold the solution spray trigger to apply solution on both forward and backward passes.
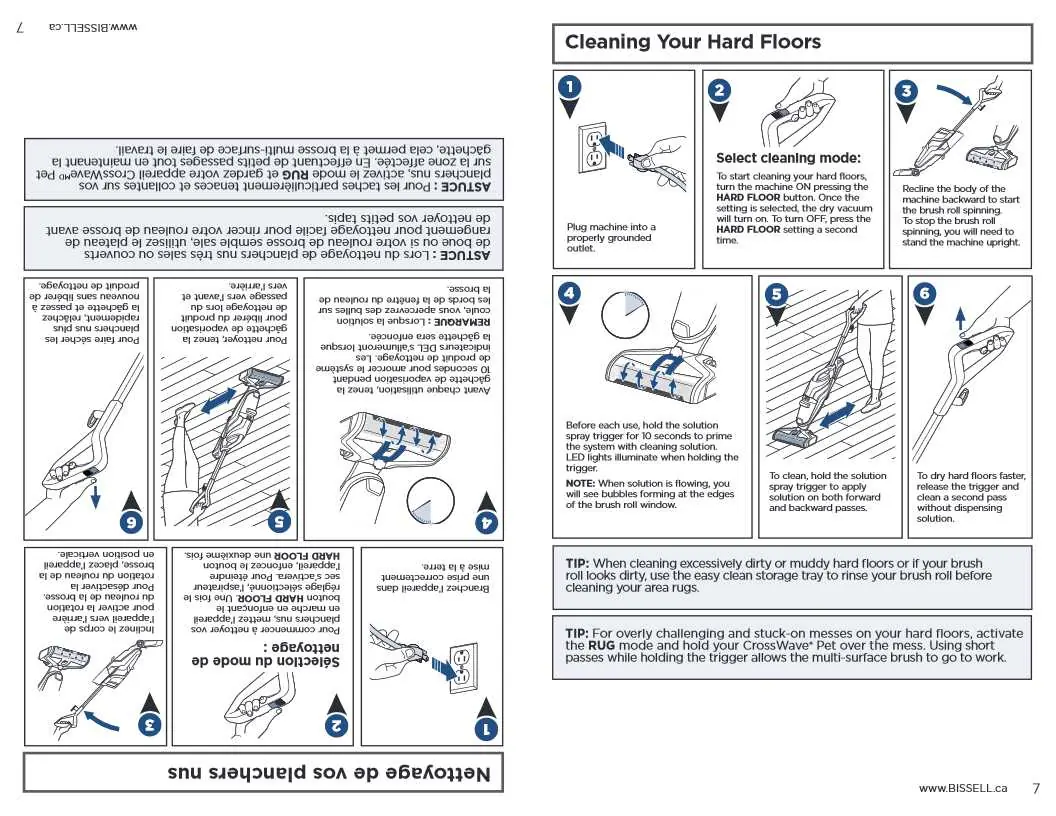
Area Rugs: Press the RUG button, recline the body, and use the trigger to apply solution. Note: Always test an inconspicuous area of the rug for colorfastness before cleaning.
Maintenance
Rinse and Storage Tray
Place the unit on the tray, fill the rinse cup with water, and pour it into the rinse funnel. Turn the machine on and let it run for 10-15 seconds until all water is picked up.
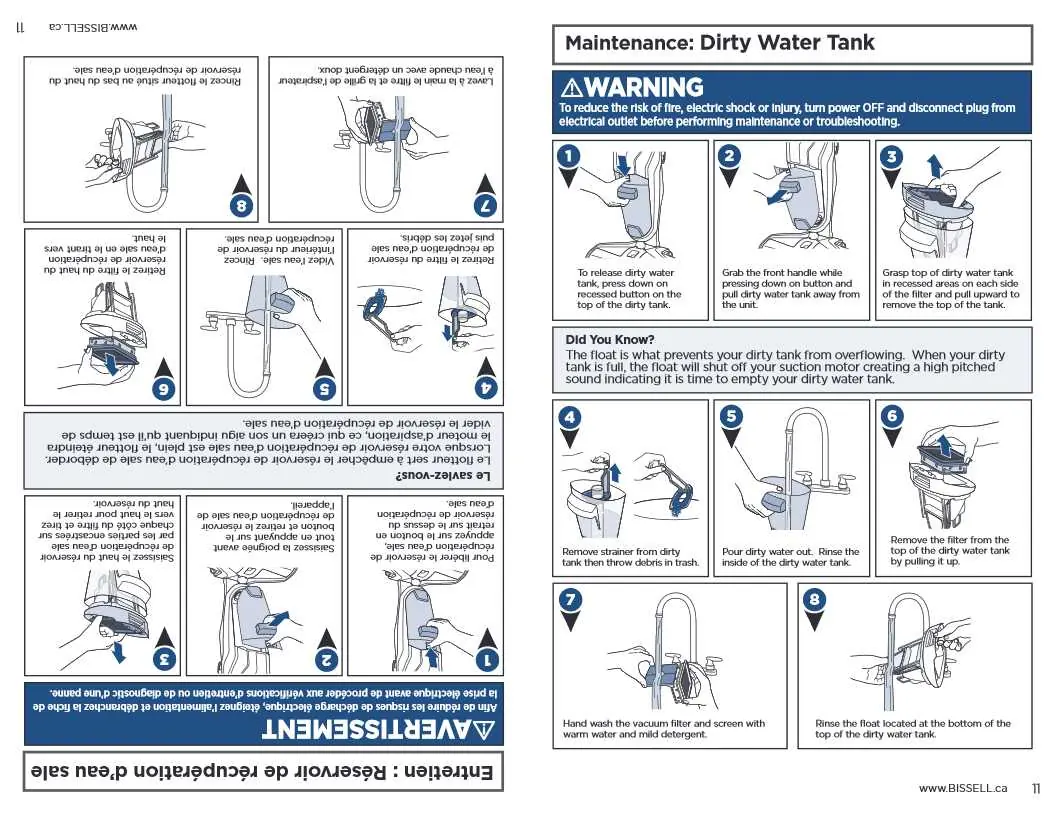
Dirty Water Tank
Press the button on top of the tank to release it. Remove the strainer and filter, empty the dirty water, and rinse the tank and filter with warm water and mild detergent. Allow all parts to dry completely before reassembling.
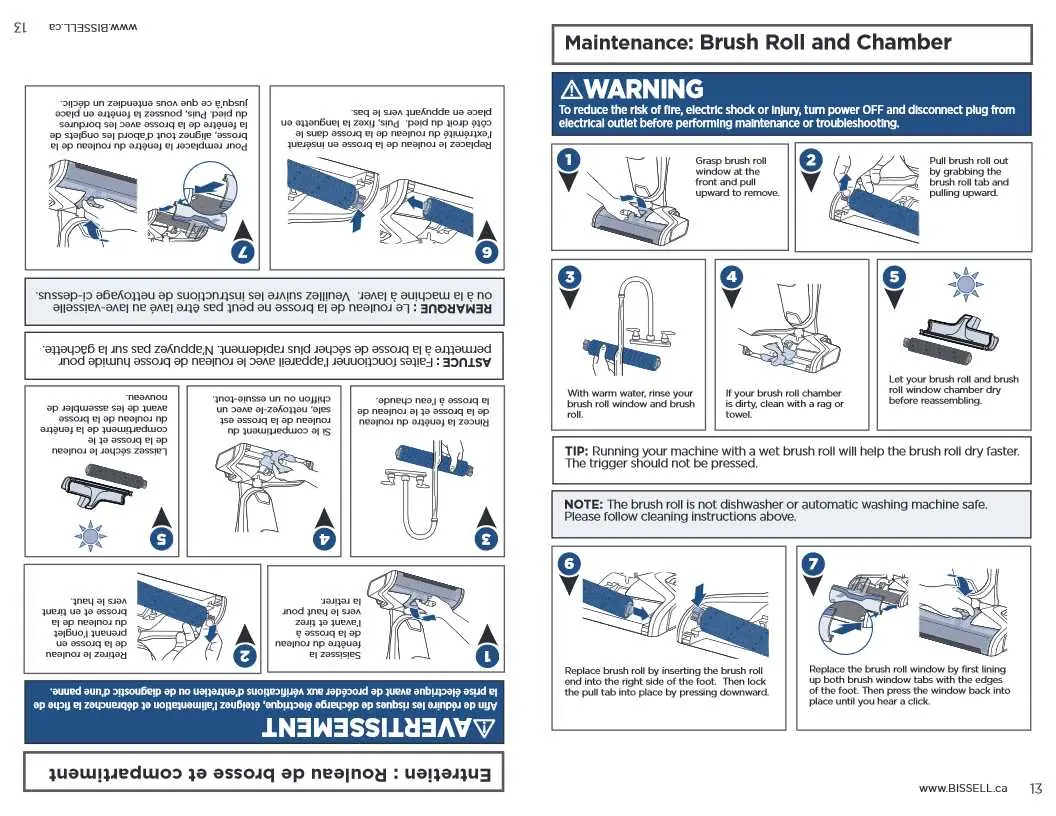
Brush Roll and Chamber
Grasp the brush roll window at the front and pull upward to remove. Pull the brush roll out using the tab. Rinse the brush roll and window with warm water. Clean the chamber with a rag or towel. Let everything dry before reassembling.
Troubleshooting
If you experience reduced spray, ensure the system is primed by holding the trigger for 10-15 seconds. If the brush roll is not turning, ensure the machine is reclined. If the machine is leaking, check that the clean water tank cap is closed properly.
Manufacturer information
Bissell Inc.
Practical help
Common problems
Reduced spray or no spray
Check if the tank is empty, ensure the tank is seated properly, prime the system by holding the trigger for 10-15 seconds, or clean spray tips with a pin.
Loss of suction power
Empty the dirty water tank, check if the brush window is latched, clean the debris channel, or clean the filter.
Brush roll is not turning
Recline the machine to start the brush roll, or check for obstructions and remove them.
Machine is leaking
Ensure the clean water tank cap is closed properly and the tank is seated correctly.
Before use
- Ensure the handle is fully inserted and clicked into place.
- Check that the clean water tank is filled with warm water (max 140°F/60°C) and formula.
- Verify the brush window is latched securely.
- Test area rugs for colorfastness before cleaning.
- Ensure the dirty water tank is empty.
Show more Show less
Specs in practice
- Water Temperature
- Maximum 140°F (60°C). Do not use boiling water.
- Cleaning Modes
- Hard Floor (standard) and Area Rug (dispenses twice the solution).
Images and diagrams
- Assembly steps showing handle insertion and tank placement.
- Filling instructions for large and small area cleaning.
- Maintenance steps for cleaning the dirty water tank and brush roll.
Model compatibility
- Use only Bissell cleaning formulas to avoid voiding the warranty.
- Not for use on silk or delicate area rugs.

Manual page author
Emily Carter
User documentation editor