Home Appliances / Vacuum Cleaners
User Manual for Bissell SmartClean 2229F Vacuum Cleaner
Comprehensive user guide for the Bissell SmartClean 2229F vacuum cleaner. Includes assembly instructions, operation, filter maintenance, troubleshooting, and cleaning procedures.
Quick answers from the manual
Quick answer
- The Bissell SmartClean 2229F is a canister vacuum cleaner. It features automatic floor type sensing, variable suction control, and a motorized brush roll. Maintenance involves regular cleaning of the dirt tank, filters, and brush roll. p. 1, 5
Key actions
- Emptying the Dirt Tank p. 6
- Cleaning Filters p. 6, 7
First start
- Assemble the hose, wand, and foot. Ensure all parts click into place. Connect to power and press the power button. p. 4, 5
Show 4 more answers Show less
Problems and fixes
Brush Roll doesn't rotate
Press the Brush Roll Power Button on the handle, turn Auto Button ON, or remove obstructions.
p. 10Maintenance and reset
- Filters must be dried for 24 hours after rinsing. p. 6, 7
Technical specifications
| Parameter | Value | Meaning | Pages |
|---|---|---|---|
| Power Supply | 220-240 Volt A.C. 50-60 Hz | Operating voltage requirements | p. 2 |
Where to find it in the PDF
- Assembly p. 4
- Maintenance p. 6, 7, 8
Table of contents
Manual images
Click an image to enlargeQuick guide from the manual
The Bissell SmartClean 2229F is a canister vacuum cleaner designed for household use. Before first use, ensure the unit is fully assembled. The vacuum features automatic floor type sensing and variable suction control. Regular maintenance, including emptying the dirt tank and cleaning the filters, is essential for optimal performance.
Assembly
Follow these steps to assemble your vacuum:
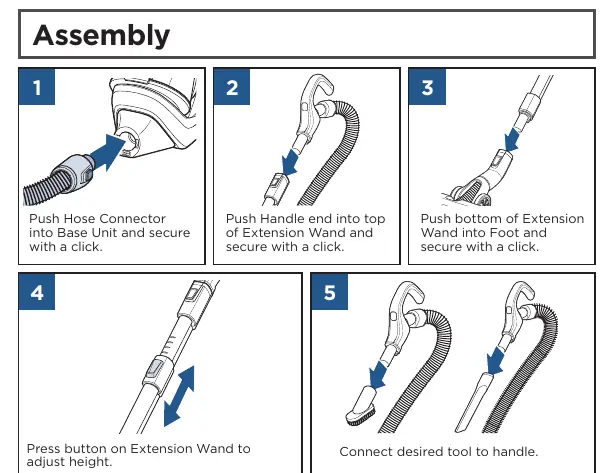
- Push the hose connector into the base unit until it clicks.
- Push the handle end into the top of the extension wand until it clicks.
- Push the bottom of the extension wand into the foot until it clicks.
- Use the button on the extension wand to adjust the height.
- Connect the desired tool to the handle.
Using your SmartClean
Powering On/Off: Press the button on the back left side of the unit.
Automatic Floor Sensing: Press the Auto Button on the back of the unit to allow the canister to detect your floor type and adjust suction automatically.
Suction Control: Adjust suction power using the plus (+) or minus (-) buttons on the canister.
Important: Always move the vacuum via the rolling wheels using the upper handle. Do not carry the vacuum while it is running.
Maintenance and Care
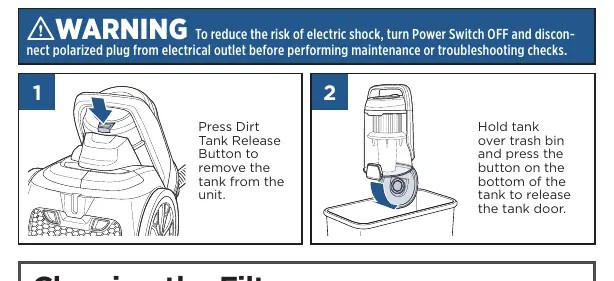
Emptying the Dirt Tank: Press the Dirt Tank Release Button to remove the tank. Hold it over a trash bin and press the button on the bottom of the tank to release the door.
Cleaning the Filters:
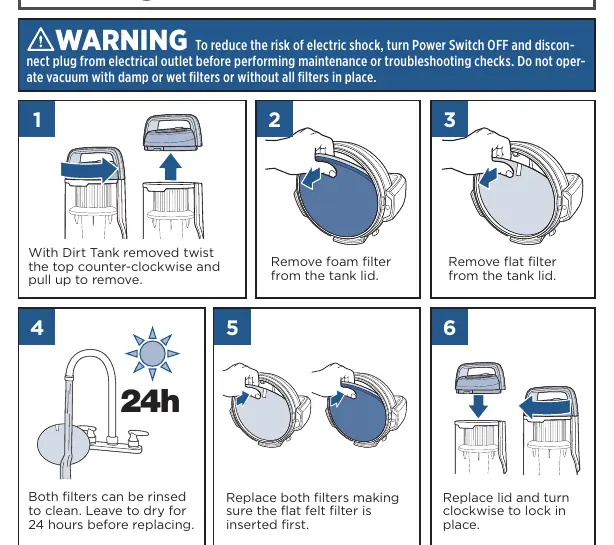
- Remove the dirt tank and twist the top counter-clockwise to remove.
- Remove the foam and flat filters from the tank lid.
- Rinse both filters and let them dry for 24 hours before replacing.
- Ensure the flat felt filter is inserted first when reassembling.
Cleaning the Cyclonic System: Turn the cyclonic system counter-clockwise to release it from the tank. It can be rinsed and must be dried for 24 hours.
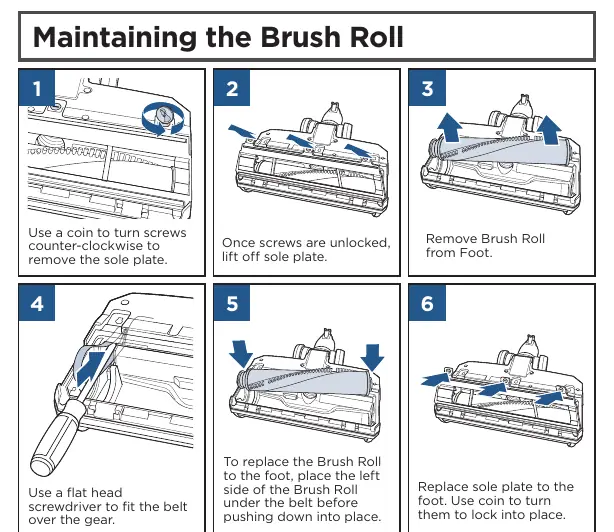
Maintaining the Brush Roll: Use a coin to unlock the sole plate screws. Remove the sole plate and the brush roll. Clean debris and reinstall.
Clearing a Clog
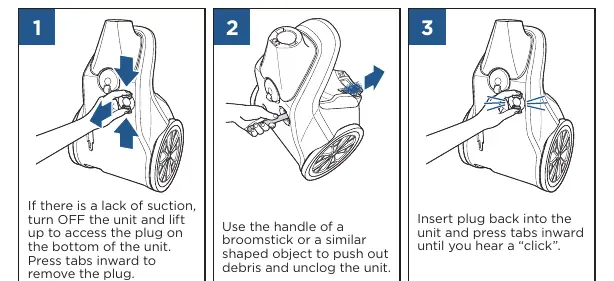
If there is a lack of suction, turn off the unit and lift the plug on the bottom of the unit. Use a broomstick handle to push out debris and unclog the unit. Reinsert the plug until it clicks.
Storing the Vacuum
Connect the T-shaped hook on the foot to the T-shaped slot on the unit for in-use storage, or to the bottom of the unit for long-term storage.
Manufacturer information
Bissell Inc.
Practical help
Common problems
Brush roll doesn't rotate
Ensure the Brush Roll button is ON and the Auto button is ON. Check for obstructions and remove debris.
Vacuum won't pick up dirt
Check if filters are dirty, the dirt tank is seated correctly, the hose is connected, or if there is a clog in the vacuum or hose.
High-pitched noise
Check for clogs in the vacuum or the pleated filter. Clean or replace filters if necessary.
Vacuum is hard to push or pull
Suction may be set too high. Adjust the suction control under the handle or on the canister.
Before use
- Ensure all parts are assembled and clicked into place
- Check that the dirt tank is seated correctly
- Verify that all filters are installed
- Ensure the hose is securely connected
- Check for any visible clogs
Show more Show less
Specs in practice
- Power Supply
- 220-240 Volt A.C. 50-60 Hz only
Images and diagrams
- Assembly steps for hose, wand, and foot
- Dirt tank removal and emptying process
- Filter removal and cleaning steps
- Brush roll maintenance and belt access
- Clog clearing procedure
Model compatibility
- For household use only
- Do not use on wet surfaces or to pick up water
- Do not use with an external switching device like a timer

Manual page author
Emily Carter
User documentation editor