Home Appliances / Vacuum Cleaners
User Manual for Bissell Featherweight Cordless 2-in-1 Lightweight Vacuum 3061 Series
Comprehensive user guide for the Bissell Featherweight Cordless 2-in-1 Lightweight Vacuum 3061 Series. Includes assembly, charging, maintenance, filter cleaning, and troubleshooting steps.
Quick answers from the manual
Quick answer
- The Bissell 3061 Series is a cordless 2-in-1 vacuum. Charge for at least 4 hours before first use. Maintenance involves cleaning the dirt tank, filters, and brush roll. p. 3, 4, 5, 6
Key actions
- Charge the vacuum p. 3
- Empty the dirt tank p. 4
- Clean the filters p. 5
- Maintain the brush roll p. 6
First start
- Charge for at least 4 hours before first use. p. 3
Show 4 more answers Show less
Problems and fixes
Vacuum won't turn ON
Charge battery or use the correct charger.
p. 7
Brush Roll not turning
Remove obstruction or reset brush roll.
p. 7Maintenance and reset
- The LED light will reset when the machine is turned ON after clearing a brush roll stall. p. 7
Technical specifications
| Parameter | Value | Meaning | Pages |
|---|---|---|---|
| Charging Time | 4 hours | Minimum time for full charge | p. 3 |
Where to find it in the PDF
- Product Overview p. 1
- Assembly and Charging p. 3
- Cleaning Filters p. 5
- Maintaining Brush Roll p. 6
Table of contents
Manual images
Click an image to enlargeQuick guide from the manual
This guide provides essential instructions for the Bissell Featherweight Cordless 2-in-1 Lightweight Vacuum. Before first use, ensure the machine is charged for at least 4 hours. Always turn the vacuum OFF before performing any maintenance or troubleshooting.
Product Overview
The vacuum consists of several key components:
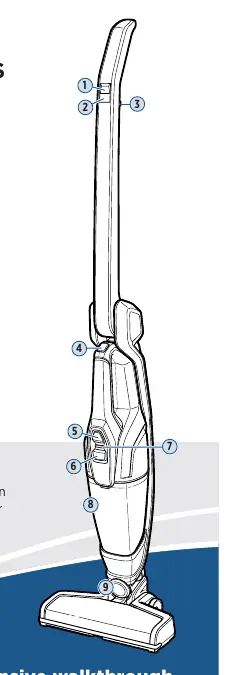
- Power Button
- Brush Roll ON/OFF Button
- 2-Way Folding Handle Release Trigger
- Hand Vacuum Release Button
- Hand Vacuum Power Button
- Dirt Tank Release Button
- Charging Light Indicator
- Dirt Tank
- Swivel Head
Assembling and Charging
Assembly: Insert the Foot into the Body of the vacuum until you hear a click.
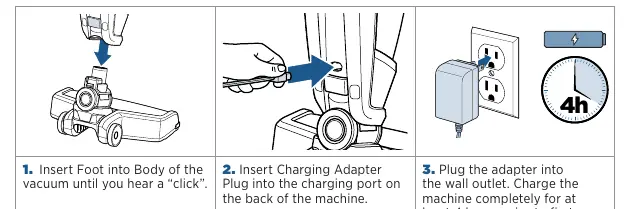
Charging: Insert the Charging Adapter plug into the charging port on the back of the machine. Plug the adapter into a wall outlet. Charge the machine completely for at least 4 hours prior to first use.
Using the 2-Way Folding Handle
Pull the 2-Way Folding Handle Release Trigger to fold the handle. You can fold the handle forward to clean underneath low places or fold it back for easy storage.
Using the Hand Vacuum
Press the button on top of the Hand Vacuum handle and lightly pull to remove it from the machine. Press the Power Button to begin cleaning. Insert the desired tool firmly into the hand vacuum nozzle.
Emptying the Dirt Tank
- Ensure the vacuum is OFF.
- Remove the hand vacuum by pressing the release button on its top handle.
- Hold the hand vacuum vertically and press the release button on the front to release the Dirt Tank.
- Grasp filter tabs and pull up to remove the filter assembly and empty dirt into a waste container.
- Replace the filter assembly in the Dirt Tank and snap the Dirt Tank back into place.
Cleaning the Filters
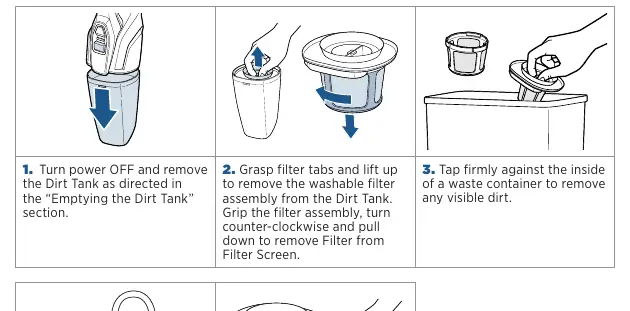
- Remove the Dirt Tank as described above.
- Grasp filter tabs and lift up to remove the washable filter assembly.
- Grip the filter assembly, turn counter-clockwise, and pull down to remove the Filter from the Filter Screen.
- Tap firmly against the inside of a waste container to remove visible dirt.
- Rinse the filter and screen in warm water and let dry completely before reassembling.
- Reattach the filter assembly into the Dirt Tank and attach to the hand vacuum until it snaps securely.
Maintaining the Brush Roll
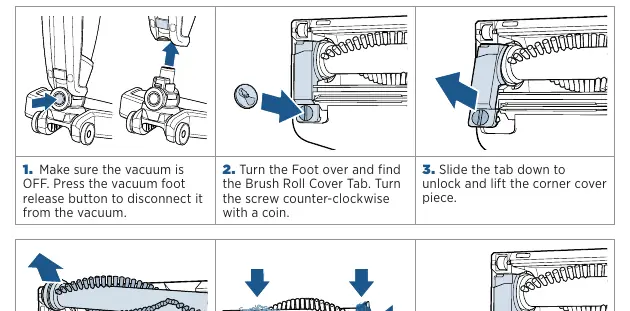
- Ensure the vacuum is OFF and disconnect the foot from the vacuum.
- Turn the Foot over and find the Brush Roll Cover Tab. Turn the screw counter-clockwise with a coin.
- Slide the tab down to unlock and lift the corner cover piece.
- Remove the Brush Roll and clear any hair wrap from the Brush Roll, End Cap, and end of the Brush Roll.
- Place the clean Brush Roll back into the Foot and use a coin to turn the lock clockwise to secure it.
Troubleshooting
If the vacuum won't turn on, ensure the battery is fully charged and you are using the correct charger. If the brush roll is not turning, check for obstructions or reset the brush roll by cleaning it. If suction is low, empty the dirt tank, clean the filters, or check for clogs in the foot area.
Manufacturer information
Bissell Inc.
Practical help
Common problems
Vacuum won't turn ON
Check if the battery is fully charged or if the wrong charger is being used.
Brush Roll not turning
Remove obstructions from the brush roll or reset it by cleaning the brush roll and endcap area.
Vacuum cleaner has low suction
Empty the dirt tank, clean or replace filters, ensure the foot is fully inserted, or remove clogs from the foot area.
Vacuum won't charge
Ensure the correct charger is used and the hand vacuum is installed properly.
Before use
- Charge the machine for at least 4 hours
- Ensure the Dirt Tank is installed correctly
- Ensure filters are in place
- Check that the Foot is fully inserted into the Body
Show more Show less
Specs in practice
- Charging Time
- At least 4 hours for a full charge
- Charger Model
- Use only charger E-TEK, Model ZD12D140080US
Images and diagrams
- Page 1: Product Overview showing part locations
- Page 3: Assembly and charging steps
- Page 5: Filter cleaning procedure
- Page 6: Brush roll maintenance steps
Model compatibility
- Use only the charger supplied by the manufacturer
- Do not use with other battery packs

Manual page author
Emily Carter
User documentation editor