HVAC / Water Heaters
Installation and Operating Instructions for Bosch AquaStar 125HX Water Heater
A comprehensive guide for the Bosch AquaStar 125HX tankless water heater. This manual covers installation requirements, gas and water connections, operating procedures, maintenance schedules, and troubleshooting steps for both LP and NG...
Table of contents
Manual images
Click an image to enlargeQuick Guide from the Manual
The Bosch AquaStar 125HX is an instantaneous, tankless water heater designed for potable water heating. It features automatic variable power modulation and electronic ignition. Important: This unit is not approved for space heating, mobile homes, RVs, or boats. Installation must be performed by a qualified installer or service agency.
Installation Requirements
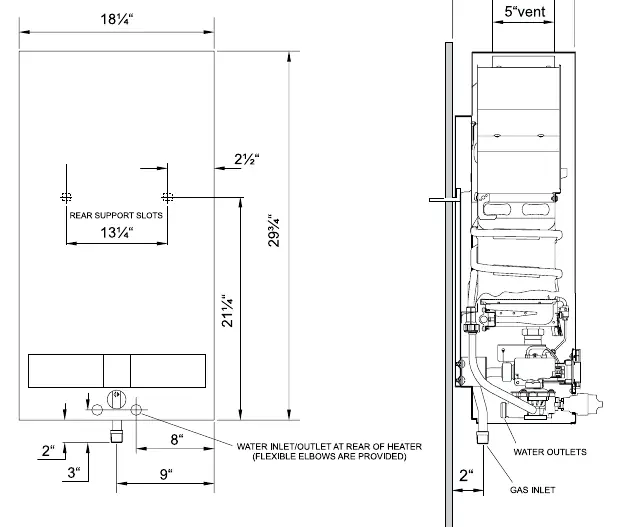
Proper installation is critical for safety and performance. Ensure the unit is mounted on a wall using the provided L-shaped hooks, spaced 13 1/4 inches apart. If mounting on a stud wall with plasterboard, use support boards (1x4 or 1/2 inch plywood) to prevent movement. Maintain minimum clearances: 12 inches top, 4 inches front, 0 inches back, 4 inches sides, and 12 inches bottom.
Venting and Combustion Air
The unit requires a 5-inch vent. Ensure the vent pipe is not restricted and has a minimum height of 6 feet (if no elbows are used). The vent must terminate 2 feet above any obstruction within a 10-foot radius. Ensure adequate combustion air supply; in confined spaces, provide two permanent openings (one within 12 inches of the top, one within 12 inches of the bottom) to allow sufficient air intake.
Gas and Water Connections
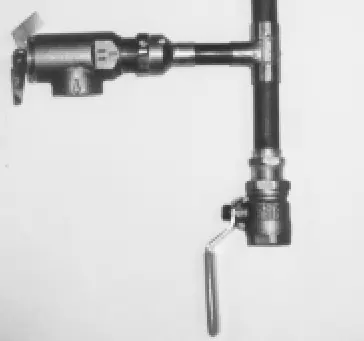
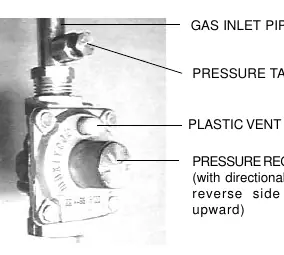
The unit is supplied with a gas pressure regulator that must be installed before the gas supply line. Use black iron pipe for gas lines, sized according to the distance from the meter. For water connections, use 1/2 inch copper or brass fittings. Install full-port valves on both cold water feed and hot water outlet lines to facilitate servicing. A pressure relief valve (PRV) must be installed on the hot water line.
Operating Instructions
Before operating, ensure the system is filled with water. Open the cold water inlet supply fully and open a hot water faucet to purge air from the system. To start the heater, flip down the cover plate on the front panel and set the On/Off switch to the 'On' position. Use only your hand to push the button; do not use tools. The green LED indicates the main burner is on; a flashing red LED indicates insufficient water flow to ignite the burner.
Setting Water Temperature
Adjust the temperature using the knob located beneath the main gas control. Turning the knob clockwise increases the temperature and decreases flow; turning it counter-clockwise decreases the temperature and increases flow.
Maintenance and Service
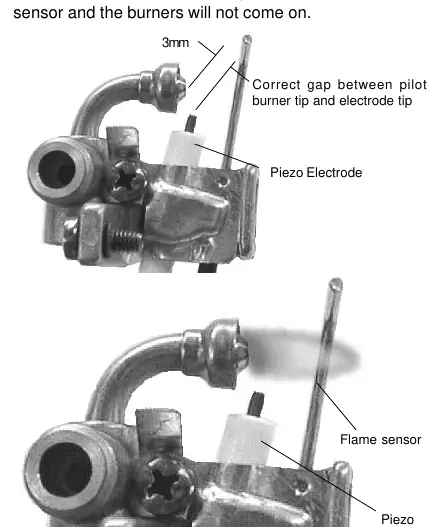
Perform maintenance annually. This includes checking the vent system, inspecting the pilot assembly, and cleaning the water inlet filter. The water valve should be lubricated every two years and rebuilt every 3-5 years. If the pilot flame appears soft or yellow, the pilot burner orifice may need cleaning or replacement. Do not use wire or sharp objects to clean orifices.
Troubleshooting
If the unit fails to ignite, check the following: ensure the On/Off switch is 'On', verify water flow is sufficient (minimum 0.5 GPM), check for clogged water inlet filters, and ensure there are no plumbing cross-overs. If the pilot sparks but burners do not ignite, check for air in the gas line, ensure the gas cock is open, and verify the gas regulator is not locked or damaged.
Manufacturer information
Bosch
Practical help
Common problems
No spark at pilot
Check if On/Off switch is 'On', ensure water flow is sufficient (min 0.5 GPM), clean water inlet filter, or check for plumbing cross-overs.
Pilot sparks but burners do not ignite
Bleed air from gas line, ensure gas cock is open, check if gas regulator is locked/damaged, or clean pilot orifice.
Main burners go out during use
Check for unbalanced water pressure, ensure faucet aerators are clean, or check if temperature limiter was activated due to overheating.
Water is too hot
Turn temperature adjustment knob counter-clockwise to lower temperature.
Before use
- Ensure the system is filled with water.
- Open the cold water inlet supply fully.
- Open a hot water faucet to purge air from the system.
- Verify the gas supply is turned on.
- Set the On/Off switch to the 'On' position.
- Check for gas leaks using soapy water (never use a flame).
Specs in practice
- Water Pressure
- Min 18 PSI (at 4 GPM), Max 150 PSI.
Images and diagrams
- Fig 1: Mounting the heater using L-shaped hooks and support boards.
- Fig 4: Correct installation of the gas pressure regulator.
- Fig 10: Correct pilot flame appearance and electrode gap (3mm).
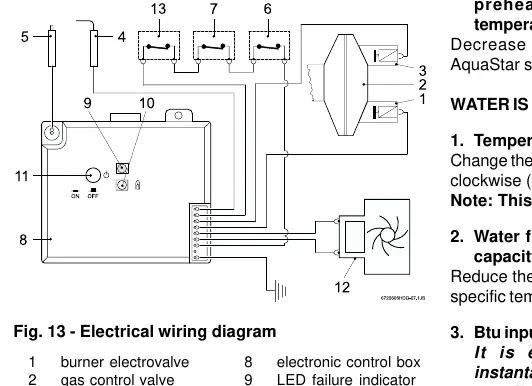
- Fig 13: Electrical wiring diagram for troubleshooting.
Model compatibility
- Not approved for mobile homes, RVs, or boats.
- Not for space heating purposes.
- Requires specific gas type (LP or NG) as per rating plate.

Manual page author
Emily Carter
User documentation editor
Prepares concise manual descriptions and highlights the most useful setup, operation, and maintenance information for readers.