HVAC / Water Heaters
User Guide for Zip Electric Mains Pressure Water Heater
Comprehensive installation, maintenance, and safety guide for Zip Electric Mains Pressure Water Heaters. Includes plumbing and electrical connection instructions, warranty details, and troubleshooting.
Quick answers from the manual
Quick answer
- This guide covers the installation, operation, and maintenance of Zip Electric Mains Pressure Water Heaters. It emphasizes that installation must be performed by a qualified person, the unit must be filled with water before powering on, and safety valves require regular maintenance. p. 1, 7, 9, 16
Key actions
- Perform minor maintenance every 6 months by operating the easing levers on the relief valves. p. 8, 10
- Ensure the water heater is completely filled with water before switching on the electrical supply. p. 15, 16
First start
- Open all hot water taps, open the cold water isolation valve, wait for water to flow freely from taps, check for leaks, then switch on the electrical supply. p. 16
Maintenance and reset
- If the over-temperature cut-out operates, it must not be reset; the unit must be serviced by a qualified person. p. 7
Technical specifications
| Parameter | Value | Meaning | Pages |
|---|---|---|---|
| Maximum Mains Supply Pressure | 680 kPa | Maximum pressure allowed without a pressure limiting valve. | p. 9, 13 |
| Temperature Pressure Relief Valve Setting | 1000 kPa | Pressure rating of the supplied relief valve. | p. 9, 13 |
Where to find it in the PDF
- Warranty p. 3, 4, 5, 6
- Safety and Installation Notes p. 7, 9, 12
- Maintenance p. 10
- Plumbing and Electrical Connections p. 14, 15
Table of contents
Manual images
Click an image to enlargeImportant Information
This guide provides essential instructions for the installation, operation, and maintenance of Zip Electric Mains Pressure Water Heaters. All installation and service work must be performed by a qualified person. Failure to follow these instructions may void the warranty and create safety hazards.
Safety and Warnings
- Scalding Risk: The water heater operates at temperatures between 60°C and 70°C. These temperatures can cause severe scalding. It is recommended to install a temperature limiting device on hot water lines to bathrooms and ensuites to keep temperatures below 50°C.
- Qualified Personnel: Installation, maintenance, and repairs must be carried out by a qualified person.
- Electrical Safety: The unit uses 220V-240V AC power. Never operate the heater with the front cover removed.
- Relief Valves: The temperature pressure relief valve and expansion control valve are critical safety devices. Do not tamper with or remove them.
- Danger: If the over-temperature cut-out operates, do not reset it; the unit must be serviced by a qualified person.
Installation Requirements
- Location: Suitable for indoor or outdoor installation. The unit must be installed vertically on a stable base.
- Access: Ensure the temperature pressure relief valve lever is accessible and there is sufficient headroom for anode inspection/replacement.
- Seismic Restraints: All water heaters must be restrained to protect against seismic forces.
- Water Supply: The maximum mains supply pressure is 680 kPa. If pressure exceeds this, a pressure limiting valve must be installed.
Plumbing Connections
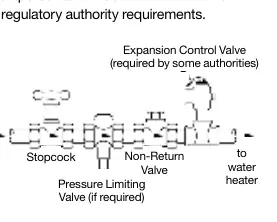
- Valves: An isolation valve and non-return valve must be installed on the cold water line. An expansion control valve is mandatory on the cold water line.
- Relief Valve: The temperature pressure relief valve must be fitted before operation. Ensure the drain line is left open to the atmosphere and installed in a continuously downward direction.
- Connection Sizes: Hot and cold water connections are Rp 3/4; relief valve connection is Rp 1/2.
Electrical Connections
- Power Supply: The unit must be directly connected to a 220V-240V AC 50Hz supply.
- Isolation: An isolating switch must be installed at the switchboard. A second, lockable isolating switch adjacent to the unit and an RCD may be required by local wiring rules (AS/NZS 3000).
- Filling: Do not switch on the power until the water heater is completely filled with water.
Commissioning and Draining
- Commissioning: Open all hot water taps, open the cold water isolation valve, and wait for water to flow freely from taps to ensure the tank is full. Check for leaks before switching on the electrical supply.
- Draining: Turn off the electrical supply and close the cold water isolation valve. Open a hot water tap to relieve pressure, then attach a hose to the cold water inlet union and open the relief valve to allow air in and water to drain.
Maintenance Requirements
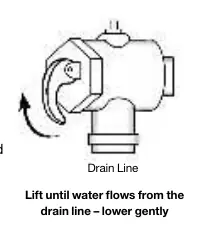
- Minor Maintenance (Every 6 Months): Operate the easing lever on the temperature pressure relief valve and expansion control valve to clear deposits. Ensure the lever is raised and lowered gently. Check that the safe tray drain line is not blocked.
- Major Service (Every 5 Years): Replace the temperature pressure relief valve, inspect/flush the expansion control valve, inspect/replace the anode, and check the heating unit for calcium build-up.
Warranty Information
The warranty covers repair or replacement of faulty components. It does not cover damage from misuse, improper installation, poor water quality, or failure to maintain the unit. Claims must be made through the Rheem New Zealand Service Department.
Practical help
Common problems
Continuous leakage from relief valve
May indicate a problem with the water heater or valve. Check if the valve is blocked or damaged. If leakage persists, contact a qualified service person.
No hot water
Check if the electrical supply is switched on at the switchboard and the isolating switch at the unit. Ensure the unit is filled with water.
Scalding water at taps
Install a temperature limiting device on the hot water pipework to bathrooms and ensuites to reduce temperature below 50°C.
Before use
- Ensure all packaging materials are removed.
- Verify the unit is installed vertically on a stable base.
- Confirm the relief valve drain line is open and directed downwards.
- Fill the water heater completely by opening hot water taps until water flows freely.
- Check all plumbing connections for leaks.
- Ensure the electrical supply is connected by a qualified person and the unit is filled with water before switching on.
Specs in practice
- Maximum Mains Supply Pressure
- 680 kPa. If your local supply exceeds this, a pressure limiting valve is required.
- Relief Valve Setting
- 1000 kPa. This is the pressure at which the temperature pressure relief valve will discharge.
- Expansion Control Valve Setting
- 850 kPa. Mandatory fitting on the cold water line.
Images and diagrams
- The relief valve easing lever must be lifted gently to clear deposits every 6 months.
- Plumbing connections require an isolation valve, non-return valve, and pressure limiting valve (if required) before the water heater inlet.
Model compatibility
- Designed for single-family domestic dwellings.
- Not suitable for pool heating.
- Requires compliance with AS/NZS 3500.4 and G12/AS1 (New Zealand).

Manual page author
David Miller
Documentation analyst
Organizes user manual content into clear summaries, with attention to model details, product context, and everyday usability.