Tools / Woodworking Tools
User Manual for Bosch GFF 18V-22 Professional Biscuit Jointer
Quick guide for the Bosch GFF 18V-22 Professional biscuit jointer. Includes setup, operation, routing depth/angle adjustments, and maintenance instructions.
Table of contents
Manual images
Click an image to enlargeQuick guide from the manual
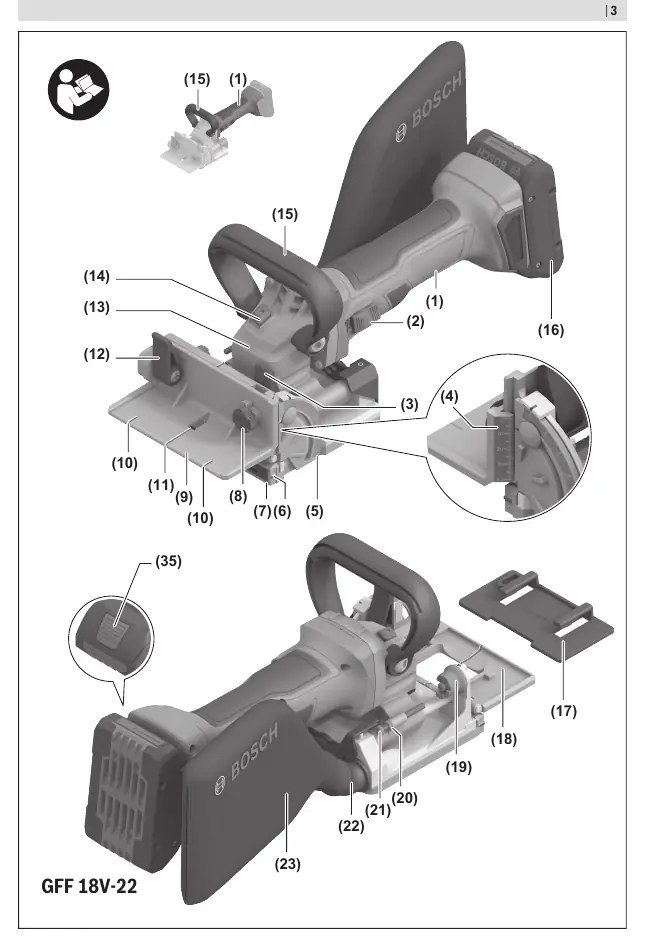
The Bosch GFF 18V-22 Professional is a cordless biscuit jointer designed for creating slots for biscuit joints in various wood materials. Before use, ensure the battery is charged and the anti-slip protection is fitted. Always hold the tool firmly with both hands during operation.
Inserting/Replacing the Side Milling Cutter
Warning: Always remove the battery before performing maintenance or changing accessories.
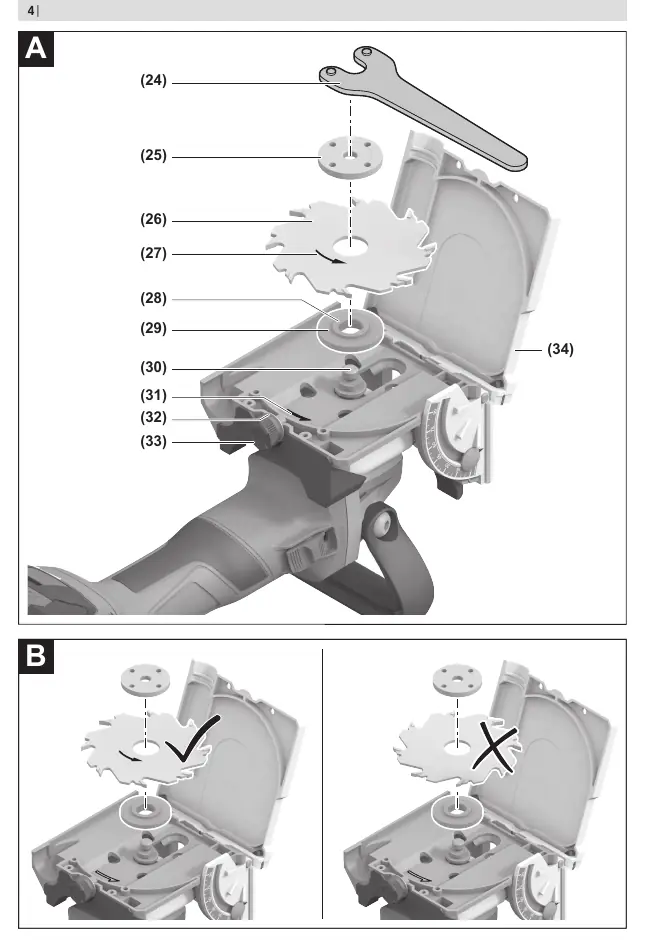
- Turn the tool so the base plate (34) faces upward.
- Loosen the clamping screw (33) by approximately three turns.
- Open the base plate (34).
- Press and hold the spindle lock button (14).
- Use the two-hole spanner (24) to loosen and remove the clamping nut (25).
- Remove the existing cutter (26) and mounting flange (29) if necessary, and clean them.
- Place the mounting flange (29) on the routing spindle (30) with the centring collar (28) facing up.
- Place the clean cutter (26) on the mounting flange, ensuring the rotation arrow (27) matches the arrow on the spindle (31).
- Screw on the clamping nut (25) and tighten firmly while holding the spindle lock button (14).
- Close the base plate (34) and tighten the clamping screw (33).
Operation
Setting the Routing Depth
Use the adjustment knob (19) to set the routing depth. It has lock-in heights for six standard biscuit sizes (0, 10, 20, Simplex, Duplex, MAX).
Setting the Height-Adjustable Stop
Use the height-adjustable stop (9) to set the distance between the top of the workpiece and the slot. Use the adjustment knob (8) to set the distance on the height scale (4) and tighten the clamping lever (12).
Setting the Routing Angle
Loosen the clamping lever (3) to adjust the angle guide (18) to the desired angle on the angle scale (5). Lock-in points are available at 0°, 30°, 45°, 60°, and 90°.
Maintenance and Cleaning
Always keep the tool and ventilation slots clean. If necessary, clean and grease the guides using non-resinous oil (e.g., sewing machine oil). If the clamping levers (3) and (12) lose tension, they can be readjusted by loosening, repositioning, and retightening.
Manufacturer information
Bosch
Practical help
Common problems
Tool does not start
Check if the battery is charged and correctly inserted.
Excessive vibration
Check if the cutter is blunt, damaged, or incorrectly mounted.
Dust extraction not working
Check if the extraction outlet is clogged or the dust bag is full.
Before use
- Ensure the battery is fully charged.
- Check that the cutter is sharp and correctly mounted.
- Verify the base plate is securely locked.
- Ensure the anti-slip protection is fitted.
Specs in practice
- Rated voltage
- 18V DC
- Rated no-load speed
- 11,000 min-1
- Max. routing depth
- 22 mm
Images and diagrams
- (9) Height-adjustable stop
- (18) Angle guide
- (26) Side milling cutter
- (34) Base plate
Model compatibility
- Compatible with Bosch GBA 18V and ProCORE18V batteries.

Manual page author
David Miller
Documentation analyst
Organizes user manual content into clear summaries, with attention to model details, product context, and everyday usability.