Tools / Woodworking Tools
User Manual for Holzmann PJ 100PRO Biscuit Jointer
Quick guide for the Holzmann PJ 100PRO biscuit jointer. Includes setup, operation, safety instructions, maintenance, and technical specifications.
Table of contents
Manual images
Click an image to enlargeQuick guide from the manual
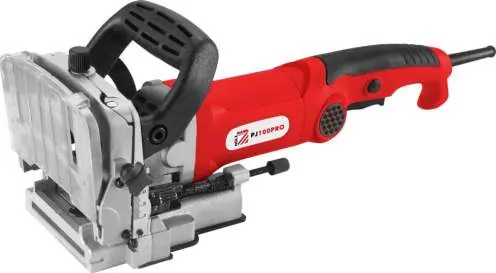
The Holzmann PJ 100PRO is a biscuit jointer designed for cutting grooves for biscuit dowel joints in solid wood, plywood, chipboard, and plastic boards. Before using the machine, ensure you have read all safety instructions. Always wear appropriate personal protective equipment, including safety goggles and hearing protection. Never operate the machine without the provided protective devices, and ensure the workpiece is securely clamped before starting.
Description of the machine
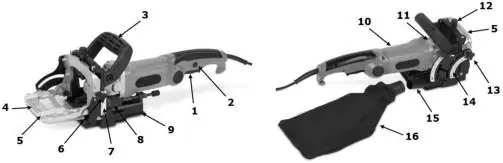
The machine features a main switch, handle, angle stop, height adjustment knob, and a dust collection port. The base plate is adjustable for different cutting depths and angles.
Assembly
Blade Installation:
- Loosen the screws and open the top of the base plate.
- Press the spindle lock and turn the spindle until it engages.
- Remove the flange nut using the wrench.
- Position the saw blade and flange, then replace and tighten the flange nut.
- Ensure the spindle is unlocked before closing the base plate and fastening the screws.
Dust Bag: Insert the dust bag into the dust collector plug if you are not using an external extraction system. Empty it regularly to maintain performance.
Plate Protection: Attach the plate protection to the angle stop before use. For easier assembly, set the angle stop to 90 degrees.
Operation
Adjustments:
- Cutting Depth: Move the motor base plate backwards. Set the depth using the adjustment knob (marked 0, 2, 4, 5, 7, 12, 19). Move the base forward to lock the setting.
- Cutting Angle: Unlock the lock knob for angle adjustment and set the angle stop to the desired position.
- Height: Unlock the height adjustment knob and use the scale to set the height to half the material thickness.
Operating:
- To switch on, press the lock-off button and the ON-OFF switch simultaneously.
- To switch off, release the ON-OFF switch.
- Always hold the machine firmly with both hands.
- Apply the machine to the workpiece only after it is switched on.
Maintenance
Clean the machine and all parts thoroughly once a month. Use a dry cloth or brush; do not use running water or high-pressure cleaners. Keep ventilation slits clean and dust-free. Store the machine in a cool, dry place, out of the reach of children, and avoid plastic bags to prevent humidity build-up.
Technical Data
- Voltage: 230 V / 50 Hz
- Power: 900 W
- No-load speed: 10800 min-1
- Blade diameter: 100 mm
- Max. cutting depth: 19 mm
- Weight: 3.3 kg
Practical help
Common problems
Machine does not start
Check the power supply, ensure the switch is functioning, and verify the carbon brushes are not worn out.
Poor cutting performance
Check if the blade is dull, damaged, or incorrectly installed. Ensure the cutting depth is set correctly.
Excessive dust
Empty the dust bag regularly or check if the dust collector plug is clogged.
Before use
- Inspect the machine for any transport damage.
- Ensure the blade is sharp and undamaged.
- Verify all safety guards and protective devices are in place.
- Check the power cable for any signs of wear or damage.
- Ensure the workpiece is securely clamped or supported.
- Check that the base plate is properly adjusted for the desired cut.
Specs in practice
- No-load speed: 10800 min-1
- The rotational speed of the blade when not under load.
- Max. cutting depth: 19 mm
- The maximum depth the blade can cut into the material.
- Blade diameter: 100 mm
- The standard size of the biscuit jointer blade required for this machine.
Images and diagrams
- The components diagram identifies the main switch, handle, angle stop, and height adjustment controls.
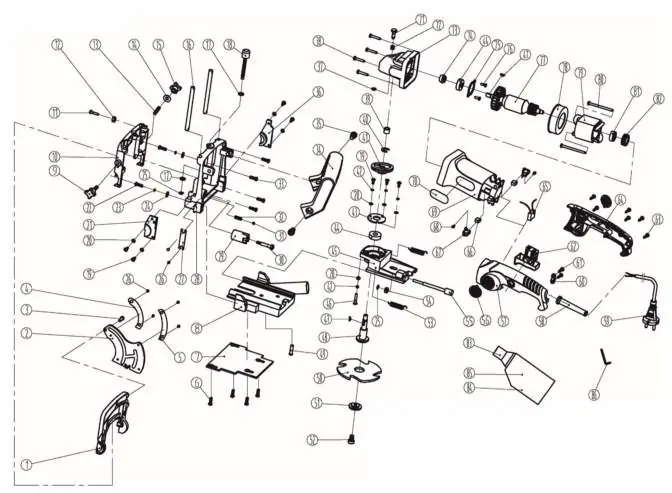
- The explosion drawing provides a detailed view of all internal parts for maintenance and spare parts identification.
Model compatibility
- Use only blades allowable for this machine.
- Do not use cutting discs or circular saw blades.
- The machine is not intended for outdoor use or in wet/damp areas.

Manual page author
Emily Carter
User documentation editor
Prepares concise manual descriptions and highlights the most useful setup, operation, and maintenance information for readers.