Tools / Power Tools
User Manual for Bosch GGS 18V-10 SLC Professional Die Grinder
Quick guide for the Bosch GGS 18V-10 SLC Professional cordless die grinder. Includes setup, operation, safety instructions, and troubleshooting.
Table of contents
Manual images
Click an image to enlargeQuick Guide
This guide provides essential information for operating the Bosch GGS 18V-10 SLC Professional die grinder. Always refer to the full manual for complete safety instructions.
Before You Start
- Ensure the battery is fully charged.
- Check that the abrasive tool is undamaged and correctly mounted.
- Verify the collet nut is securely tightened.
Mounting Abrasive Tools
Use the provided open-ended spanners to mount tools:
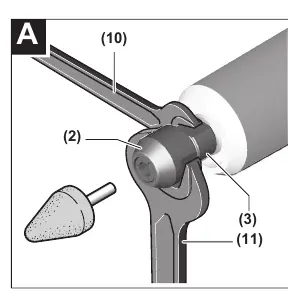
- Clean the grinding spindle (3) and all parts to be fitted.
- Hold the grinding spindle (3) with the open-ended spanner (10).
- Loosen the clamping nut (2) with the open-ended spanner (11) by turning counter-clockwise.
- Insert the shank of the grinding tool into the collet (1) until it hits the stop.
- Hold the spindle (3) and tighten the clamping nut (2) with the spanner (11) by turning clockwise.
Operation
Switching On/Off
To start, slide the on/off switch (5) forward. To lock, push the front of the switch down until it clicks. To switch off, release the switch or press the rear of the switch if locked.
Safety Features
- Kickback Stop: If the tool jams, the power supply is interrupted electronically. Reset the switch to off and restart.
- Restart Protection: Prevents uncontrolled starting after power interruption. Reset the switch to off and restart.
- Impact Shutdown: Automatically switches off the tool if it hits the floor after a fall. Reset the switch to off and restart.
Status Indicators
The User Interface (13) provides real-time status:
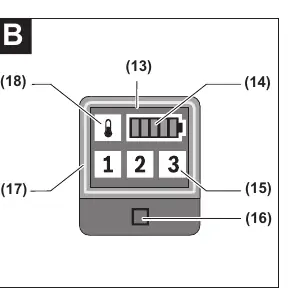
- Battery Charge Indicator (14): Shows charge level.
- Overload Protection (18): Yellow indicates critical temperature (run at no load to cool); red indicates overheating (let tool cool down).
- Tool Status (17): Green is OK; yellow is critical temp/low battery; red is overheated/empty battery; flashing red indicates safety shutdown.
Maintenance
Keep the tool and ventilation slots clean for safe operation. Remove the battery before any maintenance or transport.
Manufacturer information
Bosch
Practical help
Common problems
Tool does not start
Check battery charge, ensure switch is in off position before restarting after safety shutdown.
Tool shuts down unexpectedly
Check status indicator (17). If flashing red, a safety feature (kickback, restart protection, or impact shutdown) has triggered. Reset switch to off and restart.
Overheating
Check overload indicator (18). If yellow, run at no load to cool. If red, let tool cool down completely.
Before use
- Ensure battery is fully charged
- Check that abrasive tool is undamaged and correctly mounted
- Verify collet nut is tightened
- Ensure work area is well-lit and clear of flammable materials
Specs in practice
- Rated Voltage
- 18V DC
- Max Collet Diameter
- 8 mm
- Max Grinding Tool Diameter
- 50 mm
Images and diagrams
- Figure A: Mounting abrasive tools using open-ended spanners.
- Figure B: User Interface showing battery status, speed levels, and tool status indicators.
Model compatibility
- Compatible with Bosch 18V Li-Ion batteries (GBA 18V, ProCORE18V).
- Bluetooth Low Energy Module GCY 30-4 available as accessory.

Manual page author
Michael Turner
Technical manual editor
Reviews PDF manuals for structure, safety notes, and practical product details so readers can find the right information quickly.