Baby / Swings & Bouncers
User Manual for Bright Starts Minnie Mouse Forever Besties Infant to Toddler Rocker
Comprehensive user guide for the Bright Starts Minnie Mouse Forever Besties Infant to Toddler Rocker. Includes assembly instructions, safety warnings, battery installation, cleaning, and usage tips.
Table of contents
Manual images
Click an image to enlargeImportant Safety Information
WARNING: Failure to follow these warnings can result in serious injury or death.
- Fall Hazard: Never leave the child unattended. Always use the restraint system and adjust to fit snugly. Stop using the restraint system once the child tries to stand up or climb out. Never move or lift the product with the baby inside. Never lift by the toy bar.
- Suffocation Hazard: Never use on soft surfaces like beds, sofas, or cushions. This product is not for sleep. If the baby falls asleep, move them to a firm, flat sleep surface like a crib or bassinet.
- Usage Limits: Never place a child over 18 kg (40 lb) in the product. The reclined position is for children who cannot sit upright unassisted (up to 9 kg/20 lb). The upright position is for children who have developed enough upper body control to sit up without tipping forward.
- Placement: Always use on the floor. Never use on elevated surfaces. Keep away from windows, cords, blinds, and heat sources.
Assembly Instructions
Before assembly, ensure all parts are present according to the parts list. Adult assembly is required.
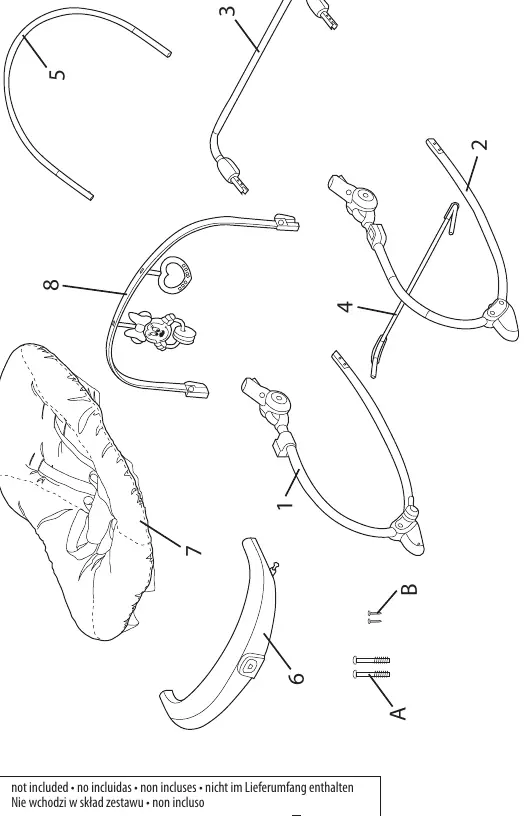
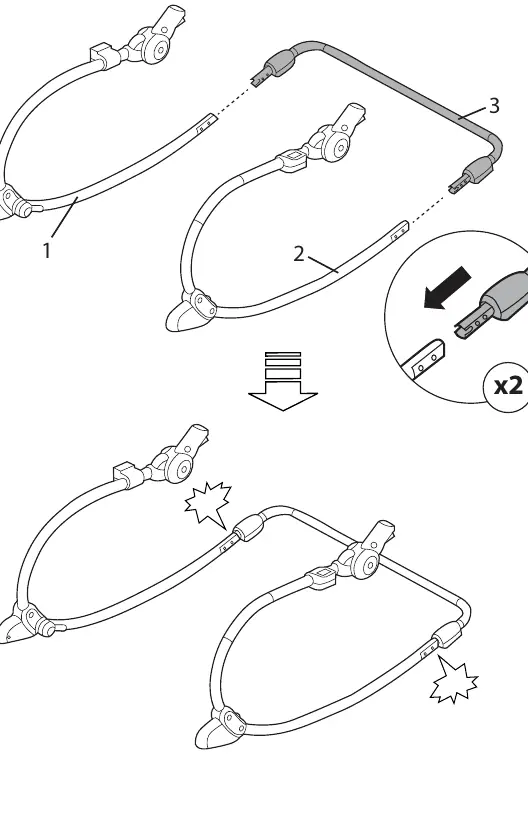
- Frame Assembly: Connect the left and right seat frame sides (1, 2) using the rear cross bar (3). Ensure they click into place.
- Kickstand: Attach the kickstand (4) to the frame.
- Backrest: Insert the backrest tube (5) into the frame.
- Vibration Unit: Install the battery (see Battery Installation section) into the vibration unit (6). Attach the vibration unit to the frame using the provided screws (A, B).
- Seat Pad: Attach the seat pad (7) to the frame, ensuring all buckles and hook-and-loop patches are fastened securely.
- Toy Bar: Attach the toy bar (8) to the frame.
Battery Installation
The vibration unit requires (1) size C/LR14 (1.5V) alkaline battery (not included).
- Use a screwdriver to open the battery compartment.
- Install the battery, ensuring the polarity matches the markings inside the compartment.
- Replace the cover and secure it with the screw.
- Replace batteries if the vibration becomes weak, sound is distorted, or lights fail.
Using the Rocker
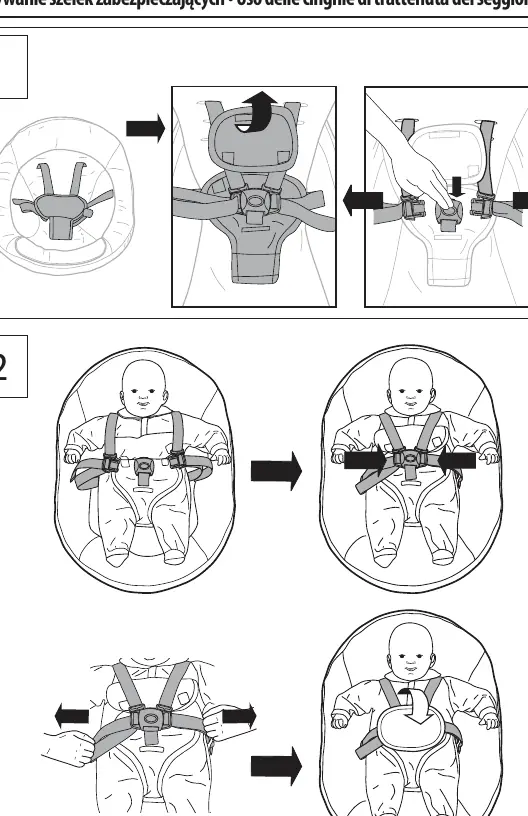
- Restraint System: Place the child in the seat. Fasten the buckles and adjust the straps to fit snugly.
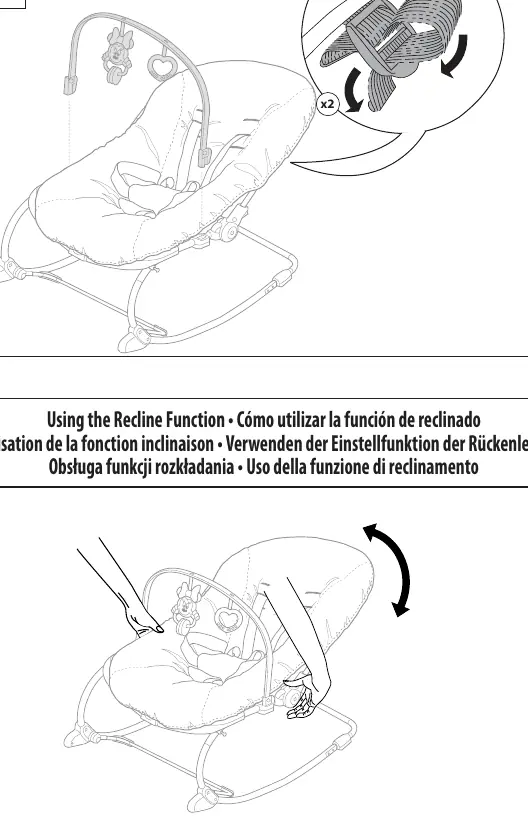
- Recline Function: Adjust the seat recline as needed for the child's comfort and developmental stage.
- Vibration: Press the button on the vibration unit to turn the vibration feature on or off.
Care and Cleaning
- Seat Pad: Remove from the frame. Fasten all buckles and hook-and-loop patches. Machine wash with cold water on a gentle cycle. Do not bleach. Tumble dry on low heat.
- Toy Bar and Toys: Wipe clean with a damp cloth and mild soap. Air dry. Do not immerse in water.
- Frame: Wipe the metal frame with a soft, clean cloth and mild soap.
Manufacturer information
Bright Starts
Practical help
Common problems
Vibration unit not working
Check that the battery is installed correctly with the right polarity. Replace with a fresh C/LR14 alkaline battery.
Distorted sound or slow motor
This indicates weak batteries. Replace the battery immediately.
Before use
- Ensure all parts are present and undamaged.
- Assemble on a flat, stable surface.
- Install 1x C/LR14 alkaline battery.
- Verify all buckles and hook-and-loop patches are securely fastened.
- Check that the child is within the weight limit (max 18 kg / 40 lb).
Specs in practice
- Weight Limit
- Maximum weight capacity is 18 kg (40 lb).
Images and diagrams
- Page 15 provides a full parts list and diagram for identification.
- Pages 16-20 detail the frame and vibration unit assembly steps.
- Page 21 shows seat pad attachment.
- Page 24 illustrates how to use the seat restraint system.
- Page 25 shows how to adjust the recline function.
Model compatibility
- Not intended for sleep; move baby to a crib if they fall asleep.
- Use only on the floor; never on elevated surfaces.
- Stop using the reclined position when the baby starts trying to sit up.

Manual page author
Emily Carter
User documentation editor
Prepares concise manual descriptions and highlights the most useful setup, operation, and maintenance information for readers.