Baby / Swings & Bouncers
User Manual for Bright Starts 16732-MEES Vibrating Bouncer
Quick guide for the Bright Starts 16732-MEES Vibrating Bouncer. Includes assembly instructions, safety warnings, battery installation, and cleaning procedures.
Table of contents
Manual images
Click an image to enlargeQuick guide from the manual
This guide provides essential information for the assembly, safe operation, and maintenance of the Bright Starts 16732-MEES Vibrating Bouncer. Always read the full manual before use. The bouncer is designed for infants and requires adult assembly. Stop using the product when the baby starts trying to sit up or reaches 20 lb (9 kg), whichever comes first.
Important Safety Warnings
- Fall Hazard: Never leave the child unattended. Use the bouncer ONLY on the floor. Never use on elevated surfaces. Never lift or carry the baby in the bouncer.
- Suffocation Hazard: Never use on a bed, sofa, cushion, or other soft surface. This product is not safe for sleep. If the baby falls asleep, move them to a firm, flat sleep surface like a crib or bassinet.
- General Safety: Always use the restraints and adjust them to fit snugly. Never use as an infant carrier for travel. Do not attach additional strings or straps.
Assembly Instructions
The bouncer requires adult assembly. Ensure all parts are present before beginning.
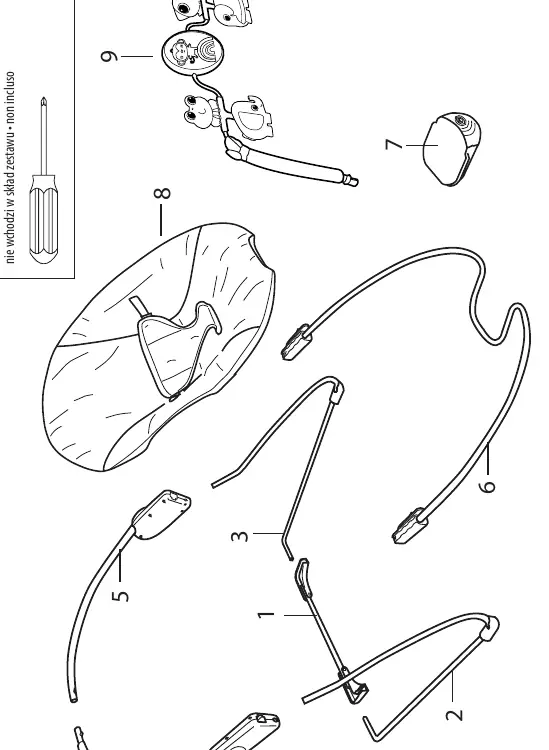
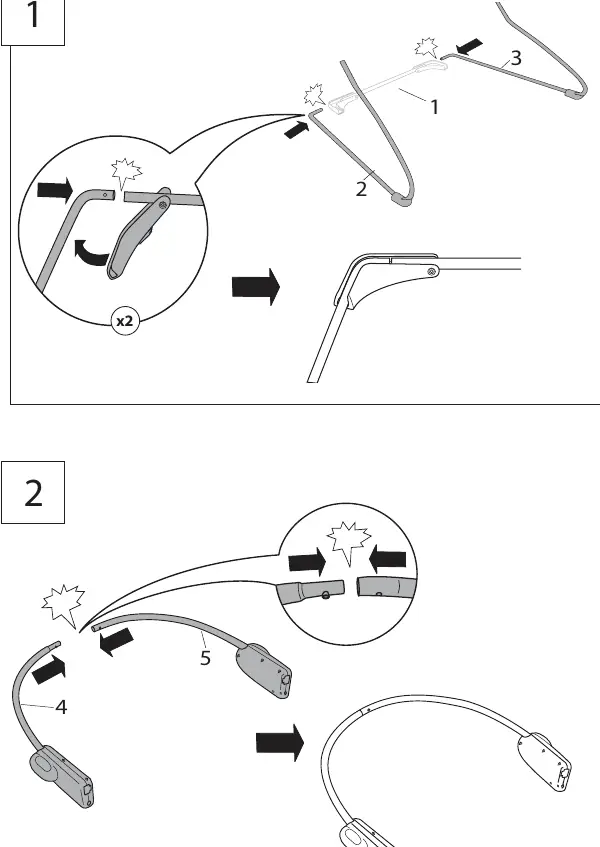
- Connect the base frame tubes (1, 2, 3) as shown in the assembly diagrams.
- Attach the backrest tubes (4, 5) to the base frame.
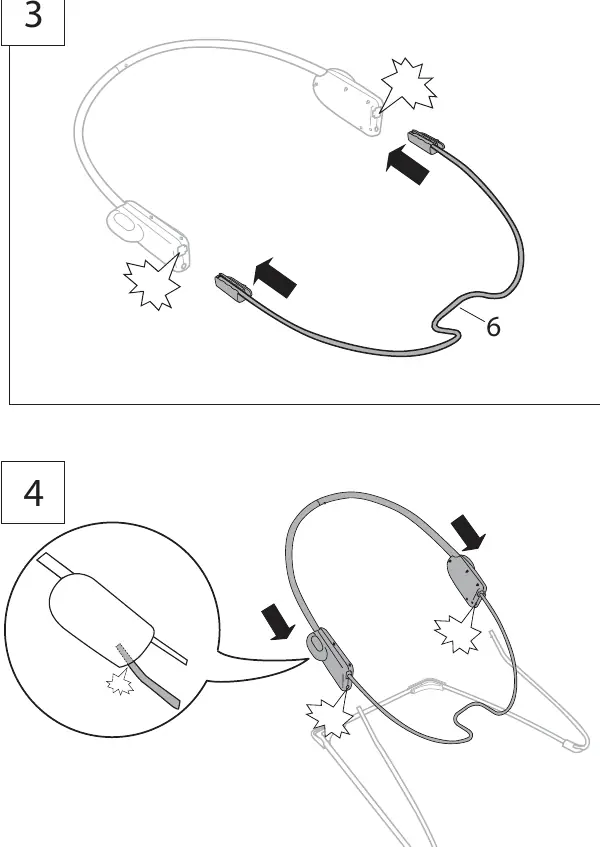
- Connect the footrest wire (6) to the connecting hubs.
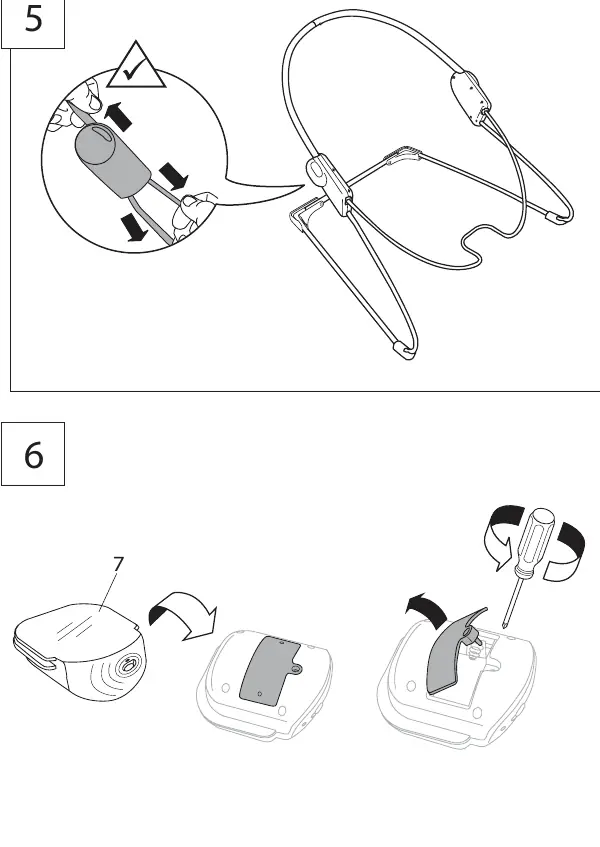
- Attach the vibration unit (7) to the frame.
- Install the seat pad (8) onto the frame and secure the buckles.
- Attach the toy bar (9) to the bouncer frame.
Battery Installation
The vibration unit requires (1) size C/LR14 (1.5V) alkaline battery (not included).
- Use a small Phillips screwdriver to open the battery compartment on the vibration unit.
- Insert the battery, ensuring the polarity matches the markings in the compartment.
- Replace the cover and screw.
- Replace batteries if the vibration function becomes weak or erratic.
Using the Bouncer
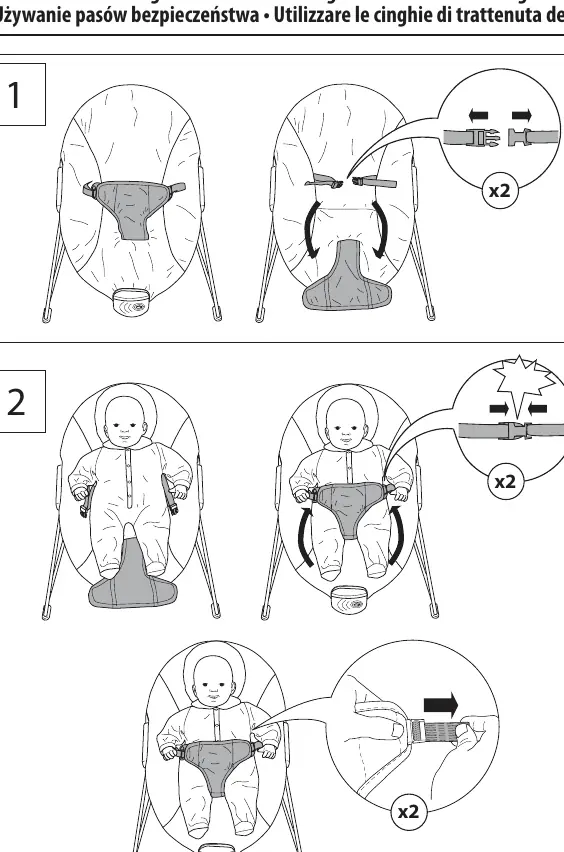
- Seat Restraint: Always place the baby in the seat and secure the restraint system. Adjust the straps to fit snugly around the baby.
- Vibration Function: Slide the vibration ON/OFF switch on the vibration unit to the ON position to soothe the baby. Slide to OFF when not in use.
Care and Cleaning
- Seat Pad: Remove from the frame. Fasten all buckles and hook-and-loop patches. Machine wash with cold water on a gentle cycle. Do not bleach. Tumble dry on low heat.
- Toy Bar and Toys: Wipe clean with a damp cloth and mild soap. Air dry. Do not immerse in water.
- Frame: Wipe the metal frame with a soft, clean cloth and mild soap.
Disassembly for Storage
To disassemble the bouncer for storage, use a small Phillips screwdriver to depress the release button on the inside of each connecting hub. Remove the footrest tube and base frame tubes from the hubs.
Manufacturer information
Bright Starts
Practical help
Common problems
Product not vibrating
Check if the battery is installed correctly and has sufficient charge. Replace with a new C/LR14 alkaline battery.
Erratic operation (distorted sound, slow motor)
This is often caused by weak batteries. Replace the battery with a fresh one.
Parts missing or damaged
Do not use the product. Contact Kids2 for replacement parts and instructions.
Before use
- Ensure all parts are present according to the parts list.
- Verify the bouncer is placed only on the floor.
- Check that the seat restraint is adjusted snugly.
- Ensure the toy bar is securely attached.
- Check for any damaged, missing, or loose parts.
- Ensure the battery is installed correctly if using vibration.
Specs in practice
- Weight Limit
- Stop using when the baby reaches 20 lb (9 kg) or starts trying to sit up.
Images and diagrams
- Assembly steps 1-14 illustrate the frame connection and seat attachment sequence.
- Battery compartment is located on the vibration unit.
- The release button for disassembly is located inside the connecting hubs.
Model compatibility
- Not for sleep or unsupervised use.
- Do not use on elevated surfaces.
- Do not use as an infant carrier for automobile or airline travel.

Manual page author
Michael Turner
Technical manual editor
Reviews PDF manuals for structure, safety notes, and practical product details so readers can find the right information quickly.