Lighting / Fixtures
User Manual for Brilliant Saturn LED Ceiling Light
Quick guide for the Brilliant Saturn LED Ceiling Light (models 22125, 22126). Includes installation instructions, safety warnings, technical specifications, and warranty details.
Quick answers from the manual
Quick answer
- The Brilliant Saturn LED Ceiling Light (22125/22126) is a fixed indoor lighting fixture. It must be installed by a qualified electrician in accordance with AS/NZS 3000 standards. It features a selectable color temperature switch and is not compatible with dimmer switches. p. 1, 3
Key actions
- Install the fixture p. 2
- Select color temperature p. 2
First start
- Turn off mains power, install the base, connect wires (L, N, Earth), attach the diffuser, and turn on power. p. 2
Problems and fixes
Light not working or flickering
Check electrical connections and ensure no dimmer switch is used.
p. 3Maintenance and reset
- The fitting has no serviceable parts and should not be modified. p. 3
Technical specifications
| Parameter | Value | Meaning | Pages |
|---|---|---|---|
| Input Voltage | 220-240V AC 50Hz | Standard mains voltage. | p. 3 |
| Wattage | 15W / 24W | Power consumption based on model. | p. 3 |
Where to find it in the PDF
- Safety and Overview p. 1
- Installation Instructions p. 2
- Specifications and Warnings p. 3
- Warranty p. 4
Table of contents
Manual images
Click an image to enlargeQuick guide from the manual
The Brilliant Saturn LED Ceiling Light is an indoor lighting fixture available in 15W (22125) and 24W (22126) versions. This device must be installed by a qualified electrical contractor in accordance with AS/NZS 3000 standards. The unit features a selectable color temperature switch and is non-dimmable.
Safety Warnings
- Electrical Safety: Ensure power is disconnected at the mains before starting any installation work.
- Installation: Must be performed by a licensed electrician.
- Usage: Indoor use only. Do not use with dimmer switches.
- Handling: The light assembly may become hot during operation. Do not touch with bare hands while the light is on.
- Maintenance: The fitting has no serviceable parts. Do not modify or change internal components.
Installation Instructions
- Remove Diffuser: The diffuser is a twist-and-lock type. Use both hands to turn it anticlockwise by about 5-10cm to loosen it from the base, then gently lower it.
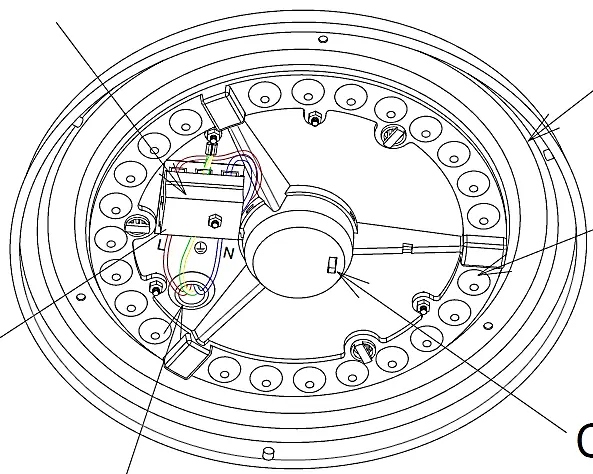
- Prepare Wiring: Run the supply cable through the cable entry hole (G).
- Mount Base: Mark the ceiling through the mounting holes (M) and secure the base (A) to the ceiling using a suitable fixture system.
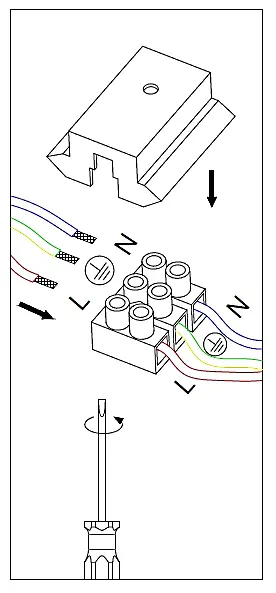
- Connect Wires: Remove the terminal block cover (C). Connect the supply cable to the terminal block (H) according to the markings: L (Live/Active), N (Neutral), and Earth (Green/Yellow). Replace the terminal block cover.
- Finalize: Fit the diffuser (B) back onto the fitting. Turn the power on.
Operation
You can select the desired color temperature using the switch (E) located on the unit. The available options are:
- Warm White (WW)
- Cool White (CL)
- Daylight (DL)
Technical Specifications
- Input Voltage: 220-240V AC 50Hz
- Safety Class: Class I (requires earth connection)
- Dimming: Non-dimmable
- Diffuser: Frosted white (twist and lock)
Recycling and Environmental Concerns
Dispose of packaging thoughtfully. When the fitting reaches its end of life, recycle it in accordance with your local regulations.
Practical help
Common problems
Light does not turn on
Ensure the mains power is connected and the electrical connections at the terminal block are firm.
Light flickers or behaves erratically
Verify that no dimmer switch is connected to the circuit; this product is not dimmable.
Diffuser is difficult to remove
The diffuser uses a twist-and-lock mechanism. Use both hands to turn it anticlockwise by 5-10cm to release it.
Before use
- Ensure power is disconnected at the mains.
- Confirm the installer is a qualified electrical contractor.
- Verify that the wiring conforms to AS/NZS 3000 standards.
- Check that the mounting surface is suitable for the fixture.
- Ensure the light is not being connected to a dimmer switch.
Specs in practice
- Non-Dimmable
- The light cannot be used with dimmer switches; doing so may damage the unit.
Images and diagrams
- Wiring: Connect Live (L), Neutral (N), and Earth (Green/Yellow) to the terminal block.
- Diffuser Removal: Twist anticlockwise to unlock from the base.
Model compatibility
- Indoor use only.
- Not compatible with dimmer switches.
- Requires earth connection (Class I).

Manual page author
Emily Carter
User documentation editor
Prepares concise manual descriptions and highlights the most useful setup, operation, and maintenance information for readers.