Automotive / Car Audio
User Manual for Caliber RCD 239DAB-BT Car Radio
Quick guide for the Caliber RCD 239DAB-BT car radio. Includes installation, wiring, DAB antenna setup, technical specifications, and button operation instructions.
Quick answers from the manual
Quick answer
- The RCD 239DAB-BT is a car radio with Bluetooth, DAB+, and CD/USB/SD playback. Installation requires a 12V negative ground system and proper antenna connection. p. 2, 3
Key actions
- Switch to DAB mode p. 3
- Scan for DAB stations p. 3
First start
- Upon first energizing in DAB mode, the system will automatically search and store stations. p. 3
Show 4 more answers Show less
Problems and fixes
Disc Error
Check disc insertion or press RESET button.
p. 4, 5, 6, 7Maintenance and reset
- If 'Disc Error' persists, press the RESET button with a pointed object. p. 4, 5, 6, 7
Technical specifications
| Parameter | Value | Meaning | Pages |
|---|---|---|---|
| Power Supply | 12V DC | Negative ground | p. 2 |
| Fuse | 10A | Fuse rating | p. 2 |
Where to find it in the PDF
- Connection Diagram p. 2
- DAB Antenna Installation p. 3
Table of contents
Manual images
Click an image to enlargeQuick Guide
The Caliber RCD 239DAB-BT is a car radio featuring DAB+ tuner, Bluetooth connectivity, and CD/USB/SD playback. This guide provides essential information for installation, antenna setup, and daily operation.
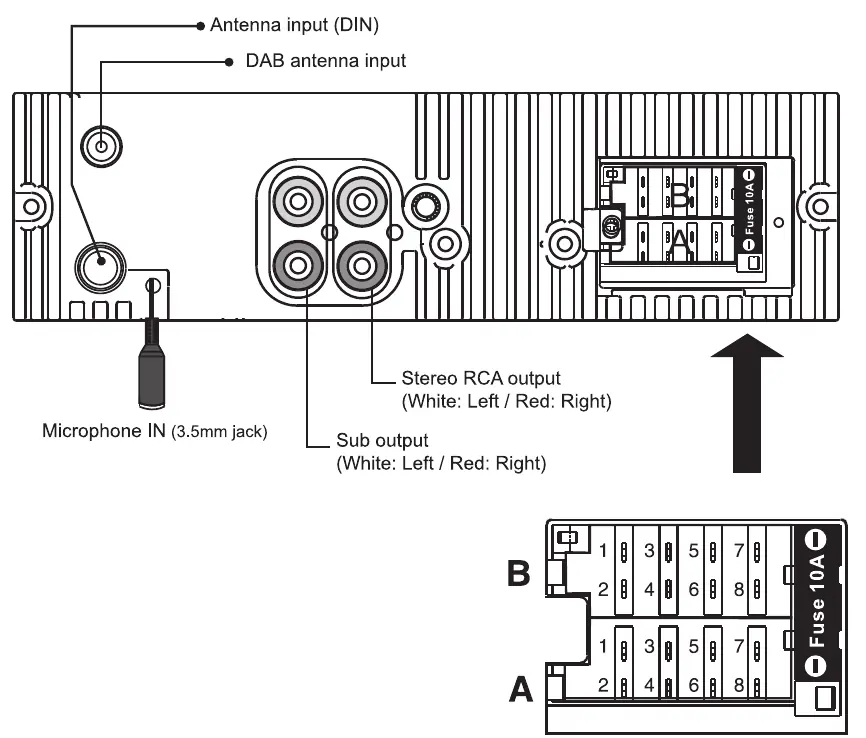
Connection Diagram
The unit requires a 12V DC negative ground power supply. Ensure all wiring is connected according to the diagram provided in the manual. The ISO connector pinout is detailed for speakers (Front/Rear Left/Right) and power/ignition connections.
DAB Antenna Installation
The active DAB+ antenna is powered through the antenna wire (+5V), so no separate power source is required. Installation steps:
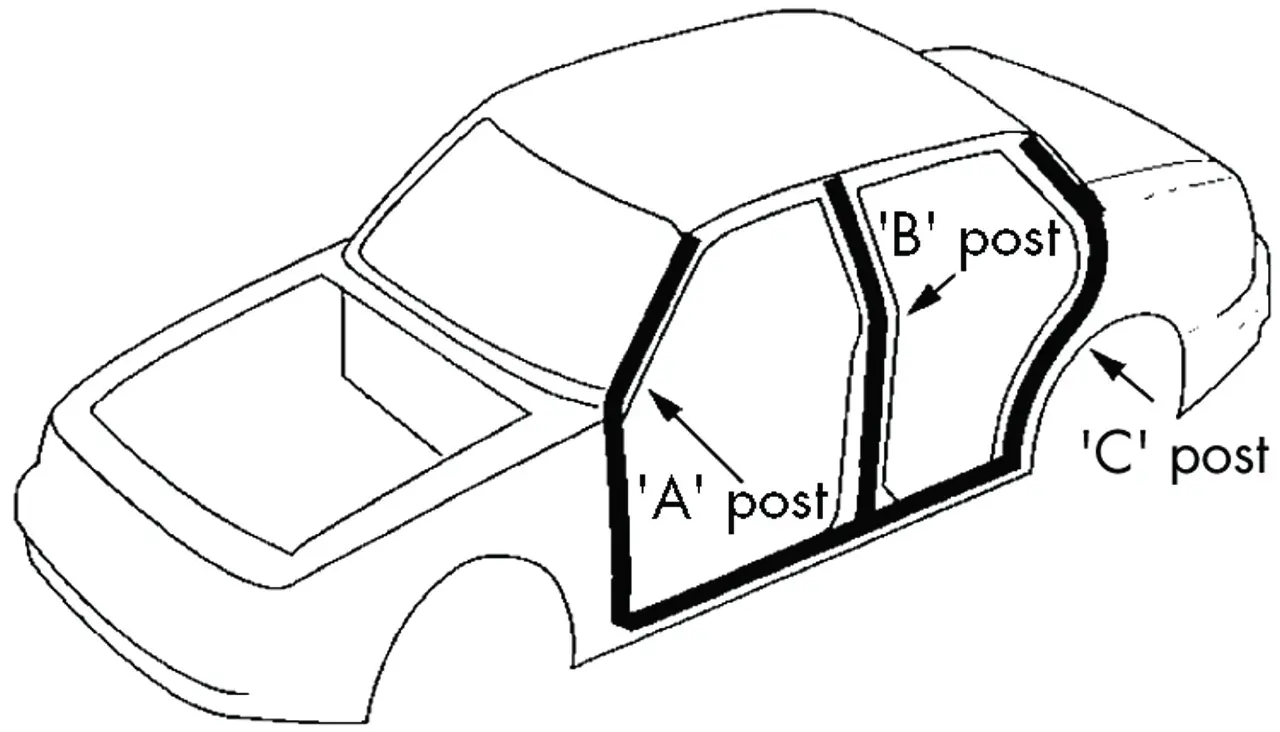
- Remove the cover of the A-post.
- Place the antenna on the windshield near the A-post.
- Stick the transparent part of the antenna on the windshield and attach the black part to the metal frame.
- Attach the ground wire to the metal of the car frame (no need to remove paint).
DAB Settings
To use the DAB+ tuner:
- Press the [MODE] button to switch to DAB mode.
- Upon first use, the system will automatically search and store stations.
- To re-scan, press the [SCAN] button.
- After a full search, 18 stations are stored across three DAB bands (DAB1, DAB2, DAB3).
- Use the [BND] button to switch bands and preset buttons (16-21) to recall stations.
Button Functions
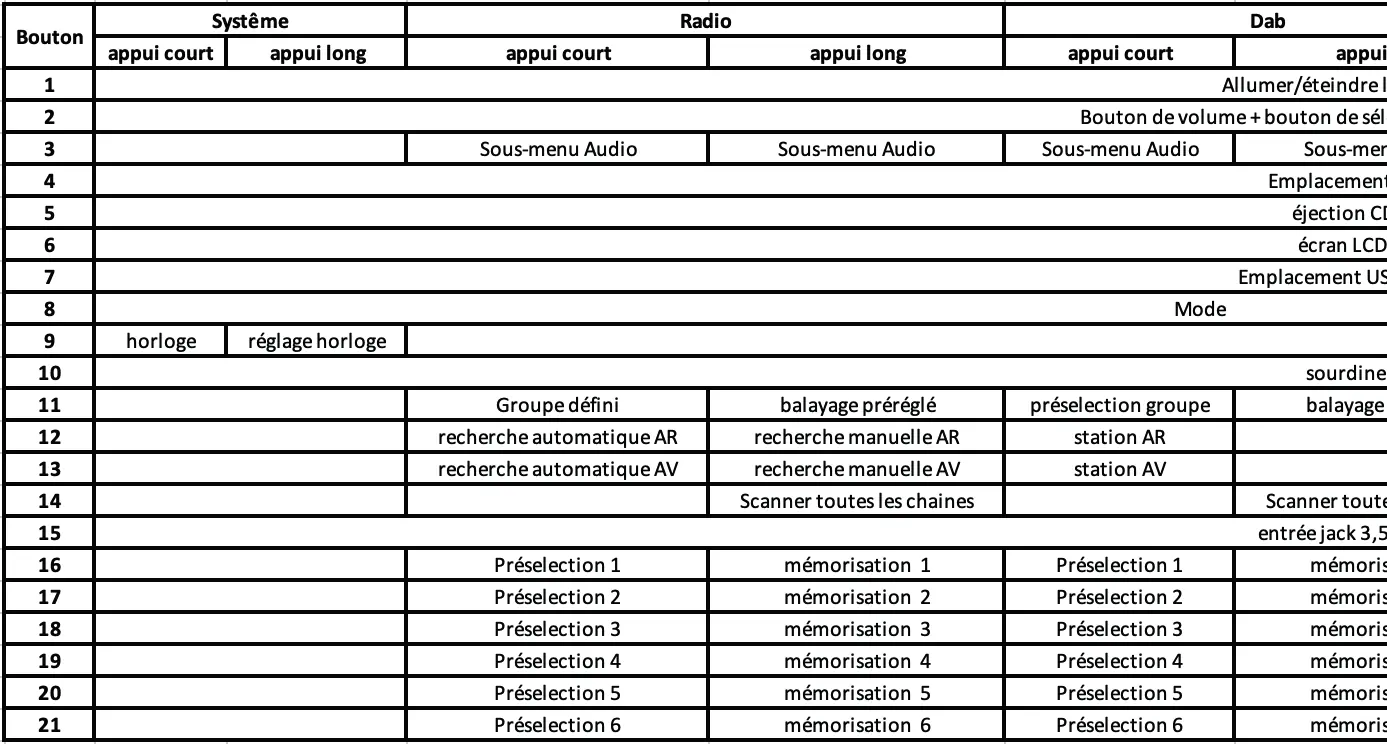
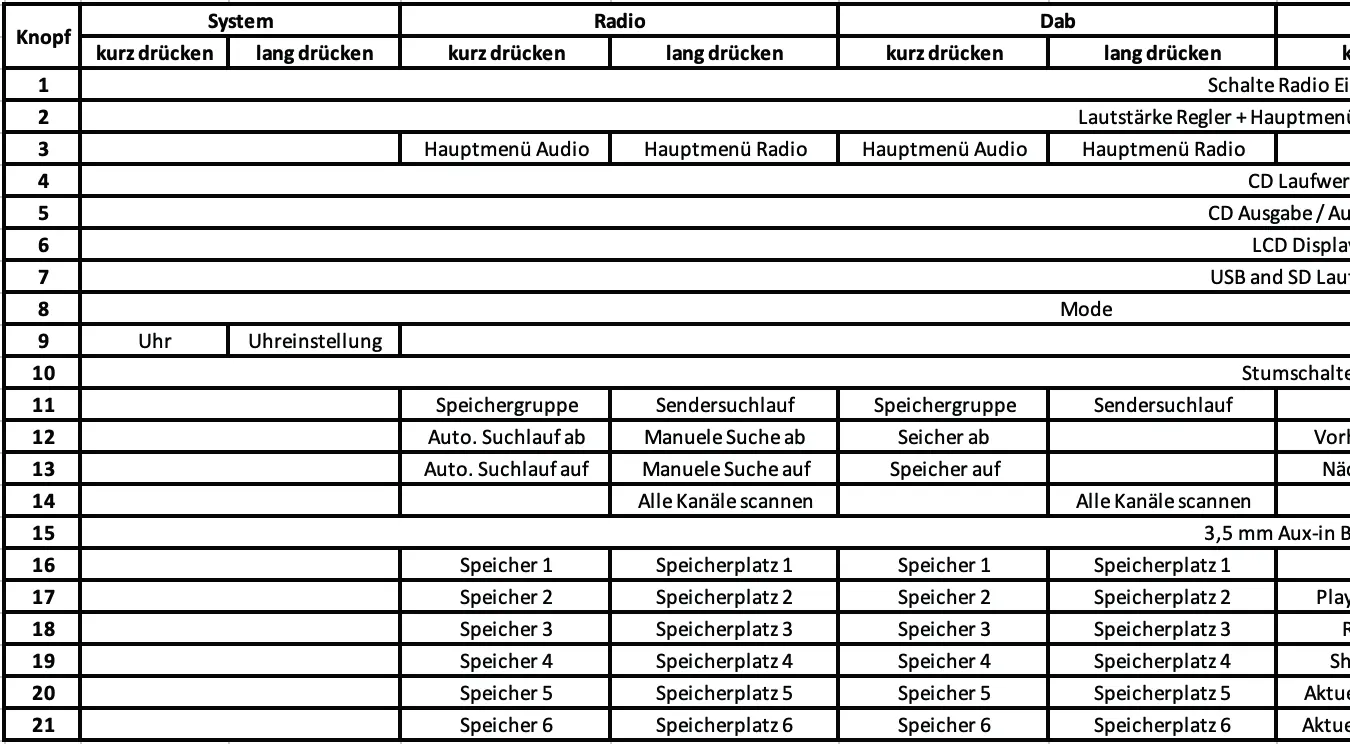
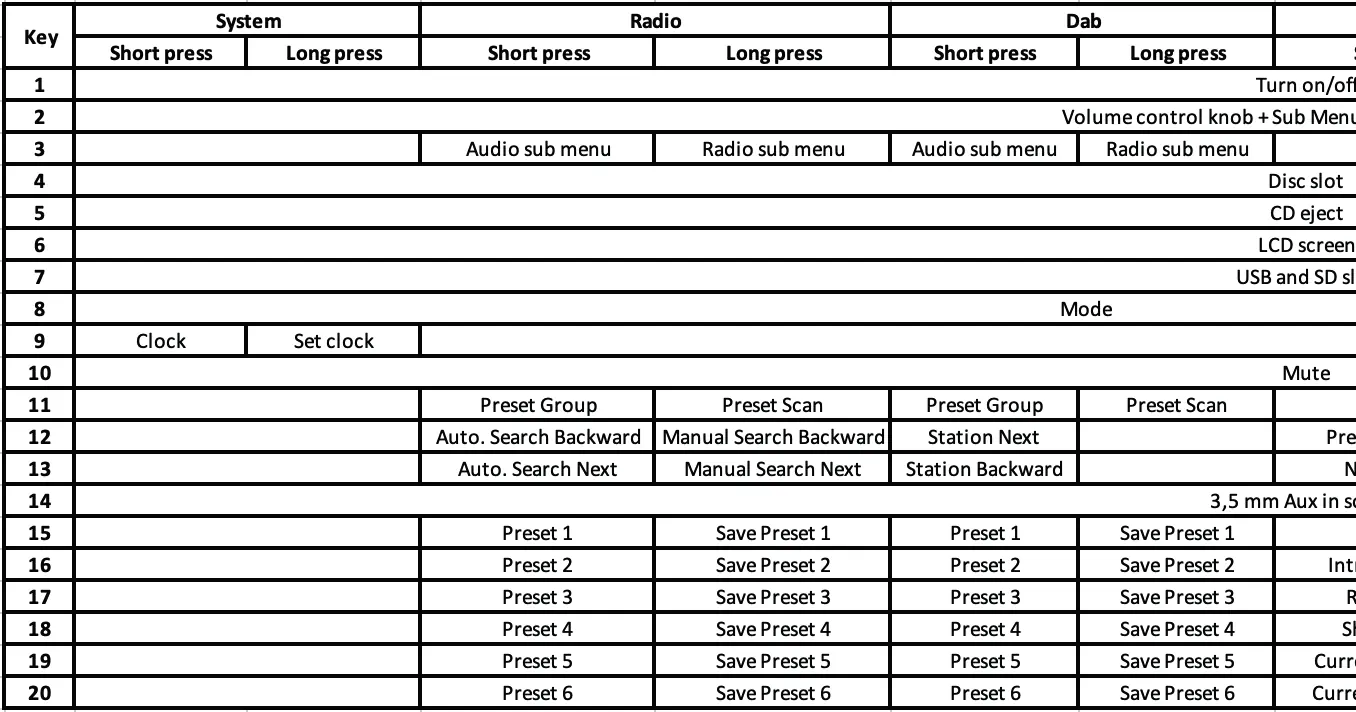
The radio features various buttons for system control, radio tuning, and media playback. Key controls include:
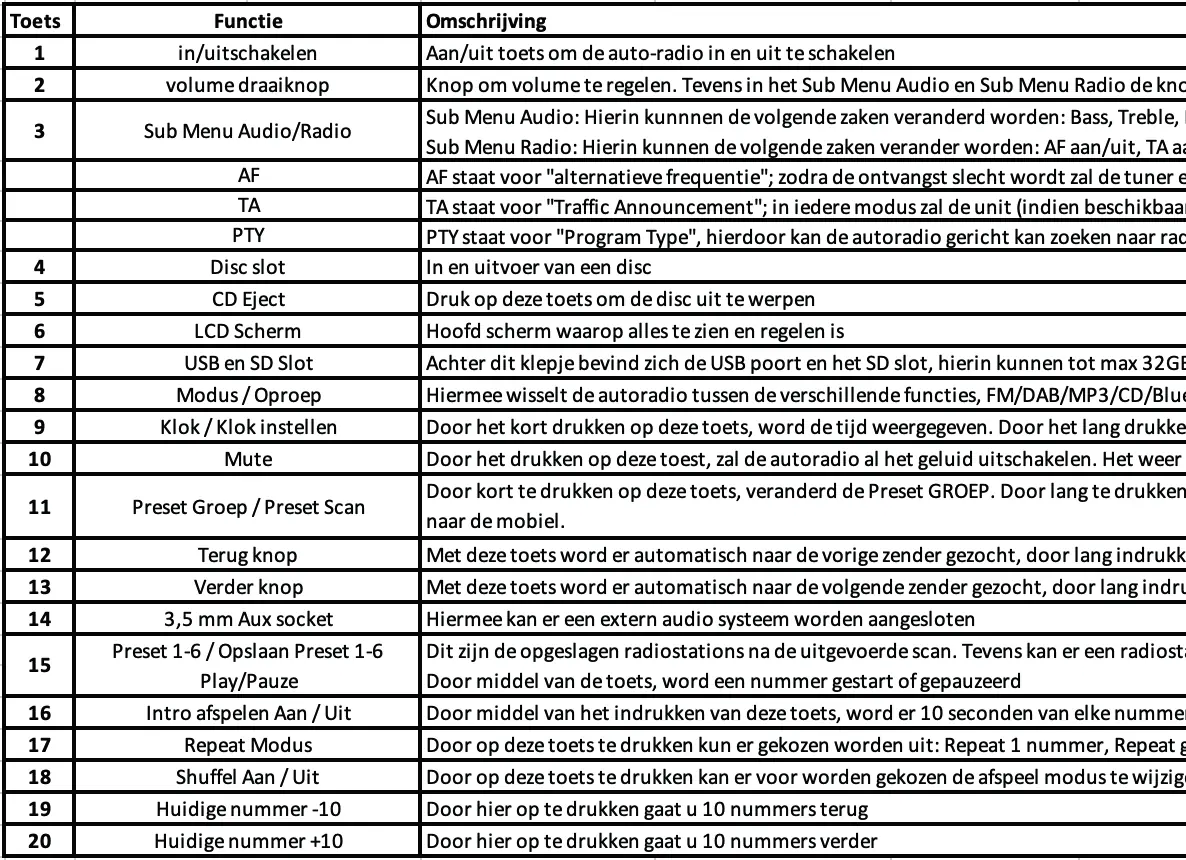
- [MODE] (8): Switches between FM, DAB, MP3, CD, Bluetooth, and AUX modes.
- Volume Knob (2): Adjusts volume and accesses sub-menus (Audio/Radio).
- [SCAN] (14): Initiates station scanning in DAB/FM modes.
- [BND] (11): Switches between radio bands.
- [MUTE] (10): Mutes the audio.
Precautions
For safe operation, observe the following:
- Do not operate the unit while driving if it distracts your attention.
- Use only in vehicles with a 12V negative ground system.
- Keep the volume at a level where you can still hear outside noises.
- Do not disassemble or alter the device.
- Use the correct ampere rating when replacing fuses (10A).
- Ensure the vehicle temperature is between 0°C and +45°C before turning on.
Technical Specifications
General:
- Power supply: 12V DC, negative ground
- Max power output: 75W x 4 channels
- RMS power output: 25W x 4 channels (@ 10% T.H.D.)
- Fuse: 10A
- Dimensions: 178 x 178 x 51mm
Radio & Tuner:
- FM Frequency range: 87.5-108.0 MHz
- DAB+ Frequency range: 174-240 MHz
- Antenna type: Screen mount, active (5V phantom power)
Media:
- USB/SD Audio: MP3/WAV compatible, 24bit/96KHz
- Bluetooth: A2DP and AVRCP profiles, range up to 10 meters
Manufacturer information
Caliber Europe
Practical help
Common problems
Disc Error
Ensure the disc is inserted correctly (label side up). If the error persists, press the RESET button with a pointed object.
Sound skipping
Clean the disc surface from the center to the outer edge with a soft, dry cloth. Avoid playing damaged or irregularly shaped discs.
Before use
- Ensure vehicle has a 12V negative ground electrical system.
- Check that the DAB antenna is connected correctly according to the wiring diagram.
- Verify that the vehicle temperature is between 0°C and +45°C before turning on the unit.
- Ensure the fuse rating is 10A.
Show more Show less
Specs in practice
- Power Output
- 4x75W Max / 4x25W RMS per channel.
- FM Frequency
- 87.5-108.0 MHz (Europe).
- DAB+ Frequency
- 174-240 MHz.
- Bluetooth Range
- Up to 10 meters without barriers.
Images and diagrams
- The connection diagram shows the ISO connector pinout (Blocks A and B) and antenna inputs.
- The DAB antenna installation guide illustrates placement on the windshield near the A-post.
Model compatibility
- Supports MP3/WAV files via USB/SD (up to 32GB).
- Bluetooth supports A2DP and AVRCP profiles.

Manual page author
Emily Carter
User documentation editor