Home Appliances / Food Processing Equipment
User Manual for Cecotec Ready Warm 2500 Thermal Connected Heater
Comprehensive user manual for the Cecotec Ready Warm 2500 Thermal Connected heater. Includes installation instructions for wall and floor mounting, Wi-Fi app setup, operation guide, and maintenance tips.
PDF source: EL · summary: English
Quick answers from the manual
Quick answer
- The Cecotec Ready Warm 2500 Thermal Connected is a 2000W electric heater. It can be installed on the wall or floor and controlled via a touch panel, remote, or the EnergySilence smartphone app. p. 1, 4, 5
Key actions
- Wall mounting p. 3
- Wi-Fi setup p. 5
First start
- Run the device in a well-ventilated area for 2-3 hours to eliminate initial odors. p. 2
Show 4 more answers Show less
Problems and fixes
Wi-Fi connection error
Check 2.4GHz network, press temperature button to reset pairing mode.
p. 5Maintenance and reset
- Clean with a soft, dry cloth. Do not use abrasive cleaners or immerse in water. p. 5
Technical specifications
| Parameter | Value | Meaning | Pages |
|---|---|---|---|
| Power | 2000 W | Power consumption for Ready Warm 2500 | p. 6 |
Where to find it in the PDF
- Installation p. 2, 3
- Operation p. 4, 5
Table of contents
Manual images
Click an image to enlargeQuick Guide
The Cecotec Ready Warm 2500 Thermal Connected is a Wi-Fi enabled electric heater. Before first use, it is normal to notice an unusual smell; run the device in a well-ventilated area for 2-3 hours. Ensure the device is installed at least 20 cm from the floor, walls, and furniture when wall-mounted. The device can be controlled via the touch panel, remote control, or the EnergySilence smartphone app.
Parts and Accessories
The package includes the heater, feet for floor standing, and wall mounting hardware (brackets, hooks, screws, and plugs). Refer to the diagrams in the manual for specific identification of parts A through F.
Installation
Wall Mounting:
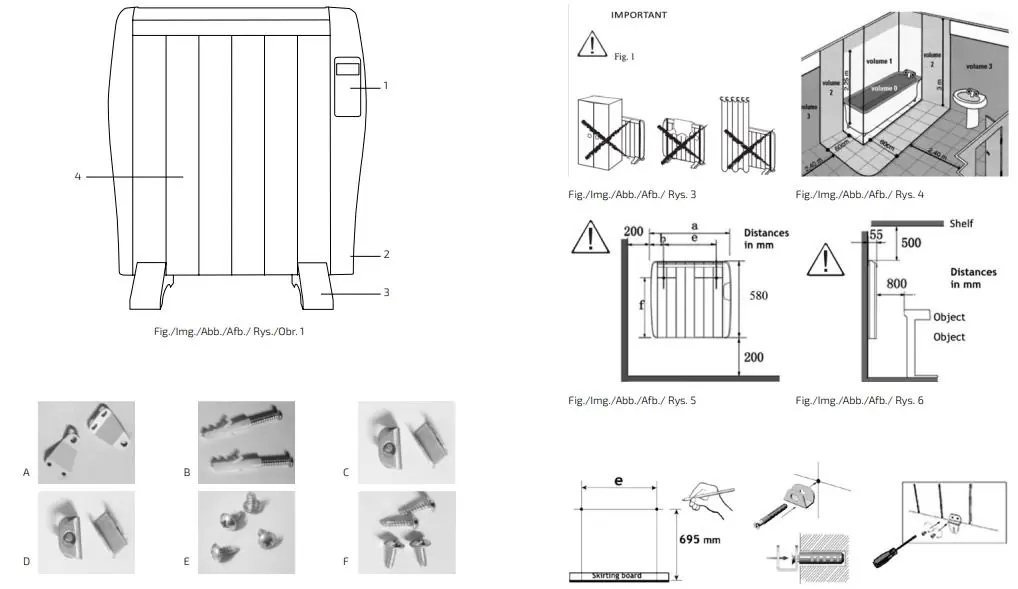
- Choose a stable, flat wall surface near a power outlet.
- Mark the wall according to the measurements provided in the manual (distance 'e').
- Drill holes (10 mm diameter, 60 mm depth), insert plugs (D), and secure hooks (C).
- Attach the support brackets (A) to the back of the heater using the provided screws (E).
- Hang the heater on the hooks and secure it.
Floor Standing:
- Attach the two feet to the bottom rear of the heater using the four provided screws (F), two per foot.
Operation
Controls:
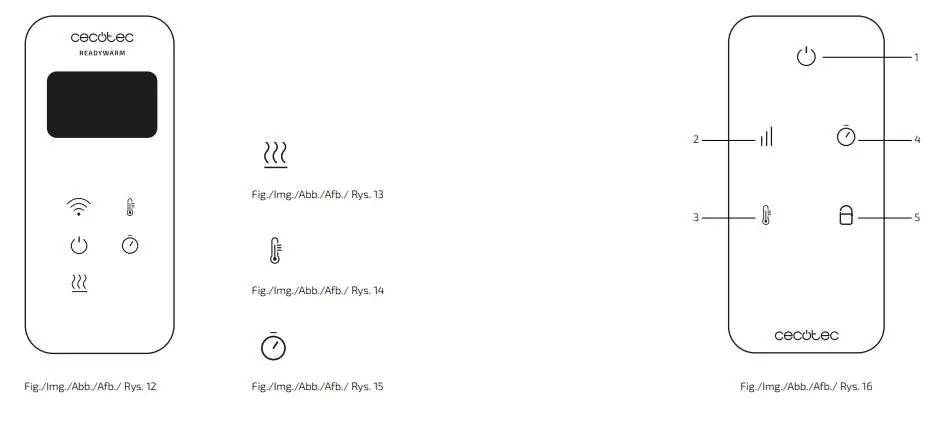
- Connect the device and turn it on using the side switch.
- Use the On/Off button to start the device. The LED screen will display the room temperature.
- Adjust power, temperature (5 ºC to 40 ºC), and timer settings via the touch panel or remote control.
- The device features a child lock system: hold the lock button on the remote for 3 seconds (or the heat button on the panel for 3 seconds) to activate/deactivate.
Wi-Fi Setup:
- Download the EnergySilence app from Google Play or the App Store.
- Register or log in.
- Press '+' in the app and select 'ReadyWarm Thermal'.
- Ensure the Wi-Fi indicator on the heater is flashing. If not, press the temperature button until it flashes rapidly.
- Enter your 2.4 GHz Wi-Fi password and follow the app instructions to complete the connection.
Cleaning and Maintenance
Always turn off, unplug, and let the device cool down before cleaning. Use a soft, dry cloth to clean the exterior. Do not use chemical or abrasive cleaners. Do not immerse the device in water. Store in a well-ventilated, safe place away from children when not in use for long periods.
Technical Specifications
The Ready Warm 2500 Thermal Connected model (Ref: 05376) operates at 2000 W, 220-240 V, 50/60 Hz.
Manufacturer information
Cecotec Innovaciones S.L.
Practical help
Common problems
Unusual smell during first use
This is normal. Operate the device in a well-ventilated area for 2-3 hours.
Wi-Fi connection failure
Ensure the network is 2.4 GHz. Press the temperature button until the Wi-Fi indicator flashes rapidly to reset pairing mode.
Before use
- Remove all packaging materials.
- Inspect the device and power cord for any visual damage.
- Ensure the device is in good condition before plugging it in.
- Place in a well-ventilated area for the initial run.
Show more Show less
Images and diagrams
- Fig 1-2: Identification of parts and accessories.
- Fig 3-11: Step-by-step guide for wall mounting and floor stand installation.
- Fig 12-16: Control panel and remote control button functions.
Model compatibility
- Wi-Fi network must be 2.4 GHz.

Manual page author
Emily Carter
User documentation editor