Optics / Telescope Accessories
User Manual for Celestron NexGo DX 2-Axis Smartphone Digiscoping Kit
Quick guide for the Celestron NexGo DX 2-Axis Smartphone Digiscoping Kit. Learn how to attach your phone to optical devices, align the camera, and set up the Bluetooth remote for remote shutter control.
Quick answers from the manual
Quick answer
- The NexGo DX is a 2-axis smartphone adapter for digiscoping. It allows you to mount your phone to an optical device and use a Bluetooth remote to take photos or record videos. p. 1, 3
Key actions
- Pairing the Bluetooth remote p. 3, 4
- Adjusting phone alignment p. 2
First start
- Attach adapter to eyepiece p. 1
Problems and fixes
Remote not working
Check battery orientation (positive side up) and re-pair.
p. 3, 4Technical specifications
| Parameter | Value | Meaning | Pages |
|---|---|---|---|
| Max Phone Width | 5 inches (127mm) | Maximum width of the smartphone compatible with the adapter. | p. 1 |
Where to find it in the PDF
- Adapter Setup p. 1, 2
- Bluetooth Remote p. 3, 4
Table of contents
Manual images
Click an image to enlargeQuick guide from the manual
The Celestron NexGo DX 2-Axis Smartphone Digiscoping Kit allows you to attach your smartphone to an optical device such as a telescope, binocular, or microscope to capture images and video. The kit includes a 2-axis adapter for precise alignment and a Bluetooth remote for hands-free shutter control.
Adapter installation
To attach the adapter to your optical device:
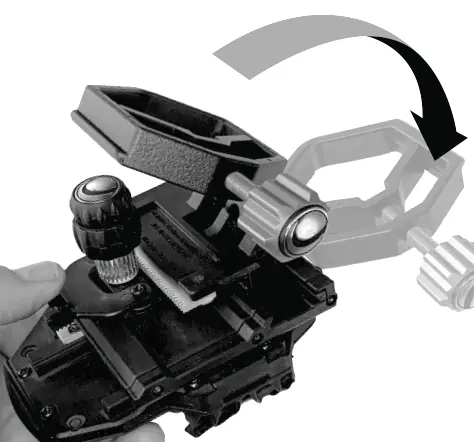
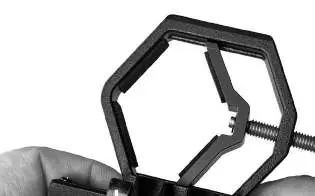
- Identify the eyepiece of your optical device.
- Clamp the adapter onto the eyepiece.
- Ensure the adapter is securely tightened to the eyepiece to prevent movement during use.
Phone alignment
To align your smartphone camera with the optical device:
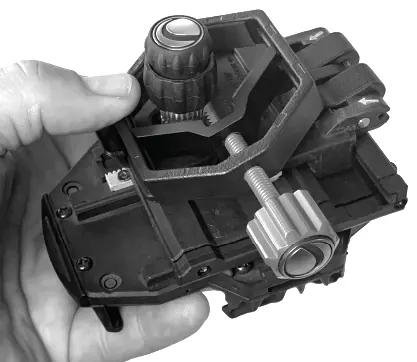
- Place your smartphone into the holder.
- Use the X and Y adjustment knobs to move the phone holder until the camera lens is perfectly centered over the eyepiece.
- Ensure your phone is securely held in place.
- The adapter is compatible with smartphones up to 5 inches (127mm) in width.
Bluetooth remote operation
The Bluetooth remote allows you to trigger the shutter on your phone remotely.

Battery replacement
To insert or replace the battery:
- Place your thumb in the center of the back cover.
- Press inward and slide downward to remove the battery door.
- Insert a CR2032 battery with the positive (+) side facing upward.
- Replace the cover.
Pairing and usage
- Press and hold the button on the remote for 5 seconds. A blue light will turn on and start to blink, indicating the remote is in pairing mode.
- Open the Bluetooth settings on your phone and pair with the device named "GBshutter".
- Open your camera app. Press the button on the remote to trigger the shutter.
- If your camera is in video mode, press the button once to start recording and again to stop.
Manufacturer information
Celestron
Practical help
Common problems
Remote not pairing
Ensure the CR2032 battery is inserted with the positive (+) side facing up. Hold the button for 5 seconds until the blue light blinks before attempting to pair.
Camera not centered
Use the X and Y adjustment knobs on the adapter to fine-tune the position of the phone until the camera lens aligns with the eyepiece.
Before use
- Verify your smartphone width is less than 5 inches (127mm).
- Ensure a CR2032 battery is installed in the remote.
- Identify the eyepiece diameter of your optical device.
- Ensure the adapter is securely clamped to the eyepiece.
Images and diagrams
- Steps 1-6 illustrate the process of clamping the adapter to the eyepiece.
- Steps 8-9 demonstrate how to use the X and Y knobs to align the phone.
- Step 7 shows the maximum phone width limitation.
Model compatibility
- Compatible with smartphones up to 5 inches (127mm) wide.
- Works with various optical devices including telescopes, binoculars, and microscopes.

Manual page author
Michael Turner
Technical manual editor
Reviews PDF manuals for structure, safety notes, and practical product details so readers can find the right information quickly.