Optics / Telescope Accessories
User Manual for Celestron ThermoCharge 3 2-in-1 Hand Warmer and Power Bank
Quick guide for the Celestron ThermoCharge 3 2-in-1 Hand Warmer and Power Bank. Learn how to charge the internal battery, use the hand warmer feature, charge external devices, and understand LED status indicators.
Quick answers from the manual
Quick answer
- The Celestron ThermoCharge 3 is a 2-in-1 device that acts as a 3000 mAh power bank and a hand warmer. It charges via a Mini USB port and provides 5V-1A output for external devices. p. 1
Key actions
- Charge the internal battery p. 1
- Activate hand warmer p. 1
- Charge external device p. 1
First start
- Charge the device completely before using it for the first time. p. 1
Maintenance and reset
- Discharge and recharge fully every 3-4 months to maintain optimal battery life. p. 1
Technical specifications
| Parameter | Value | Meaning | Pages |
|---|---|---|---|
| Battery | 3000 mAh | Rechargeable lithium polymer | p. 1 |
| Input | 5V-1A | Mini USB Connector | p. 1 |
| Output | 5V-1A | Standard 2.0 USB Connector | p. 1 |
Where to find it in the PDF
- English Manual p. 1
- French Manual p. 2, 3
Table of contents
Quick guide from the manual
The Celestron ThermoCharge 3 is a 2-in-1 device that functions as both a 3000 mAh power bank and a hand warmer. Before first use, it is recommended to charge the device completely. The device features a Mini USB input for charging and a standard USB 2.0 port for powering external devices.
Product Overview
The device includes the following components:
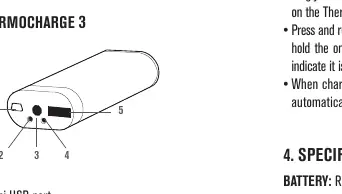
- Mini USB port: Used for charging the internal battery.
- USB 2.0 port: Used to charge external devices.
- On/off button: Controls the hand warmer and power bank functions.
- LED indicators: Provide status updates on charging and hand warmer mode.
Charging the Internal Battery
- Connect the included USB cable to the Mini USB port on the ThermoCharge 3.
- Plug the standard USB end into a PC, laptop, car charger, or 5V-1A adapter.
- The blue LED will blink to indicate charging is in progress.
- Charging is complete when the blue LED stops blinking.
Note: The device has overcharge protection. For extended storage, charge the battery for at least one hour.
Using the Hand Warmer
- Press the on/off button once to activate the hand warmer.
- The unit will heat up to its maximum temperature (104° to 113°F / 40° to 45°C) within minutes.
- Press the on/off button again to turn the unit off.
Charging External Devices
- Plug your device's USB charging cable into the USB 2.0 port on the ThermoCharge 3.
- Press the on/off button quickly, then press and hold it to begin charging.
- The device will automatically power off when the charge is complete.
LED Status Indicators
- Blue LED: Indicates the internal battery is charging.
- Green LED: Indicates the ThermoCharge 3 is charging an external device.
- Red LED: Indicates the hand warmer mode is active.
Safety and Maintenance
- Do not store the battery in high-temperature environments or direct sunlight.
- Do not disassemble, modify, or attempt to repair the battery.
- Keep the battery dry; do not submerge in liquid.
- If the battery is deformed, emits an odor, or shows signs of damage, stop use immediately.
- Discharge and recharge the battery fully every 3-4 months if stored for more than 6 months to maintain battery life.
Manufacturer information
Celestron
Practical help
Common problems
Device not charging
Ensure you are using a 5V-1A adapter and that the cable is securely connected to the Mini USB port.
Hand warmer not heating
Ensure the unit is turned on by pressing the on/off button once. Check if the red LED is illuminated.
Battery life seems short
Ensure the device is fully charged (5 hours). Avoid storing in extreme temperatures.
Before use
- Charge the device completely before first use.
- Inspect the unit for any physical damage (dents, punctures, corrosion).
- Ensure the environment is within the operating temperature range (32° to 113°F).
- Use only the provided USB cable or a compatible 5V-1A source.
Specs in practice
- Battery Capacity
- 3000 mAh Lithium Polymer battery.
- Hand Warmer Temp
- Operates between 104° and 113°F (40° to 45°C).
Images and diagrams
- 1: Mini USB port for charging the internal battery.
- 2: Green/Red LED status indicators.
- 3: On/off button.
- 4: Blue LED indicator for internal battery charging.
- 5: USB 2.0 port for charging external devices.
Model compatibility
- Compatible with most USB-powered devices (cell phones, MP3 players).
- Not intended for use by children without adult supervision.
- Intended for users 14 years of age and older.

Manual page author
Emily Carter
User documentation editor
Prepares concise manual descriptions and highlights the most useful setup, operation, and maintenance information for readers.