Electronics / Headphones Earbuds
User Manual for Chug 212WGH01C Wireless Gaming Headset
Quick guide for the Chug 212WGH01C Wireless Gaming Headset. Learn how to connect to PS4, Xbox, PC, and Nintendo Switch, understand LED indicators, and manage volume and mute controls.
Quick answers from the manual
Quick answer
- To power on the headset, hold the power button for 3 seconds. To enter pairing mode, hold the power button for 5 seconds. p. 1
Key actions
- Power on/off p. 1
- Mute microphone p. 1
First start
- Charge the device via Type-C port and plug the 2.4Ghz receiver into your device. p. 1
Show 3 more answers Show less
Problems and fixes
Headset not pairing
Hold the power button for 5 seconds.
p. 1Technical specifications
| Parameter | Value | Meaning | Pages |
|---|---|---|---|
| Input | 5V 400mA | Power input requirements | p. 1 |
Where to find it in the PDF
- Headset controls and setup instructions p. 1
Table of contents
Quick guide from the manual
This document provides setup and operation instructions for the Chug 212WGH01C Wireless Gaming Headset. It covers connectivity for major gaming platforms, button functions, and LED status indicators to help you get started quickly.
Device Overview
The headset features the following controls and ports:
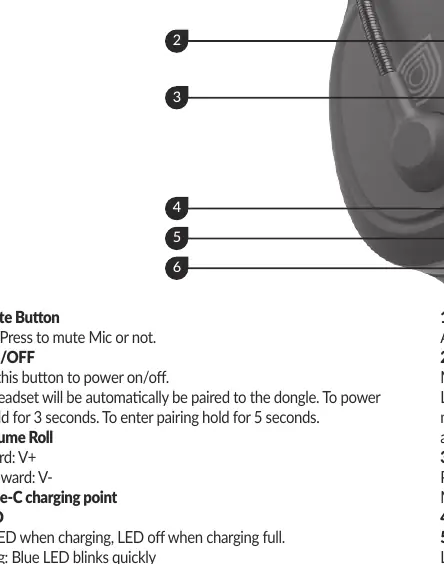
- 1. Mute Button: Short press to mute or unmute the microphone.
- 2. ON/OFF: Hold to power on/off. Hold for 5 seconds to enter pairing mode.
- 3. Volume Roll: Scroll upward for V+ (volume up) and downward for V- (volume down).
- 4. Type-C charging point: For charging the device.
- 5. LED: Indicates charging status and connection state.
- 6. Aux in Port: For wired connections.
LED Indicators
- Charging: Red LED is on while charging; LED turns off when fully charged.
- Pairing: Blue LED blinks quickly.
- Paired: Blue light remains constant.
- Unpaired: Blue LED blinks every 1 second.
Setup by Platform
PS4
- Plug the 2.4Ghz receiver into the USB port on the front of the console.
- The headset will automatically pair to the dongle. Hold the power button for 3 seconds to turn on.
- Navigate to Settings > Devices > Audio Devices.
- Set Input and Output device to USB Headset.
- Change "Audio Output to Headphones" to "Chat Audio".
- Adjust volume and microphone levels as desired.
Xbox
- Connect the headset to the controller using the provided 3.5mm AUX cable.
PC
- Plug the 2.4Ghz receiver into an audio-enabled USB port on your PC.
- Hold the power button for 3 seconds to turn on.
- Set audio input and output to the USB-connected device in your PC sound settings.
- If experiencing issues, ensure the USB device is selected for default communications in your sound control settings.
Nintendo Switch
- Use the headset in wired mode.
Practical help
Common problems
Headset not pairing
Hold the power button for 5 seconds to enter pairing mode.
No audio on PC
Ensure the USB device is selected as the default communication device in your PC sound control settings.
No audio on PS4
Verify that 'Audio Output to Headphones' is set to 'Chat Audio' in the Audio Devices settings.
Before use
- Charge the headset using the Type-C port.
- Ensure the 2.4Ghz receiver is plugged into the console or PC.
- For Xbox, ensure you have the 3.5mm AUX cable ready.
- Power on the headset by holding the power button for 3 seconds.
Show more Show less
Images and diagrams
- The headset features a volume roll, mute button, and power button on the ear cup.
- The LED indicator is located on the headset to show pairing and charging status.
- The Type-C port is used for charging, and the Aux port is for wired connections.
Model compatibility
- Compatible with PS4, Xbox (wired), PC, and Nintendo Switch (wired).

Manual page author
Michael Turner
Technical manual editor