Lighting / Stage Lighting
User Manual for Citronic CosmoPAR 154.075UK LED PAR Light
Quick guide for the Citronic CosmoPAR 154.075UK LED PAR light. Includes setup, DMX channel configurations, menu settings, and troubleshooting.
Table of contents
Manual images
Click an image to enlargeQuick guide from the manual
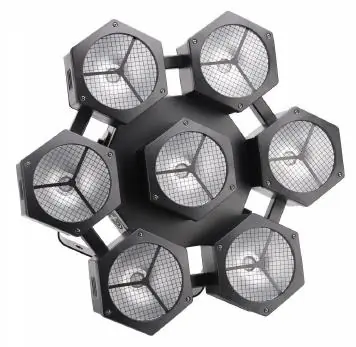
The Citronic CosmoPAR is a heavy-duty retro-style PAR light featuring 7 bright 40W RGBW COB LEDs. It is designed for stage backgrounds and larger events. The unit can be controlled via auto, sound-to-light, master/slave programs, or DMX (6, 9, 21, or 30 channels). Ensure the unit is kept away from damp or dusty environments and that there is adequate airflow around the fixture housings.
Placement and cleaning
For optimal performance and longevity, ensure the unit has adequate access to controls and connections. To clean the casing, use a soft cloth with a neutral detergent. Use a vacuum cleaner to clear dust or debris from the ventilation grilles. Do not use strong solvents.
Side panel controls
The side panel contains the following interfaces:
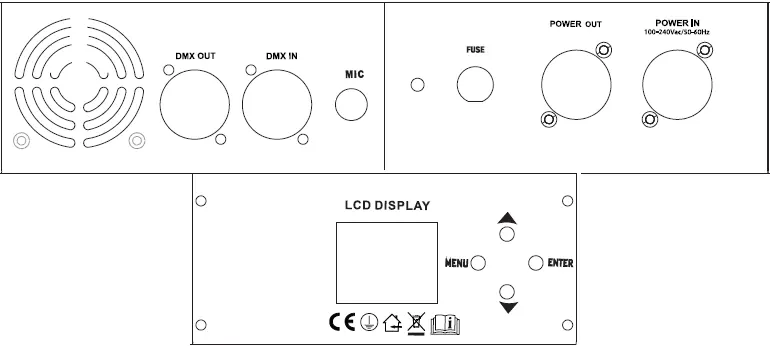
- DMX output: For daisy-chaining fixtures.
- DMX input: For connecting the DMX signal source.
- Microphone: For sound-to-light mode.
- LCD display: For menu navigation.
- Control panel: Buttons for Menu, Up, Down, and Enter.
- Fuse: Protection for the unit.
- Power output: Twist and lock connector.
- Power input: Twist and lock connector (100-240Vac).
Manual control menu
Press the MENU button to enter the settings menu. Use the UP and DOWN buttons to navigate through functions and press ENTER to save settings. Key modes include:
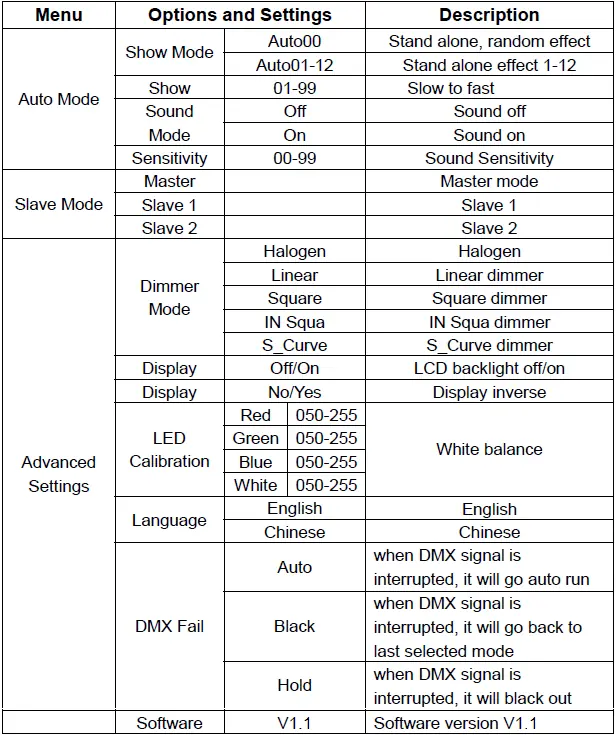
- Auto Mode: Includes Show Mode (random or 1-12 effects), Sound mode (on/off), and Sound Sensitivity.
- Slave Mode: Master, Slave 1, and Slave 2 settings.
- Advanced Settings: Includes Dimmer Mode (Halogen, Linear, Square, etc.), Display settings, LED Calibration (White balance), Language, and DMX Fail behavior (Auto, Black, or Hold).
DMX operation
To control the unit via DMX, connect the signal source to the DMX input using a balanced XLR lead. You can loop to extra fixtures via the DMX output. Select 'Addr' from the menu to set the start address. The unit supports 6, 9, 21, or 30 DMX channels, allowing for detailed control over total dimmer, individual LED dimmers, strobe effects, and color modes.
Specifications
- Power: 100 - 240Vac, 50/60Hz
- Power consumption: 260W
- Fuse rating: F5A
- LED power: 7 x 40W COB RGBW LED
- Beam angle: 40°
- Dimensions: 159 x 215 x 200mm
- Weight: 1.8kg
Troubleshooting
If you encounter issues, check the following:
- No power: Check mains lead and fuse. Ensure the unit is switched on.
- No light output: Check control panel mode settings and DMX controller settings (dimmer levels, blackout).
- Unresponsive to DMX: Ensure the unit is in DMX mode, the correct address is set, and the DMX signal is being received. Check that the controller is not set to blackout.
- Overheating: Ensure adequate ventilation and that the unit is not too close to a heat source.
Practical help
Common problems
No power (mains)
Check the mains lead and fuse. If the fuse blows repeatedly, refer to your dealer. Ensure the power switch is in the On position.
No light output
Check control panel mode settings and verify DMX controller settings (dimmer levels, blackout).
Unresponsive to DMX
Ensure the unit is in DMX mode, the correct DMX address is set, and the DMX signal is being received. Check that the controller is not set to blackout and is on the correct fixture/page.
Overheating/cutting out
Ensure adequate ventilation and that the unit is not placed too close to a heat source.
Before use
- Check contents: 1 x main unit, 1 x UK twist and lock mains lead, 1 x user guide.
- Ensure the unit is dry and kept away from damp or dusty environments.
- Ensure adequate airflow around the fixture housings.
- Ensure adequate access to controls and connections.
- Verify the power source is 100-240Vac.
Specs in practice
- DMX Channels
- Supports 6, 9, 21, or 30 channels for varying levels of control complexity.
Images and diagrams
- The side panel features DMX input/output (3-pin XLR), microphone, LCD display, control buttons (Menu, Up, Down, Enter), fuse, and power input/output (twist and lock).
Model compatibility
- Requires a DMX controller for advanced lighting control.
- Uses standard 3-pin XLR cables for DMX signal.

Manual page author
David Miller
Documentation analyst
Organizes user manual content into clear summaries, with attention to model details, product context, and everyday usability.