Tools / Construction Equipment
User Manual for Clarke 125L Cement Mixer CCM125D
Quick guide for the Clarke 125L Cement Mixer (CCM125D). Includes assembly instructions, operation steps, safety precautions, and maintenance tips.
Table of contents
Manual images
Click an image to enlargeQuick guide from the manual
This manual provides essential instructions for the safe assembly, operation, and maintenance of the Clarke 125L Cement Mixer (Model CCM125D). Always read the full manual before use. Key safety requirements include wearing appropriate protective gear (gloves, ear defenders, safety glasses), operating only on firm, level ground, and ensuring the machine is disconnected from the power supply before maintenance or moving.
Safety Precautions
- Work Area: Keep the area clean, well-lit, and free of clutter.
- Protective Gear: Always wear industrial gloves, ear defenders, and impact-resistant safety glasses. Use a dust mask when handling cement.
- Operation: Never operate on a gradient. Keep children and bystanders away. Do not leave the machine running unattended.
- Handling: Never put hands or tools inside the drum while it is rotating. Do not wear loose clothing or jewelry.
- Electrical Safety: Inspect the power cable before use. Disconnect from the power supply when not in use.
Electrical Connections
The mixer operates on a 230V (50Hz) supply. It is a Class II product and does not require an earth connection. It is strongly recommended to connect the machine via a Residual Current Device (RCD). Wiring color code: Blue = Neutral, Brown = Live.
Assembly
The mixer requires assembly before use. Ensure all components are present as listed in the unpacking section. Key steps include:
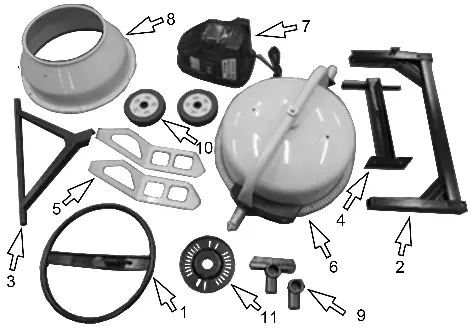
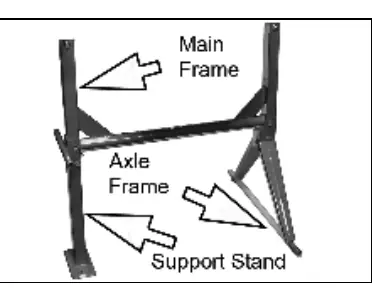


- Bolt the main frame to the axle frame and support stand.
- Attach wheels using flat washers and split pins.
- Install bearing housings and the lower drum assembly onto the main frame.
- Attach the angle adjusting plate and tilt handwheel.
- Install the motor/drive assembly, ensuring the drive spindle aligns with the pulley.
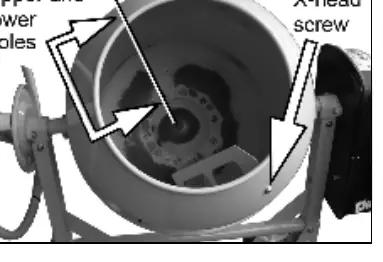
- Fit the upper drum to the lower drum, ensuring alignment arrows match, and secure with screws.
Operation
- Switch the mixer on using the green (I) button.
- Introduce water first to prevent clogging.
- Add cement and aggregate as required.
- Always keep the drum rotating while loading and emptying.
- Use the tilt wheel to tip the drum forward for discharge.
Care and Maintenance
Cleaning: It is essential to hose down the machine thoroughly with clean water after every use to prevent cement residue from hardening. The drum can be scoured by running it with coarse gravel and water.
Storage: Store in a dry place out of reach of children. The axle frame and support stand can be folded for storage. Keep the drum inverted to exclude water or debris.
Maintenance: Bearings are sealed for life and require no maintenance. The drive belt is under constant tension and does not require adjustment.
Manufacturer information
Clarke International
Practical help
Common problems
Mixer clogging
Introduce water first before adding cement and aggregate to prevent buildup.
Difficulty removing dried cement
Thoroughly clean the drum with water after every use. Do not allow residue to harden.
Motor strain
Avoid stopping and starting the mixer while it is heavily loaded.
Unstable operation
Always operate on firm, level ground. Never use on a gradient.
Before use
- Inspect the power cable for damage.
- Ensure the work area is clean and well-lit.
- Wear protective gear: gloves, ear defenders, and safety glasses.
- Check that all components are secure after assembly.
- Ensure the mixer is on firm, level ground.
Specs in practice
- Max drum capacity
- 125 Litres
- Max mixing capacity
- 79 Litres
Images and diagrams
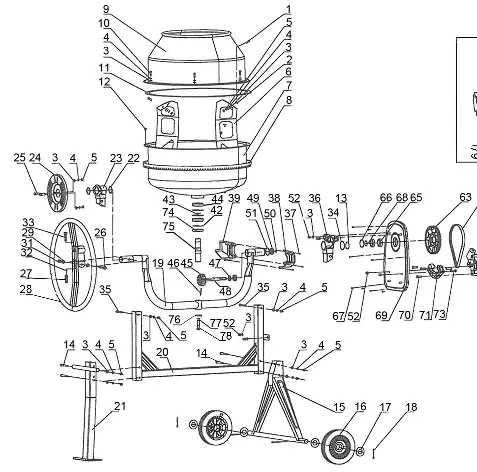
- The parts diagram (page 14) identifies all components by ID for assembly and maintenance.
- The assembly section (pages 7-9) provides step-by-step instructions for frame, drum, and motor installation.
Model compatibility
- Requires 230V (50Hz) electrical supply.
- Class II product (no earth connection required).
- Recommended to use with a Residual Current Device (RCD).

Manual page author
Emily Carter
User documentation editor
Prepares concise manual descriptions and highlights the most useful setup, operation, and maintenance information for readers.