Tools / Construction Equipment
User Manual for Clarke Summit Pro 18SQ Wet-Dry Vacuum
Quick guide for the Clarke Summit Pro 18SQ wet-dry vacuum. Includes assembly instructions, wet and dry pickup procedures, maintenance tips, and parts diagrams.
Table of contents
Manual images
Click an image to enlargeQuick Start and Safety
The Clarke Summit Pro 18SQ is designed for commercial indoor use. Before operating, ensure you are trained and authorized. Always verify the machine is grounded using the provided three-prong plug. Do not use extension cords with this machine. Ensure all safety devices are in place and the power cord is free of damage before starting.
Handle Assembly
To assemble the handle:
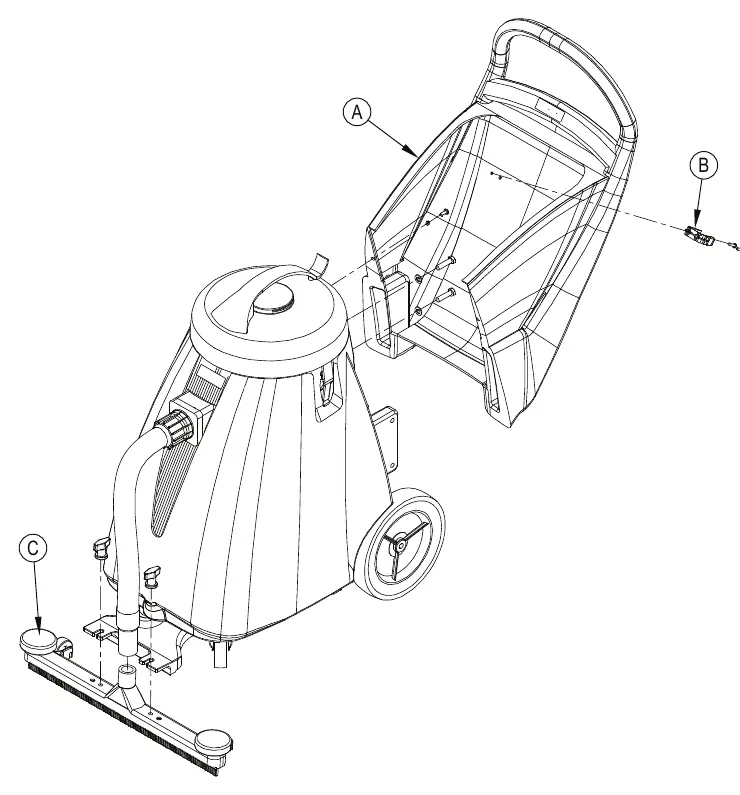
- Remove the handle from the shipping position and remove the upper handle mounting screws from the machine.
- Realign the handle as shown in the diagram and replace the screws and washers.
- Attach the rear hose dump clamp.
- Attach the front mount squeegee.
Operating the Vacuum
Wet Pickup:
- Remove the vacuum head and the cloth or paper filter.
- Install the "Bubble Buster" (blue nylon foam suppression bag). This is mandatory for all wet pickup applications to prevent motor damage.
- Check that the float shut-off is unobstructed.
- Replace the vacuum head and latch it.
- Connect the vacuum hose and appropriate accessory.
- Lower the squeegee to the floor using the pedal at the rear of the machine.
- If foam develops, use a de-foamer chemical.
Dry Pickup:
- Remove the vacuum head and the Bubble Buster.
- Ensure the cloth or paper filter is properly installed.
- Replace the vacuum head and latch it.
- Connect the vacuum hose and accessory.
- Check the filter bag periodically and replace when 3/4 full.
Maintenance and Storage
Always unplug the machine before performing maintenance.
- After each use: Drain and rinse the recovery tank, clean the float shut-off, and check the filter bag.
- Cleaning: Clean the outside of the machine with a mild cleaner and wipe squeegee blades with a cloth (do not use fingers).
- Monthly: Lubricate wheels, casters, and axles with water-resistant lubricant.
- Storage: Store in an upright position in a dry area. Keep the squeegee assembly off the ground and remove the vacuum head to allow the tank to breathe.
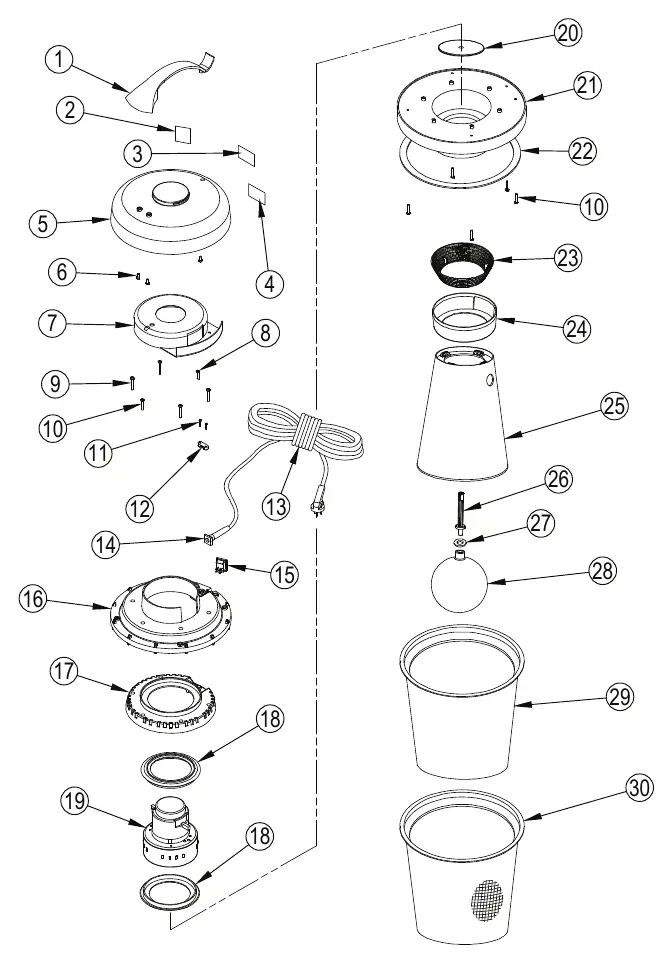
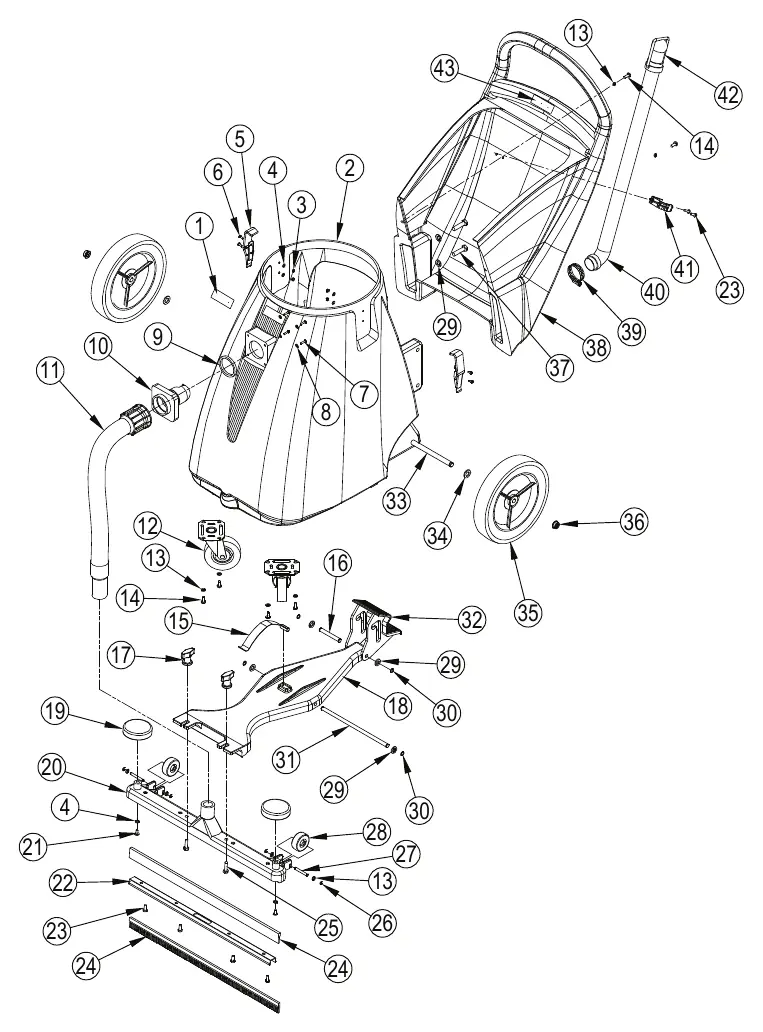
Parts and Wiring
The manual includes detailed exploded-view diagrams for the Vac Head Assembly, Tank Assembly, and Accessories. A wiring diagram is provided to assist with electrical troubleshooting. Always use manufacturer-supplied or approved replacement parts for repairs.
Manufacturer information
Clarke International
Practical help
Common problems
Foam in recovery tank
Use a de-foamer chemical. Foam will not activate the float shut-off and can damage the vacuum motor.
Loss of suction
Check for clogs in the vacuum hose or ensure the filter bag is not full.
Machine will not start
Ensure the power cord is plugged into a grounded outlet and the switch is in the 'on' position.
Before use
- Ensure the machine is grounded.
- Check that the filter or bag is properly installed for the specific task.
- Verify the float shut-off is unobstructed.
- Ensure the handle is securely assembled.
- Check the power cord for any damage.
Specs in practice
- Bubble Buster (GV25014)
- A blue nylon foam suppression bag required for all wet pickup applications to protect the motor.
- Float shut-off
- An automatic mechanism that prevents water from entering the recovery tank when it is full.
Images and diagrams
- Handle Assembly: Illustrates the correct positioning of the handle and attachment of the squeegee.
- Vac Head Assembly: Exploded view showing motor, filter, and float components.
- Tank Assembly: Exploded view showing wheels, drain hose, and squeegee pedal mechanism.
- Accessories: Shows available tools like dusting tools, crevice tools, and floor adapters.
Model compatibility
- For commercial indoor use only.
- Do not use extension cords.
- Use only recommended accessories.

Manual page author
Michael Turner
Technical manual editor
Reviews PDF manuals for structure, safety notes, and practical product details so readers can find the right information quickly.