Tools / Construction Equipment
User manual for Clarke 18V Cordless Drill CON18LiC
Quick guide for the Clarke 18V Cordless Drill (CON18LiC). Learn how to charge the battery, adjust torque, select drilling modes, and maintain your tool for optimal performance.
Table of contents
Manual images
Click an image to enlargeQuick guide from the manual
This manual provides operation and maintenance instructions for the Clarke 18V Cordless Drill (Model: CON18LiC). The package includes the drill, a battery charger, and two Li-Ion battery packs. Always read the safety precautions before use.
Safety Precautions
- Keep the work area clean and well-lit.
- Do not operate in explosive atmospheres (flammable liquids, gases, or dust).
- Keep children and bystanders away.
- Wear appropriate safety equipment, including eye protection.
- Ensure the switch is in the off position before connecting to the power supply.
- Do not force the tool; use the correct tool for the application.
- Disconnect the battery before making adjustments or changing accessories.
Battery Charging
The battery must be charged before operating the drill. Charge at ambient temperatures between -10°C and 45°C.
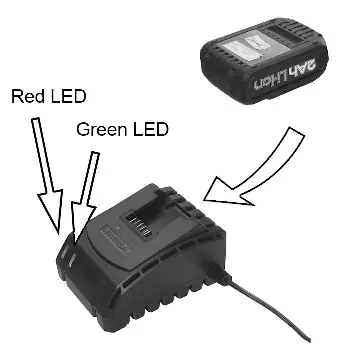
- Connect the charger to the mains supply; the green power indicator will light up.
- Slide the battery onto the charger. The green indicator stays on, and the red charging LED flashes while charging.
- When fully charged, both red and green LEDs will be on.
- If both LEDs flash rapidly, the battery is too hot or defective.
Before Use
Fitting the Battery: Slide the battery pack onto the base of the handle until it clicks.
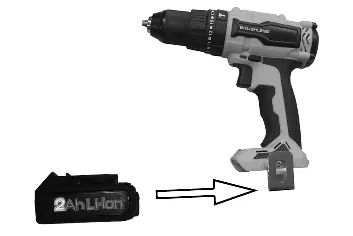
Removing the Battery: Press and hold the release button on top of the battery and slide it away from the handle.
Inserting Bits: Grip the chuck collar and rotate the front of the chuck anti-clockwise. Insert the bit into the jaws, then rotate the chuck sleeve clockwise to tighten.
Adjustments
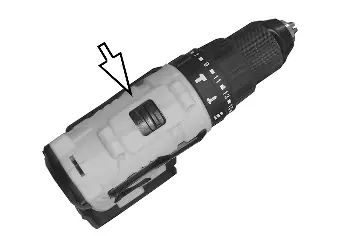
Forward/Reverse Operation: Use the switch above the trigger to select the direction of rotation. The central position acts as a safety lock.
Speed Range: Use the selector on top of the drill to choose between Setting 1 (0-400 rpm) or Setting 2 (0-1500 rpm). Only change speed when the chuck is stationary.
Selecting the Drilling Mode
Rotate the mode selector collar to align the symbol with the arrow on the casing:
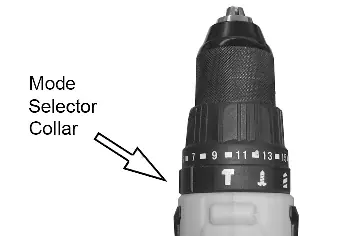
- Hammer drilling mode: For concrete and masonry (use masonry bits).
- Rotary drill mode: For general drilling.
- Screwdriver mode: For driving screws.
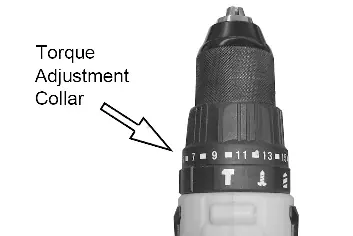
Torque Adjustment
In screwdriver mode, set the torque selector to 1. Fit the screw; if the clutch ratchets before the screw is seated, rotate the collar to a higher number until the screw head is flush with the workpiece.
Maintenance
- After use, remove the bit and clean the chuck.
- Keep cooling vents clear.
- Clean the motor housing and handle with a soft cloth.
- Keep the charger clean and free from dust.
- There are no user-serviceable parts inside the drill.
Specifications
- Battery voltage: 18V (2000 mAh)
- Max Torque: 50 Nm
- Chuck capacity: 1.5 mm - 13 mm
- Max Drilling Capacity: Wood (25 mm), Steel (10 mm), Masonry (8 mm)
- Weight: 1.5 kg
Manufacturer information
Clarke International
Practical help
Common problems
Drill will not start
Ensure the forward/reverse switch is not in the central locked position.
Battery not charging
Check mains connection. If both LEDs on the charger flash rapidly, the battery is either too hot or defective.
Clutch ratchets before screw is seated
Increase the torque setting on the adjustment collar.
Before use
- Ensure the battery is fully charged.
- Check that the forward/reverse switch is in the central locked position when changing bits.
- Ensure the correct drill bit type is used for the material (e.g., masonry bits for hammer mode).
- Verify the speed range selector is set correctly for the task.
Specs in practice
- Setting 1 (0-400 RPM)
- Low speed, high torque range, suitable for heavy-duty drilling or driving large screws.
- Setting 2 (0-1500 RPM)
- High speed, low torque range, suitable for fast drilling in wood or metal.
- Torque settings (21)
- Allows precise control over the driving force to prevent over-tightening screws.
Images and diagrams
- Forward/Reverse switch: Located above the trigger; central position locks the drill.
- Mode selector collar: Rotate to select between hammer, drill, and screwdriver modes.
- Torque adjustment collar: Rotate to set the clutch sensitivity for screwdriving.
Model compatibility
- Use only the battery charger specified by the manufacturer.
- Hammer mode is strictly for concrete and masonry.

Manual page author
Emily Carter
User documentation editor
Prepares concise manual descriptions and highlights the most useful setup, operation, and maintenance information for readers.