Power / Batteries Chargers
Instruction Manual for CORE 13FT Instant Canopy
A comprehensive guide for the CORE 13FT Instant Canopy, covering setup, height adjustment, takedown procedures, maintenance, and safety warnings.
Table of contents
Quick guide from the manual
This document provides instructions for the assembly, operation, and maintenance of the CORE 13FT Instant Canopy (Model #40155). For optimal setup, we recommend two people, a rubber mallet, and a level surface. Always ensure the canopy is fully secured with stakes and guylines to prevent damage.
Assembly and Setup
- Extend Canopy Frame: Expand and spread the frame halfway. Avoid pinch points during this process.
- Fully Extend Frame: Drape the canopy over the frame and have two people pull from opposite corners to fully extend it.
- Lock and Secure Canopy Frame: Grasp the canopy leg above the gray button and push up on the apex support pole until the gray button clicks into the locked position. Repeat for all four poles.
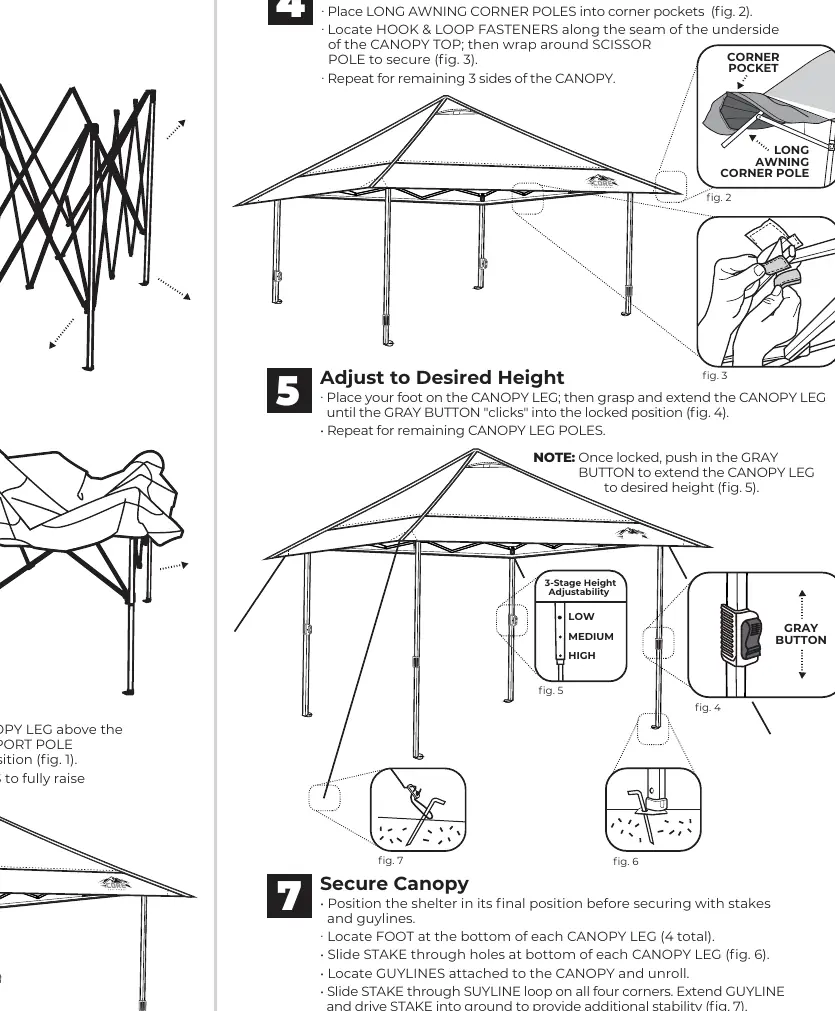
- Attach Canopy to Frame: Place long awning corner poles into corner pockets. Secure the canopy top to the frame using the hook and loop fasteners along the underside seams.
- Adjust to Desired Height: Place your foot on the canopy leg, grasp the leg, and extend it until the gray button clicks. Use the gray button to adjust to the desired height setting (Low, Medium, or High).
- Secure Canopy: Position the shelter, slide stakes through the holes at the bottom of each leg, and secure the guylines at a 45-degree angle using stakes.
Take Down Instructions
To disassemble, perform the assembly steps in reverse order. Remove all stakes, release hook and loop fasteners, press gray buttons to telescope legs down, and release the apex support poles. Fold the frame carefully to avoid pinch points and store in the carry bag.
Maintenance and Care
- Cleaning: Clean the canopy top with a soft sponge, mild soap, and tepid water. Let it air dry in the sunlight.
- Storage: Always store in a clean, dry area. Ensure the canopy is completely dry before packing to prevent mold or damage. Remove stakes before storing in the carry bag.
- Waterproofing: The fabric is factory-treated and highly water-repellent but not waterproof. Use a seam sealing compound for additional moisture protection. Do not use chemical sprays as they may compromise the fire-retardant coating.
Safety Warnings
- Keep all flame and heat sources away from the fabric. The material is flame-resistant but not fireproof.
- Do not use fuel-burning devices inside or near the shelter.
- Do not set up under trees due to the risk of lightning or falling limbs.
- Do not leave the shelter set up for weeks at a time to avoid UV damage.
Practical help
Common problems
Canopy legs not locking into place
Ensure the gray buttons are secure and extend the pole further until it clicks into place.
Difficulty extending the roof assembly
Ensure the frame is stretched out fully and the roof assembly is locked before raising the canopy legs.
Seam leakage during wet weather
Apply a seam sealing compound to the shelter, ideally during initial setup and before each camping season.
Before use
- Ensure you have two people for assembly.
- Select a level area for setup.
- Check that all parts (poles, joints, stakes) are present.
- Verify the canopy top is attached before extending legs.
- Ensure all guylines are available for securing the shelter.
Specs in practice
- 3-Stage Height Adjustability
- Allows the canopy to be set at Low, Medium, or High positions using the gray button mechanism.
Images and diagrams
- Fig 1: Shows the apex support pole and gray button locking mechanism.
- Fig 2 & 3: Illustrates attaching the long awning corner poles and securing hook & loop fasteners.
- Fig 4 & 5: Demonstrates the leg extension and height adjustment process.
- Fig 6 & 7: Shows the correct method for staking the legs and guylines.
Model compatibility
- Replacement parts are available by contacting customer service at 1-888-775-5628.
- The warranty is valid for one year for the original purchaser.

Manual page author
Michael Turner
Technical manual editor
Reviews PDF manuals for structure, safety notes, and practical product details so readers can find the right information quickly.