Furniture / Furniture Hardware
Corston 10043 Shelf Bracket Installation Guide
Installation guide for the Corston 10043 shelf bracket. Includes a list of required tools, step-by-step mounting instructions for timber and stone shelves, and maintenance advice.
Quick answers from the manual
Quick answer
- The Corston 10043 shelf bracket is installed by marking positions, drilling 8mm holes (40mm deep), fixing the bracket to the wall, and securing the shelf using either 18mm screws (for timber) or contact adhesive (for stone). p. 1, 2
Key actions
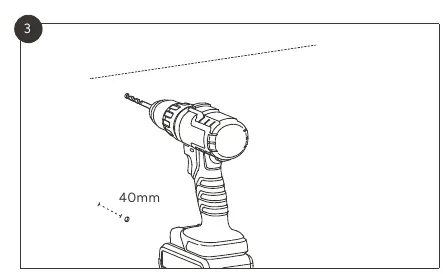
- Drill 8mm holes to a depth of 40mm. p. 2
- Secure timber shelves using the provided 18mm screws. p. 2
- Secure stone shelves using contact adhesive. p. 2
Maintenance and reset
- Clean with a mild detergent and damp cloth; avoid chemical cleaners. p. 1
Technical specifications
| Parameter | Value | Meaning | Pages |
|---|---|---|---|
| Hole diameter | 8mm | Required drill bit size for wall holes | p. 2 |
| Hole depth | 40mm | Required depth for wall holes | p. 2 |
Where to find it in the PDF
- Included items and tools p. 1
- Installation steps p. 2
Table of contents
Manual images
Click an image to enlargeQuick guide from the manual
This document provides instructions for installing the Corston 10043 shelf bracket. Before beginning, ensure you have determined the number of brackets required and their spacing. The installation process involves marking positions, drilling holes, and securing the bracket to the wall, followed by attaching the shelf using the appropriate method for your material (timber or stone).
Tools required
- Drill
- 5mm drill bit
- 8mm drill bit
- Spirit level
- Long crosshead screwdriver (PH2)
Installation steps
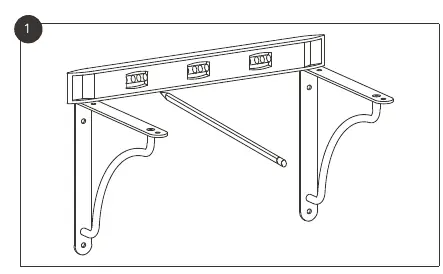
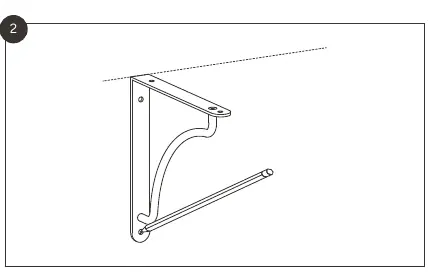
- Mark positions: Mark the horizontal shelf position on the wall.
- Mark holes: Use the shelf bracket to mark the vertical hole positions.
- Drill: Drill pilot holes where marked, followed by 8mm holes, 40mm deep.
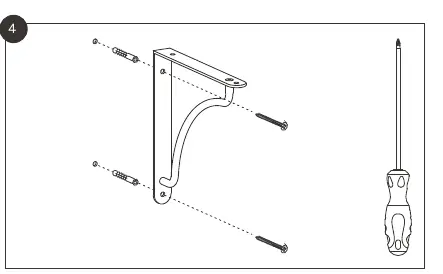
- Fix bracket: Insert wall plugs and use the long screws to fix the bracket to the wall. Use a long screwdriver to avoid damaging the bracket.
- Attach shelf: For timber shelves, use the 18mm screws provided. For stone shelves, use strong double-sided glazing tape or similar contact adhesive.
Care instructions
To maintain the hardware, use a mild detergent and a damp cloth. Avoid using chemical cleaners. Be careful not to touch the hardware with other metal or hard objects, as this is likely to scratch or damage the finish.
Practical help
Common problems
Bracket finish damaged
Avoid touching the hardware with other metal or hard objects and do not use chemical cleaners.
Before use
- 5mm drill bit
- 8mm drill bit
- Spirit level
- Long crosshead screwdriver (PH2)
Specs in practice
- Hole diameter
- 8mm
Images and diagrams
- Step 1: Mark horizontal shelf position.
- Step 2: Use bracket to mark vertical hole positions.
- Step 3: Drill pilot holes then 8mm holes to 40mm depth.
- Step 4: Fix bracket to wall using long screws and wall plugs.
- Step 5: Secure timber shelf with 18mm screws.
Model compatibility
- Timber shelves: Use 18mm screws provided.
- Stone shelves: Use strong double-sided glazing tape or contact adhesive.

Manual page author
Michael Turner
Technical manual editor
Reviews PDF manuals for structure, safety notes, and practical product details so readers can find the right information quickly.