Smart Home / Smart Switches
Installation Guide for Corston Regent Recessed Door Furniture and Hook Lock
A comprehensive installation guide for Corston Regent recessed door furniture and hook lock. This manual provides step-by-step instructions for installing small, medium, and edge pull handles, as well as the thumbturn and hook lock...
Quick answers from the manual
Quick answer
- This manual provides installation instructions for Corston Regent recessed door furniture, including small, medium, and edge pull handles, and the thumbturn & hook lock mechanism. p. 1
Key actions
- Install Small Pull Handle p. 2, 3
- Install Medium Pull Handle p. 4, 5
- Install Edge Pull Handle p. 6, 7
- Install Thumbturn & Hook Lock p. 8, 13
Where to find it in the PDF
- Small Pull Handle p. 2, 3
- Medium Pull Handle p. 4, 5
- Edge Pull Handle p. 6, 7
- Thumbturn & Hook Lock p. 8, 13
- Drilling Guides p. 14, 18
Table of contents
Manual images
Click an image to enlargeQuick Guide from the Manual
This document provides installation instructions for the Corston Regent range of recessed door furniture and hook locks. It covers the installation of small, medium, and edge pull handles, as well as the thumbturn and hook lock mechanism. Please ensure you have the correct tools, including a drill, appropriate drill bits, a spirit level, and polymer grab adhesive, before beginning installation.
Small Pull Handle Installation
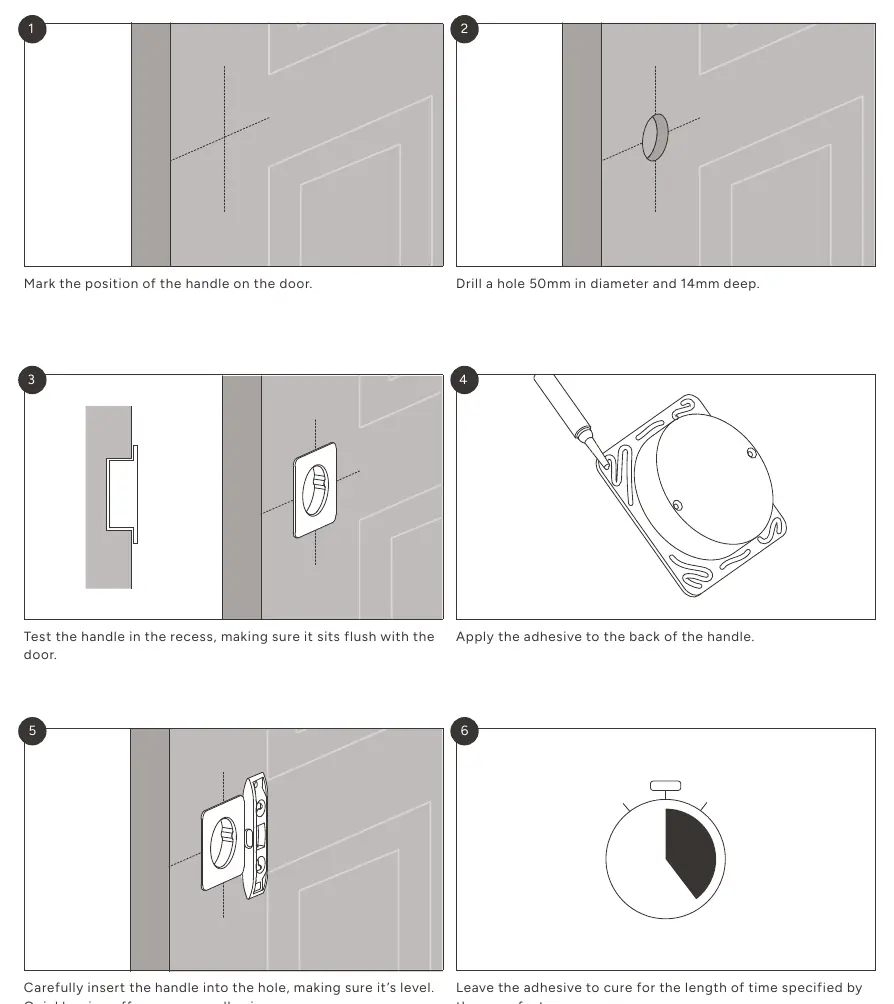
- Mark the position of the handle on the door.
- Drill a hole 50mm in diameter and 14mm deep.
- Test the handle in the recess to ensure it sits flush with the door.
- Apply polymer grab adhesive to the back of the handle.
- Carefully insert the handle into the hole, ensuring it is level.
- Quickly wipe off any excess adhesive and allow it to cure according to the manufacturer's instructions.
Medium Pull Handle Installation
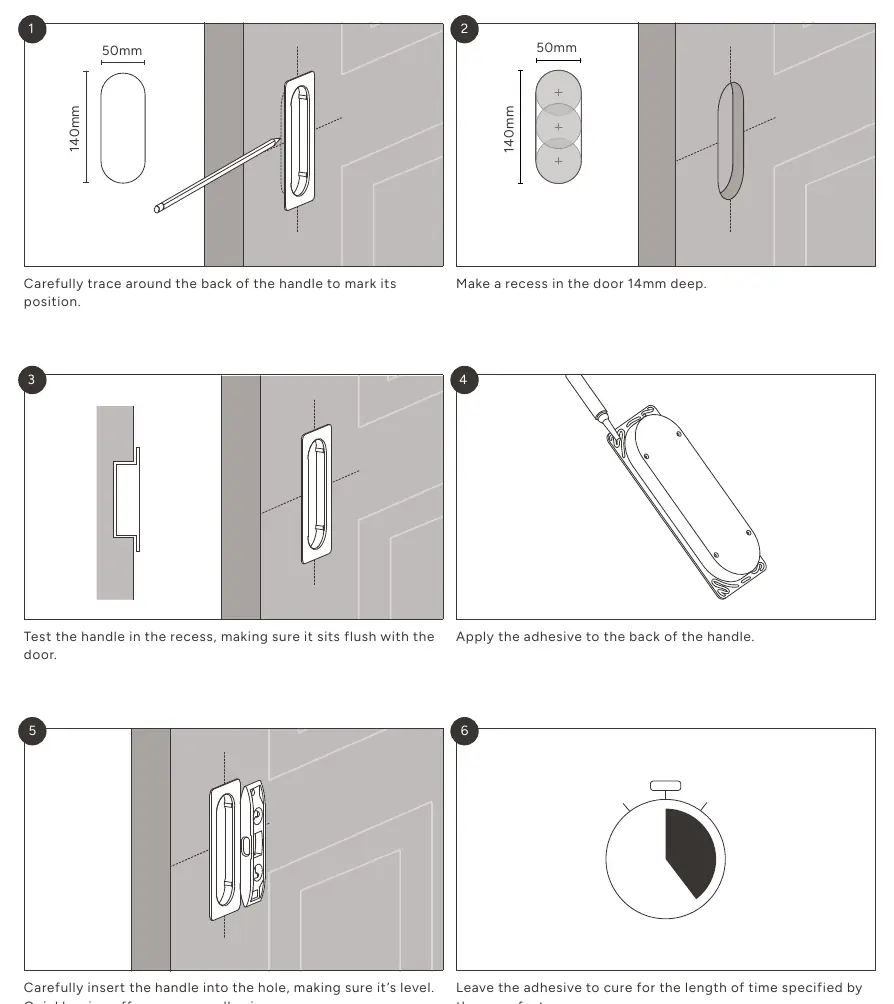
- Carefully trace around the back of the handle to mark its position on the door.
- Make a recess in the door 14mm deep.
- Test the handle in the recess to ensure it sits flush with the door.
- Apply polymer grab adhesive to the back of the handle.
- Carefully insert the handle into the hole, ensuring it is level.
- Quickly wipe off any excess adhesive and allow it to cure according to the manufacturer's instructions.
Edge Pull Handle Installation
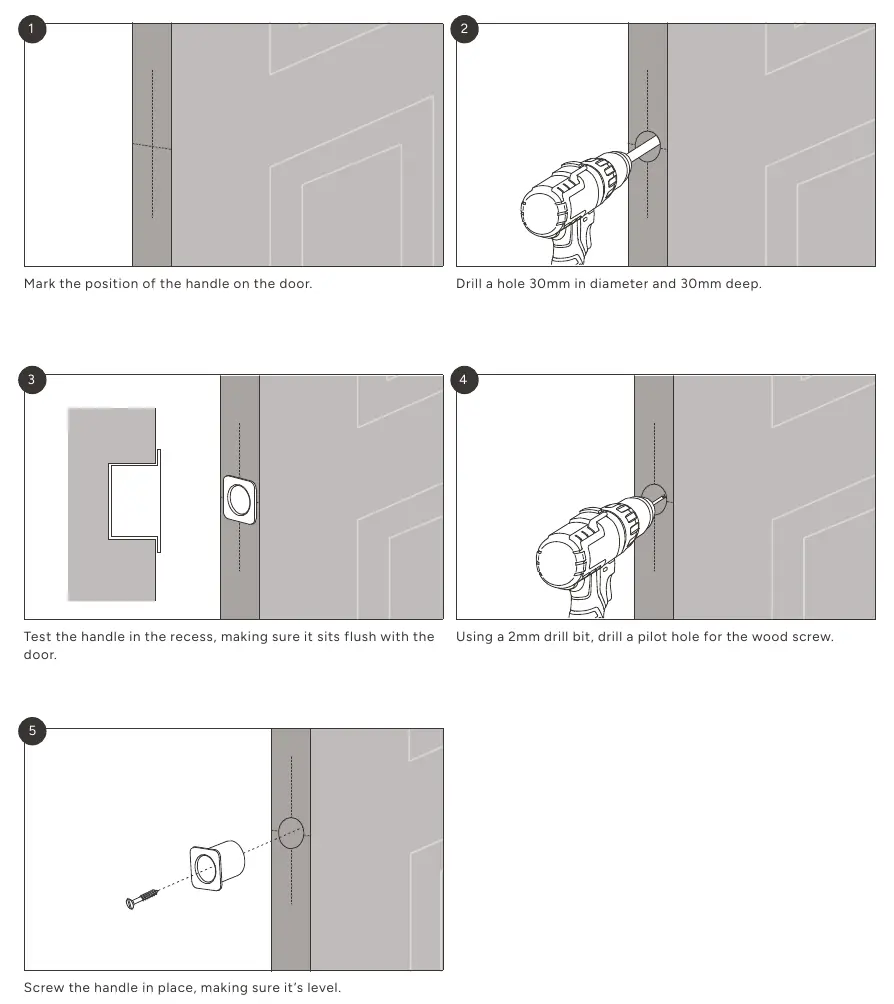
- Mark the position of the handle on the door.
- Drill a hole 30mm in diameter and 30mm deep.
- Test the handle in the recess to ensure it sits flush with the door.
- Using a 2mm drill bit, drill a pilot hole for the wood screw.
- Screw the handle in place, ensuring it is level.
Thumbturn & Hook Lock Installation
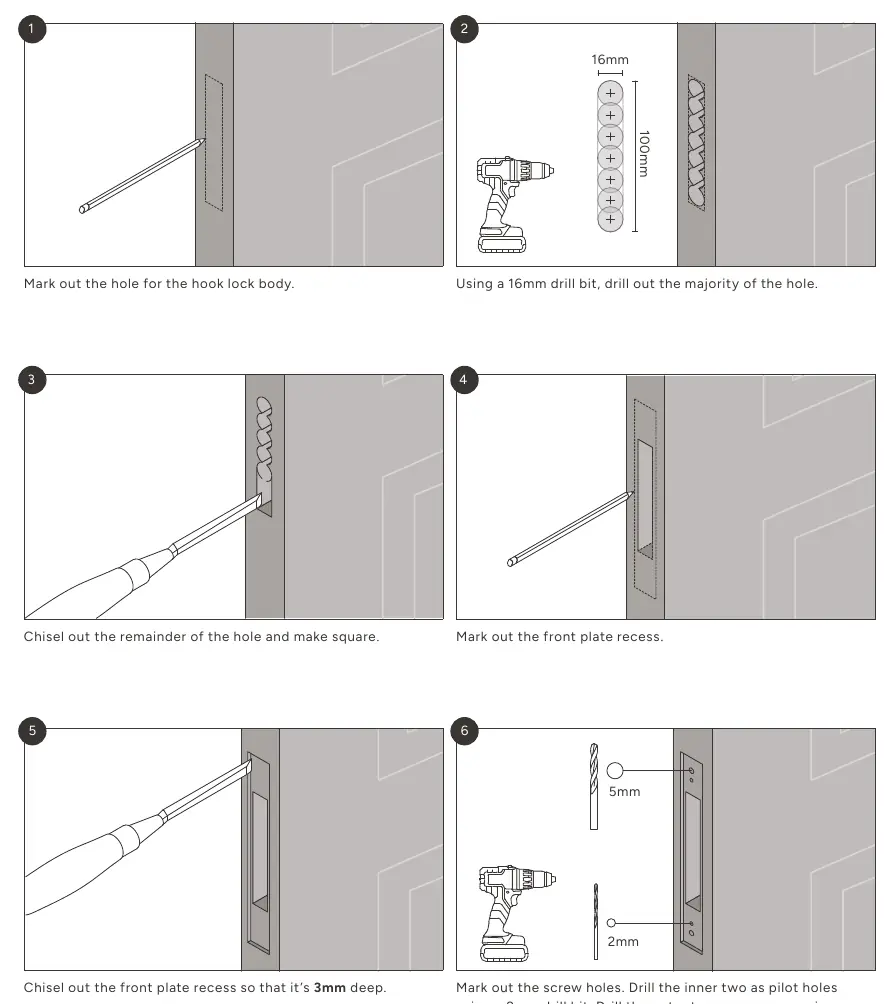
- Mark out the hole for the hook lock body.
- Using a 16mm drill bit, drill out the majority of the hole.
- Chisel out the remainder of the hole and make it square.
- Mark out the front plate recess and chisel it out so that it is 3mm deep.
- Mark the screw holes. Drill the inner two as pilot holes using a 2mm drill bit. Drill the outer two as recesses using a 5mm drill bit.
- Mark the position of the thumbturn on the door. Drill a hole 50mm in diameter and 8mm deep. Repeat on the opposite side of the door.
- Drill an 8mm hole for the spindle through the centre of the previously drilled holes.
- Test the thumbturn and hook lock together in the door.
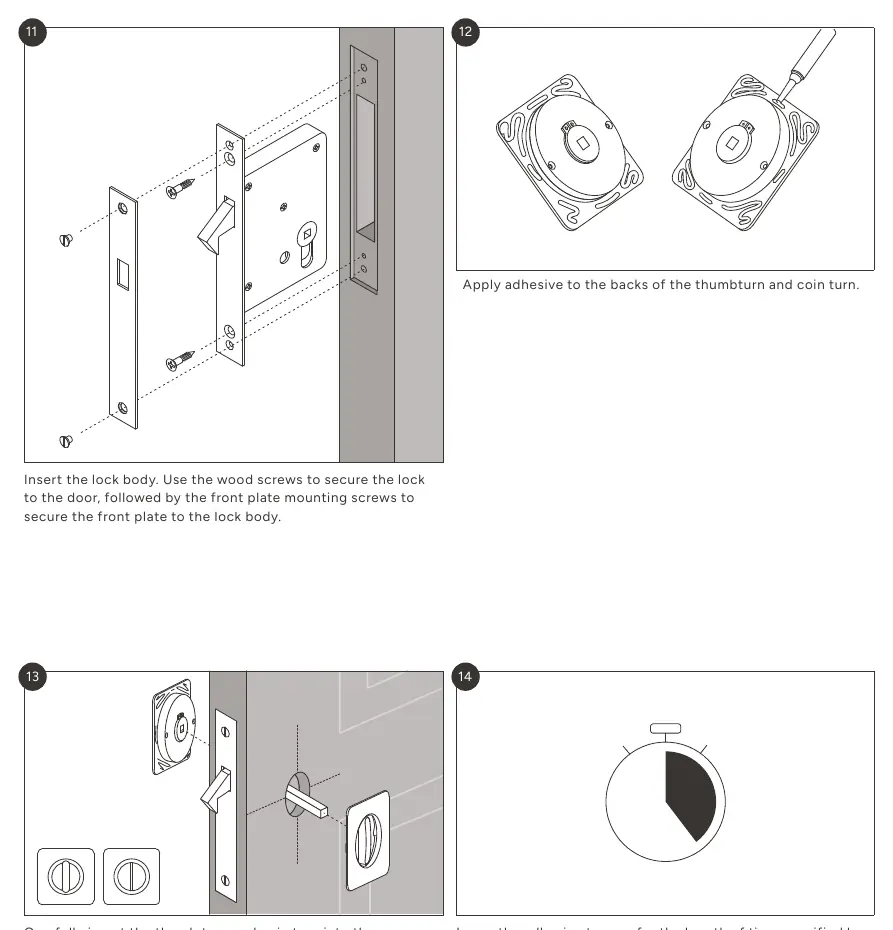
- Insert the lock body and secure it to the door using wood screws, followed by the front plate mounting screws.
- Apply adhesive to the backs of the thumbturn and coin turn.
- Carefully insert the thumbturn and coin turn into the recesses, ensuring the spindle is in the hole and both are positioned vertically.
- Allow the adhesive to cure.
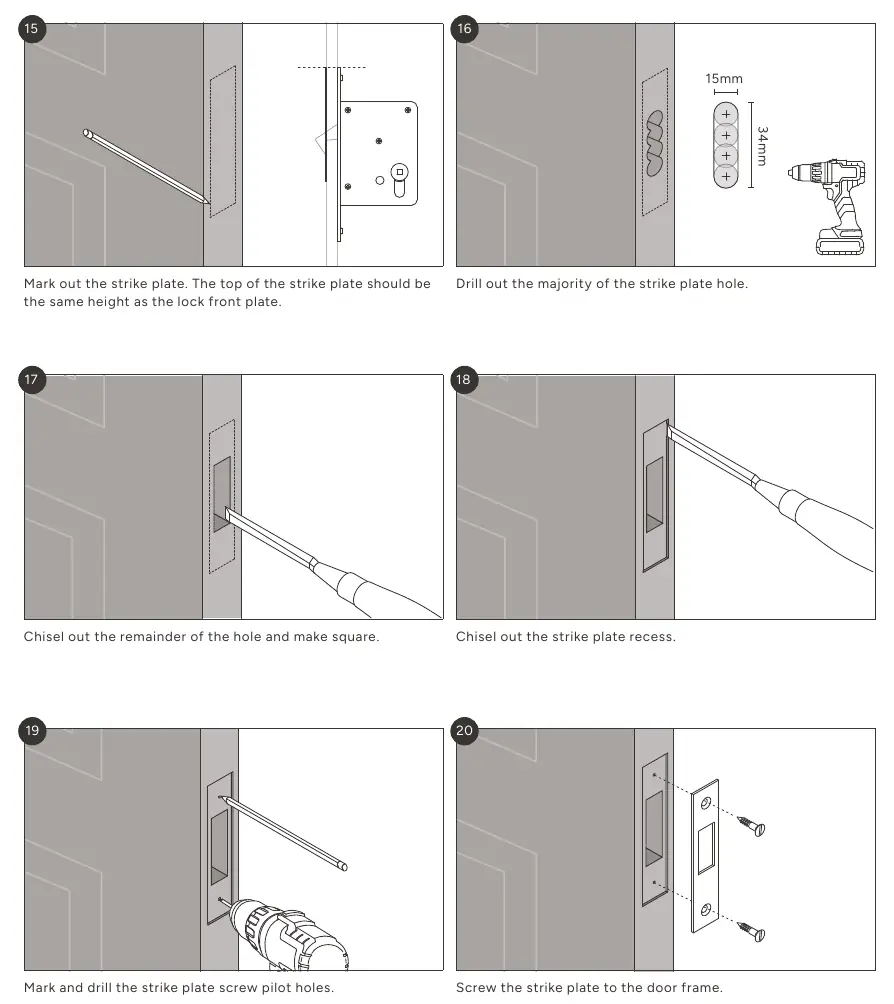
- Mark out the strike plate, ensuring the top is at the same height as the lock front plate.
- Drill out the majority of the strike plate hole, chisel out the remainder, and chisel the strike plate recess.
- Mark and drill the strike plate screw pilot holes, then screw the strike plate to the door frame.
Practical help
Common problems
Handle does not sit flush with the door
Ensure the recess is deep enough and clean of any debris or wood chips.
Excess adhesive visible
Wipe off any excess adhesive immediately after inserting the handle into the recess.
Before use
- Verify the door thickness is suitable for the hardware.
- Ensure you have the correct drill bits (50mm, 30mm, 16mm, 8mm, 5mm, 2mm).
- Have a spirit level ready for accurate alignment.
- Ensure you have polymer grab adhesive for the pull handles.
- Check that you have a chisel or router for creating recesses.
Specs in practice
- 50mm drill bit
- Used for creating the main recess for small and medium pull handles, and thumbturn holes.
- 30mm drill bit
- Used for creating the recess for the edge pull handle.
- 16mm drill bit
- Used for drilling the mortice hole for the hook lock body.
Images and diagrams
- The manual includes specific drilling templates at the end of the document to assist with accurate positioning.
- Steps are clearly numbered 1-20 across the installation process.
Model compatibility
- All units are in millimeters.
- Ensure drilling templates are printed at 1:1 scale.

Manual page author
Emily Carter
User documentation editor
Prepares concise manual descriptions and highlights the most useful setup, operation, and maintenance information for readers.