Furniture / Furniture Hardware
Corston Smart Switch Module Connectivity Guide
A guide to connecting Corston switches with smart control modules. Includes wiring recommendations, compatibility list, and system requirements for your smart home lighting setup.
Quick answers from the manual
Quick answer
- This document provides guidelines for integrating Corston switches with third-party smart control modules to enable remote switching, timing, and power monitoring. p. 1
Key actions
- Install the module behind the switch or in a separate back box. p. 1
Problems and fixes
Module doesn't fit in the back box
Install in a separate back box behind a blank plate.
p. 1Where to find it in the PDF
- Smart connectivity guidelines p. 1
Table of contents
Quick guide from the manual
This document outlines the requirements and recommendations for integrating Corston switches with smart control modules. It is intended for users looking to add smart functionality, such as remote switching, timing, and power monitoring, to their existing lighting setup.
System requirements
To successfully implement smart connectivity, you will need the following components:
- Corston switches: Use retractive switches for dimming applications and two-way switches for standard on/off switching.
- Smart control module: A compatible third-party module.
- Smart home hub: Required to manage the smart functionality.
- Standard LED bulbs: Do not use smart bulbs with this system.
- App: Installed on your phone or computer.
Installation and wiring
We recommend using retractive switches with dimming modules and two-way switches with on/off modules. It is important to maintain the convenience of wall switching.
If the smart module does not fit behind the switch in the existing back box, it can be installed in its own separate back box behind a blank plate in a matching Corston finish.
Note: Wiring varies between different modules. Always refer to the specific documentation provided by the module manufacturer.
Compatibility
Compatibility testing has been successfully carried out with modules from the following manufacturers:
- Fibaro
- Shelly
- Aeotec
- Moes
Customers and installers should perform further research to establish the most suitable module for their specific project.
Practical help
Common problems
Module does not fit behind the switch in the back box
Install the module in its own separate back box behind a blank plate in a matching Corston finish.
Before use
- Ensure you have a compatible smart home hub.
- Use standard LED bulbs (do not use smart bulbs).
- Select the correct switch type: retractive for dimming, two-way for on/off.
- Verify the smart control module is compatible with your hub.
Images and diagrams
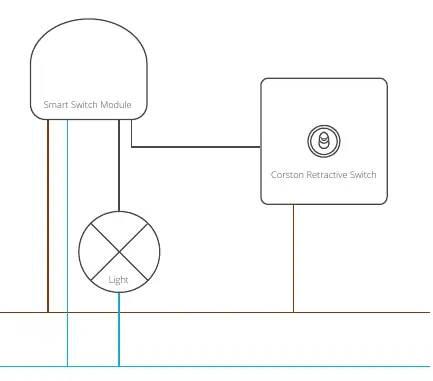
- The wiring diagram illustrates the connection between the Smart Switch Module, the Corston Retractive Switch, the light source, and the L (Live) and N (Neutral) power lines.
Model compatibility
- Tested with Fibaro, Shelly, Aeotec, and Moes modules.
- Wiring varies between modules; always consult the specific module's documentation.

Manual page author
Emily Carter
User documentation editor
Prepares concise manual descriptions and highlights the most useful setup, operation, and maintenance information for readers.