Furniture / Furniture Hardware
Installation Guide for Corston Shelf Bracket 200mm
A comprehensive installation guide for the Corston Shelf Bracket 200mm. Learn how to properly mount your brackets, attach timber or stone shelves, and maintain the hardware finish for long-lasting durability.
Quick answers from the manual
Quick answer
- To install the Corston Shelf Bracket 200mm, mark the horizontal and vertical positions, drill 8mm holes, insert wall fixings, and secure the bracket. Use 18mm screws for timber shelves or contact adhesive for stone shelves. p. 1, 2
Key actions
- Drill 8mm holes for wall fixings p. 2
- Attach timber shelf p. 1, 2
- Attach stone shelf p. 1, 2
Maintenance and reset
- Clean with mild detergent and damp cloth; avoid chemical cleaners. p. 1
Technical specifications
| Parameter | Value | Meaning | Pages |
|---|---|---|---|
| Drill bit size | 8mm | Required for wall fixings | p. 2 |
Where to find it in the PDF
- Components and Care p. 1
- Installation Steps p. 2
Table of contents
Manual images
Click an image to enlargeQuick guide from the manual
This guide covers the installation of the Corston Shelf Bracket 200mm. Ensure you have all components before starting the installation process.
Components
- Shelf Bracket (x1)
- Wall Screws (x2)
- Plastic Fixings (x2)
- 18mm Screws (x2)
Installation
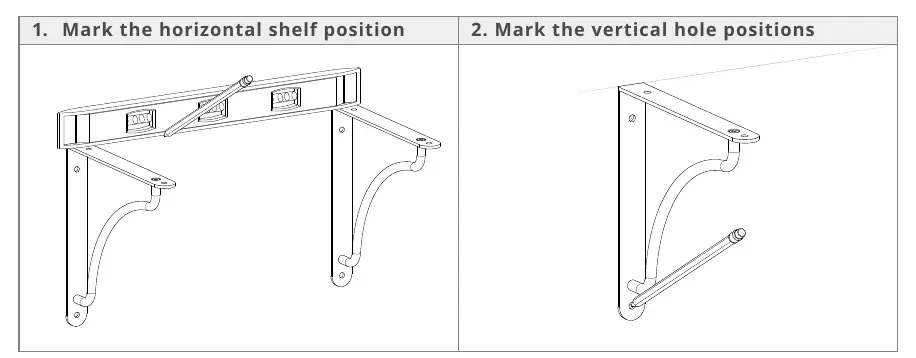
- Mark positions: Mark the horizontal shelf position and the vertical hole positions on the wall.
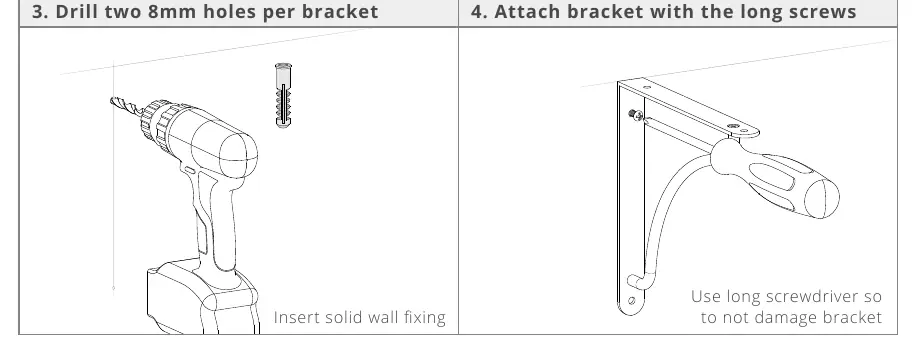
- Drill holes: Drill two 8mm holes per bracket.
- Insert fixings: Insert the solid wall fixings into the drilled holes.
- Attach bracket: Secure the bracket to the wall using the long screws. Use a long screwdriver to avoid damaging the bracket.
Attaching the shelf
The method for attaching the shelf depends on the material:
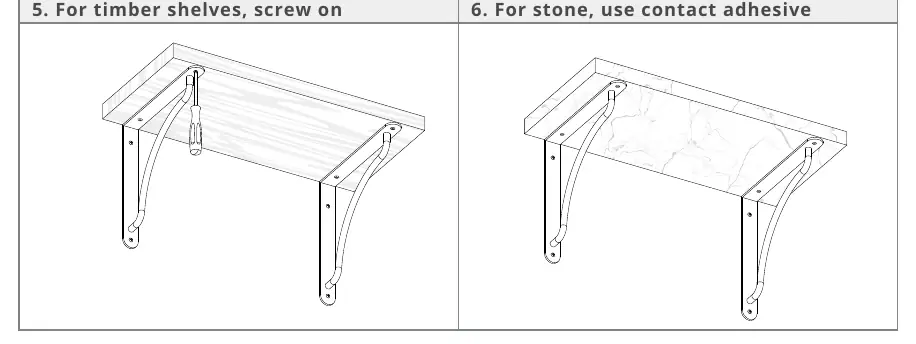
- Timber shelves: Screw the shelf to the brackets using the provided 18mm screws.
- Stone shelves: Secure the shelf using strong double-sided glazing tape or a similar contact adhesive.
Care and Maintenance
To maintain the hardware, use a mild detergent and a damp cloth. Avoid using chemical cleaners. Touching the hardware with other metal or hard objects is likely to scratch or damage it. Note that all finishes will age and develop over time. Do not use brass cleaner, as it will remove the protective lacquer.
Practical help
Common problems
Hardware finish is changing
This is normal; finishes will age and develop over time. Do not use brass cleaner as it removes the protective lacquer.
Scratching the hardware
Avoid touching the hardware with other metal or hard objects.
Before use
- Verify you have 1x Shelf Bracket, 2x Wall Screws, 2x Plastic Fixings, and 2x 18mm Screws.
- Choose a suitable shelf material (timber or stone).
- Determine the number of brackets required and their spacing.
- Ensure you have a drill with an 8mm bit.
- Have a long screwdriver available for installation.
Specs in practice
- Drill hole size
- 8mm diameter holes are required for the wall fixings.
Images and diagrams
- The installation process involves marking positions, drilling 8mm holes, inserting wall fixings, and securing the bracket with long screws.
- Timber shelves require screwing into the bracket, while stone shelves require adhesive.
Model compatibility
- Timber shelves: Screw to brackets using 18mm screws.
- Stone shelves: Secure using strong double-sided glazing tape or contact adhesive.

Manual page author
Emily Carter
User documentation editor
Prepares concise manual descriptions and highlights the most useful setup, operation, and maintenance information for readers.