Home Appliances / Air Fryers
User Manual for Cosori 12-Litre Air Fryer Oven
Quick guide for the Cosori 12-Litre Air Fryer Oven (CAF-R121-KUK). Includes setup, cooking functions, cleaning, and troubleshooting.
Table of contents
Manual images
Click an image to enlargeQuick Guide
This air fryer oven is designed for household use. Before first use, perform a test run for 30–60 minutes without food to remove any residues. Always ensure the drip tray is in place at the bottom of the oven during cooking. The unit features multiple cooking functions including Air Fry, Roast, Broil, Bake, Pizza, Toast, Reheat, Warm, Dehydrate, and Proof. Always use heat-resistant gloves when handling hot trays or accessories.
Getting to Know Your Air Fryer Oven
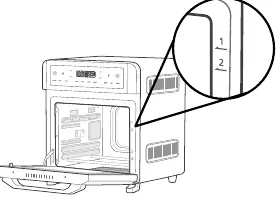
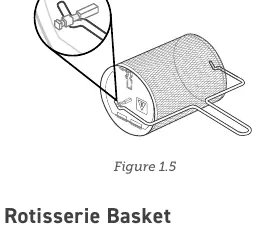
The unit includes several accessories: Air Fry Tray, Food Tray, Drip Tray, Rotisserie Basket, Rotisserie Fork Set, and a Rotisserie Handle. The oven has four tray positions numbered 1 to 4 from top to bottom. Always ensure the drip tray is properly in place at the bottom of the oven.
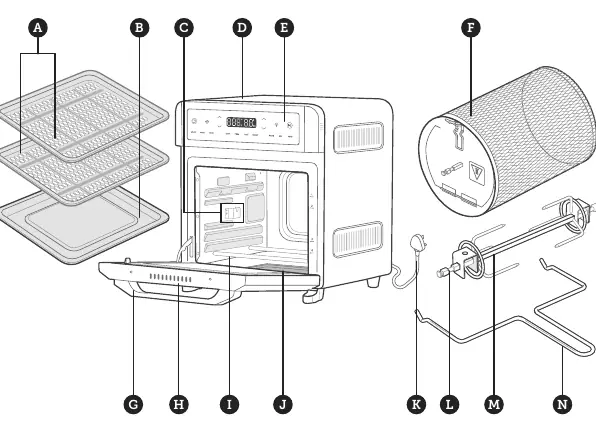
Controls and Display
The LED display shows temperature, time, and cooking functions. Use the Power Button to turn the unit on/off. Use the Increase/Decrease Temperature and Increase/Decrease Time buttons to adjust settings. The Start/Pause Button initiates or pauses cooking. The Light Button toggles the interior light.
Before First Use
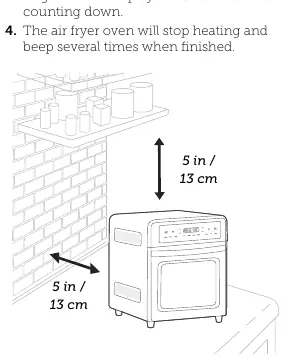
1. Remove all packaging materials from inside and outside the oven.2. Place the unit on a stable, level, heat-resistant surface. Leave at least 13 cm / 5 inches of space behind and above the oven.3. Wash all accessories and clean the interior.4. Perform a test run: Plug in the unit, tap AIR FRY, then tap the Start/Pause button to begin preheating. Run for 30–60 minutes.
Cooking Functions
Each function has a recommended tray position and fan speed. To customize settings, tap the cooking function button, then adjust time and temperature using the arrow buttons. For functions like Air Fry, Roast, Bake, and Pizza, preheating is automatic. When "Add Food" appears on the display, open the door and place your food inside.
Care and Maintenance
Clean the oven and accessories after every use. Unplug the unit and let it cool completely. Use a non-abrasive liquid cleanser or mild spray with a soft sponge. Do not use metal scouring pads. For stubborn grease on trays, use a paste of bicarbonate of soda and water. Always dry all parts thoroughly before reassembling.
Troubleshooting
If the unit does not turn on, ensure it is plugged in. If food is cooked unevenly, try preheating manually or ensure food is not packed too closely. White smoke is normal during the first use or when cooking fatty foods. If dark smoke appears, immediately turn off and unplug the unit. Error codes E1, E2, and E3 indicate sensor issues; contact customer support.
Manufacturer information
COSORI
Practical help
Common problems
Unit will not turn on
Ensure the power cord is securely plugged into the outlet.
Food is cooked unevenly
Preheat the oven manually before adding food, or ensure food is not packed too closely in the tray.
White smoke or steam
This is normal during the first use or when cooking fatty foods. Ensure the interior is clean and not greasy.
Dark smoke
Immediately turn off and unplug the unit. Wait for smoke to clear before opening the door.
Error Codes E1, E2, E3
These indicate temperature monitor issues. Contact Customer Support.
Before use
- Remove all packaging materials from inside and outside the oven.
- Place on a stable, level, heat-resistant surface.
- Ensure 13 cm / 5 inches of clearance behind and above the unit.
- Wash all accessories and clean the interior.
- Perform a 30–60 minute test run without food.
Specs in practice
- Temperature Range
- 30–220°C / 90–430°F.
Images and diagrams
- Tray Positions: Numbered 1, 2, 3, and 4 from top to bottom.
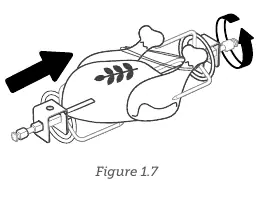
- Rotisserie Handle: Used to insert and remove the rotisserie basket or fork set.
- Drip Tray: Must be placed at the bottom of the oven during all cooking.
Model compatibility
- Not for commercial use.
- Do not use third-party replacement parts or accessories.
- Do not use with external timers or remote-control systems.

Manual page author
David Miller
Documentation analyst
Organizes user manual content into clear summaries, with attention to model details, product context, and everyday usability.