Home Appliances / Air Fryers
User Manual for Cosori 11-in-1 26-Quart Ceramic Air Fryer Oven
Comprehensive user manual for the Cosori 11-in-1 26-Quart Ceramic Air Fryer Oven (Models CCO-R252-SUS, CCO-R252-WUS). Includes setup, cooking functions, thermometer usage, cleaning, and troubleshooting.
Table of contents
Manual images
Click an image to enlargeQuick Guide
The Cosori 11-in-1 26-Quart Ceramic Air Fryer Oven is a versatile kitchen appliance. Before first use, perform a test run to remove any residues. Always use heat-resistant gloves when handling hot accessories. The oven features multiple cooking functions, including Air Fry, Toast, Bagel, Pizza, and a unique Burner function that can be used with the door open.
Getting to Know Your Oven
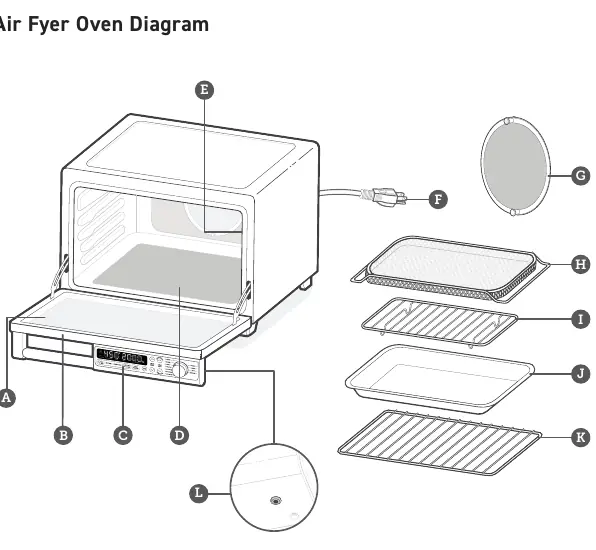
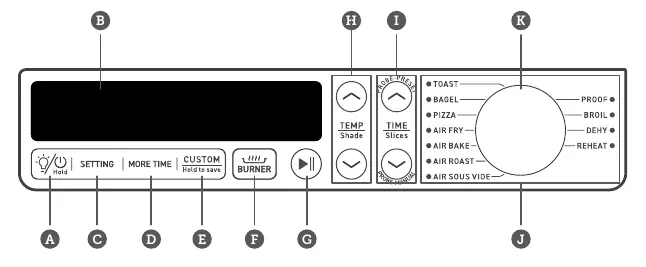
The oven includes a control panel with an LED display, a ceramic burner, and various accessories: a splatter guard, wire rack, sheet tray, roasting rack insert, and fry basket. The thermometer input is located on the front panel.
Before First Use
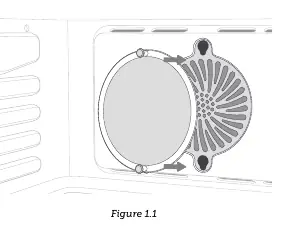
1. Remove all packaging materials from inside and outside the oven.2. Place the oven on a stable, level, heat-resistant surface.3. Wash all accessories and wipe the interior.4. Install the splatter guard in the slots inside the oven until it locks in place.5. Perform a test run: Plug in the oven, select AIR FRY, and run it without food to burn off any manufacturing residues.
Cooking Functions
The oven offers 11 functions: Toast, Bagel, Pizza, Air Fry, Air Bake, Air Roast, Air Sous Vide, Proof, Broil, Dehydrate, Reheat, and Burner. Use the control knob to select a function and the arrow buttons to adjust time and temperature. Many functions include an automatic preheat stage.
Using the Thermometer
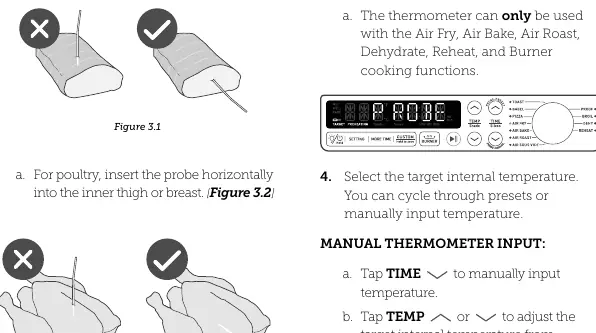
1. Insert the thermometer probe into the center of the thickest part of the meat.2. Plug the thermometer into the input on the oven.3. Select a cooking function (Air Fry, Air Bake, Air Roast, Dehydrate, Reheat, or Burner).4. Set the target internal temperature using the presets or manual input.5. The oven will stop heating when the target temperature is reached.
Care & Maintenance
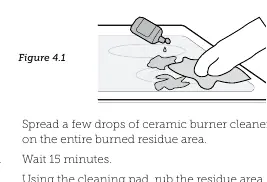
Clean the oven and accessories after every use. Allow the oven to cool completely before cleaning. Use a non-abrasive liquid cleanser or mild spray on a soft cloth. Do not use metal scouring pads. The splatter guard should be cleaned in hot water with mild detergent and replaced if discolored or dirty (usually after 2 months). Clean the vents using a vacuum cleaner with a brush attachment.
Troubleshooting
If the oven won't turn on, check the power connection and circuit breaker. If the circuit breaker trips, ensure the oven is the only appliance on the 15-amp circuit. For error codes E1–E5 or E13–E15, contact Customer Support as these indicate internal sensor or control issues.
Manufacturer information
COSORI
Practical help
Common problems
Oven won't turn on
Ensure the oven is plugged in, try a different outlet, or reset your circuit breaker.
Circuit breaker trips
The oven requires a 15-amp circuit. Ensure it is the only appliance plugged into that circuit.
Food cooked unevenly
Ensure food items are not packed too closely into the tray or rack.
White smoke during cooking
This is normal during the first use or when cooking fatty foods. Ensure the oven interior is clean.
Error Codes E1-E5, E13-E15
These indicate internal faults (temperature monitor, sensor, or control signal). Contact Customer Support.
Before use
- Remove all packaging from inside and outside the oven.
- Place on a stable, level, heat-resistant surface.
- Wash all accessories and wipe the interior.
- Install the splatter guard in the slots inside the oven.
- Perform a test run on the AIR FRY setting without food.
Specs in practice
- Temperature Range
- 80°–450°F / 25°–230°C.
Images and diagrams
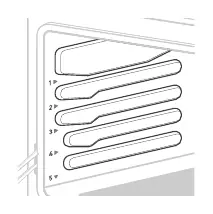
- Rack Positions: There are 5 levels. Position 5 is directly on the ceramic burner.
- Splatter Guard: Must be installed in the slots inside the oven to prevent grease buildup.
- Thermometer Input: Located on the front panel, used for precise internal temperature cooking.
Model compatibility
- Thermometer: Only compatible with Air Fry, Air Bake, Air Roast, Dehydrate, Reheat, and Burner functions.
- Burner Function: Can be used with the oven door open.
- Sheet Tray: Do not place directly on the ceramic burner.

Manual page author
David Miller
Documentation analyst
Organizes user manual content into clear summaries, with attention to model details, product context, and everyday usability.