Home Appliances / Air Fryers
User Manual for Instant Vortex Plus Air Fryer Oven
Get the most out of your Instant Vortex Plus Air Fryer Oven with this comprehensive user guide. Includes setup instructions, cooking tips, rotisserie guide, cleaning advice, and troubleshooting steps.
Table of contents
Quick guide from the manual
To get started with your Instant Vortex Plus Air Fryer Oven, ensure you have unpacked all materials and removed accessories from inside the unit. Before the first use, wipe the interior with a damp cloth and wash accessories with hot water and dish soap. Perform a test run by running the Air Fry program at 205°C for 18 minutes without food to ensure proper operation.
Safety instructions
Always operate the appliance on a stable, non-combustible, level surface. Maintain at least 13 cm of space around the unit for proper airflow. Do not block vents or place the unit on a hot stove. Never use ceramic-coated or stoneware pots for air frying. If the unit emits black smoke, press Cancel and unplug immediately.
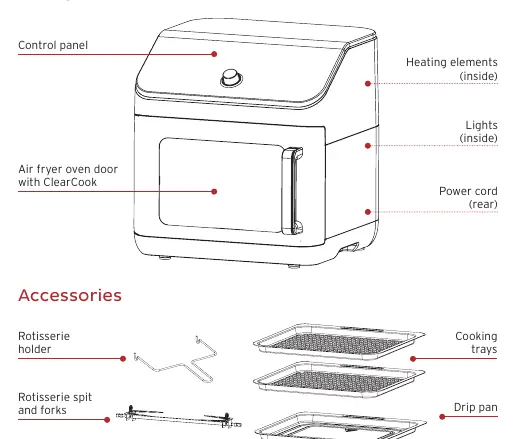
Control panel
The control panel features a status display showing temperature, time, and progress. Use the Smart Program buttons (Air Fry, Roast, Bake, Grill, Reheat, Toast, Proof, Dehydrate) to select cooking modes. Use the Control Dial to adjust time and temperature. Press Start to begin and Cancel to stop.
Cooking in your air fryer oven
Prep: Thaw, cut, and season ingredients according to your recipe.
Preheat: Insert trays, select a Smart Program, adjust time/temp if needed, and press Start. The display will show "Add Food" when ready.
Cook: Place food on trays, insert into the oven, and close the door. Cooking begins automatically.
Turn: If the display shows "Turn Food", open the door, flip or rotate food, and close the door to continue.
Rotisserie cooking
To use the rotisserie, secure food on the spit with forks and tighten setting screws. Slide the spit into the oven, ensuring it is securely positioned in the black locator. Select "Roast" and press Start. Rotation begins automatically. Use the rotisserie holder to safely remove the hot spit after cooking.
Cleaning and maintenance
Always let the unit cool before cleaning. Unplug before cleaning. Cooking trays, rotisserie accessories, and the drip pan are dishwasher safe. Clean the oven door and interior with a damp cloth and mild dish soap. Do not use metal scouring pads or steel wool.
Troubleshooting
If the unit does not turn on, check the power connection and ensure the door is fully closed. For black smoke, check for low smoke point oils or food residue on the heating element. For white smoke, avoid high-fat foods or pat moist ingredients dry before cooking.
Practical help
Common problems
Air fryer oven will not turn on
Ensure the power cord is plugged in firmly and the door is fully closed. Test the outlet with another appliance.
Black smoke coming from the oven
Cancel the program, let the unit cool, and clean the heating element and accessories. Use oils with a high smoke point.
White smoke coming from the oven
Avoid cooking foods with high fat content. Pat moist ingredients dry before air frying.
Before use
- Remove all packaging material from inside and around the unit
- Remove all accessories from inside the oven
- Wipe the interior with a damp cloth
- Wash accessories with hot water and dish soap
- Place on a stable, level surface
- Ensure 13 cm of space around the unit
Images and diagrams
- Control panel layout showing buttons and display
- Rotisserie spit and fork assembly
- Cooking tray and drip pan placement
Model compatibility
- Use only accessories authorized by Instant Brands Inc.
- Do not use ceramic-coated or stoneware pots for air frying
- Do not use extension cords or power converters

Manual page author
David Miller
Documentation analyst
Organizes user manual content into clear summaries, with attention to model details, product context, and everyday usability.