Home Appliances / Dryers
User Manual for Crosley 120-Volt Compact Electric Dryer
Quick guide for the Crosley 120-Volt Compact Electric Dryer. Includes installation requirements, venting instructions, cycle settings, maintenance tips, and troubleshooting.
Quick answers from the manual
Quick answer
- This manual provides installation, operation, maintenance, and troubleshooting instructions for the Crosley 120-Volt Compact Electric Dryer. p. 1, 24
Key actions
- Install the dryer using a 120-Volt, 60-Hz, 15- or 20-ampere fused electrical supply and a 4-inch heavy metal exhaust vent. p. 6, 8
- Clean the lint screen before every load. p. 18
- Start the dryer by loading clothes, closing the door, turning the Cycle and Temperature Control knob to the desired cycle, and pressing the Start button. p. 14
First start
- Unpack the dryer, remove the parts bag from the drum, remove tape from the drum and cabinet, and wipe the interior with a damp cloth. p. 7
- Install casters into the dryer base at four corners if required. p. 7
- Connect to a grounded 3-prong outlet. p. 6
Show 4 more answers Show less
Problems and fixes
Not drying satisfactorily
Check for blocked exhaust, clogged lint screen, restricted air movement, incorrect cycle settings, or room temperature below 45°F.
p. 20
Dryer will not run
Check power cord, fuse/circuit breaker, door closure, or Start button.
p. 20
Lint in load
Clean lint screen, sort loads, dry smaller loads, or check for paper/tissue in pockets.
p. 21
Unusual sounds
Thumping of rollers usually goes away after 5 minutes of drying.
p. 21Maintenance and reset
- Clean lint screen before every load. p. 18
- Clean lint screen with a nylon brush every six months or more frequently if clogged. p. 18
- Remove accumulated lint from inside the dryer cabinet every two to three years. p. 19
Technical specifications
| Parameter | Value | Meaning | Pages |
|---|---|---|---|
| Electrical Supply | 120-Volt, 60-Hz, AC-only, 15- or 20-ampere fused | Required electrical supply | p. 6 |
| Exhaust Vent Diameter | 4 inches | Required diameter for heavy metal vent | p. 8 |
| Load Capacity | 110 lb | Maximum weight of dryer and load | p. 5 |
| Minimum Operating Temperature | Above 45°F | Required ambient temperature for proper cycle operation | p. 5 |
| Floor Slope | 1 inch maximum | Maximum allowable slope under dryer | p. 5 |
| Garage Installation Height | At least 18 inches (46 cm) | Minimum height above floor for garage installation | p. 5 |
Where to find it in the PDF
- Installation p. 5, 12
- Parts and Features p. 13
- Using Your Dryer p. 14, 17
- Caring for Your Dryer p. 18, 19
- Troubleshooting p. 20, 21
- Assistance or Service p. 22
- Warranty p. 24
Table of contents
Manual images
Click an image to enlargeQuick guide from the manual
This manual provides essential instructions for the safe installation, operation, and maintenance of your Crosley 120-Volt Compact Electric Dryer. Key safety requirements include using a heavy metal vent (never plastic or foil), ensuring proper grounding, and keeping the area around the dryer free of lint and flammable materials. Always clean the lint screen before or after each load to maintain efficiency and safety.
Installation
Proper installation is the responsibility of the owner. Ensure the dryer is placed on a sturdy floor capable of supporting 110 lbs and that the location allows for the door to open fully. The dryer must be installed in an area with temperatures above 45°F for proper operation.
Electrical Requirements
- Requires a 120-Volt, 60-Hz, AC-only, 15- or 20-ampere fused electrical supply.
- Use a separate circuit serving only the dryer.
- Plug into a grounded 3-prong outlet. Do not use an extension cord or adapter.
Exhaust Requirements
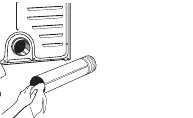
The dryer must be exhausted outdoors using a 4-inch diameter heavy metal vent. Do not exhaust into a chimney, wall, ceiling, or concealed space. Keep the exhaust path as straight as possible with minimal elbows to ensure maximum drying efficiency.
Mobile Home Installation
The exhaust vent must be securely fastened to a non-combustible portion of the mobile home structure and must not terminate beneath the mobile home. A kit is available to fasten the dryer securely during transit.
Parts and Features
The dryer features a cycle and temperature control knob, a push-to-start button, a lint screen located inside the drum, and a moisture sensor pad. Optional mounting kits are available for stacking the dryer on a washer or wall-mounting (do not wall-mount in mobile homes).
Using Your Dryer
Before first use, wipe the drum with a damp cloth to remove shipping dust.
- Load clothes into the dryer and close the door.
- Turn the Cycle and Temperature Control knob to the desired cycle. Use the Energy Preferred Automatic Setting for most loads.
- Push the Start button.
The dryer stops automatically when the cycle ends. To stop the dryer manually, open the door or turn the knob to OFF.
Selecting the Right Cycle
- Automatic Permanent Press/Regular Cycle: Shuts off when the selected dryness is reached.
- Timed Dry Cycle: Useful for delicate items, small loads, or bulky items requiring a specific drying time.
- Air Cycle: Unheated cycle for fluffing or air-drying items like foam pillows, plastic tablecloths, or sneakers.
Caring for Your Dryer
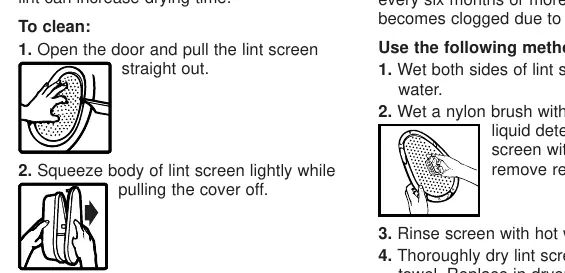
Cleaning the Lint Screen
Clean the lint screen before starting each load. Pull the screen out, remove the cover, and roll the lint off with your fingers. Do not wash the screen to remove lint. Every six months, or if residue builds up from detergents, clean the screen with a nylon brush, hot water, and liquid detergent.
Cleaning the Dryer Interior
If the drum becomes stained from unstable dyes (e.g., denim), clean it with a paste of powdered laundry detergent and warm water, or a non-flammable household cleaner. Wipe thoroughly with a damp cloth and tumble a load of clean cloths to dry the drum.
Troubleshooting
If the dryer is not drying satisfactorily, check for a clogged lint screen, blocked exhaust opening, or restricted airflow. Ensure the dryer is not located in a room below 45°F. If the dryer will not run, verify the power cord is plugged in, the circuit breaker is not tripped, and the door is closed tightly.
Practical help
Common problems
Not drying satisfactorily
Check if the exhaust opening is blocked, the lint screen is clogged, or the load is too large. Ensure the dryer is not in a room below 45°F.
Dryer will not run
Check if the power cord is firmly plugged in, the fuse/circuit breaker is okay, and the door is closed tightly.
Lint in load
Clean the lint screen, sort clothes by color and type, and avoid overloading the dryer.
Unusual sounds
Thumping of rollers may occur if the dryer has not been used for a while; this should go away after 5 minutes of drying.
Before use
- Remove tape from the drum and power cord.
- Wipe the interior of the drum with a damp cloth.
- Ensure the dryer is placed on a level floor.
- Verify the electrical supply is 120-Volt, 60-Hz, 15- or 20-ampere.
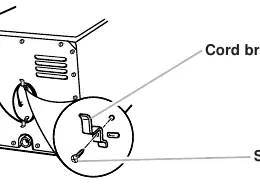
- Install the cord bracket on the rear panel.
Show more Show less
Specs in practice
- Energy Preferred
- Automatic setting for most loads that shuts off when dryness is reached.
Images and diagrams
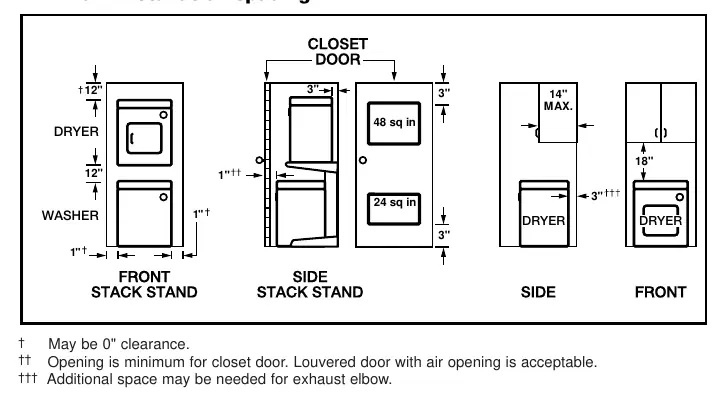
- Installation spacing diagrams show minimum clearances for closet or recessed installation.
- Exhaust vent length chart helps determine maximum vent run based on the number of 90-degree elbows.
Model compatibility
- Not for use with fuel-burning appliances in the same closet.
- Requires heavy metal venting; plastic or foil vents are prohibited.
- Wall-mounting kit (Part No. 345994) must not be used in mobile homes.

Manual page author
Emily Carter
User documentation editor