Power / USB Chargers
User Manual for Insignia 12-Cycle Electric and Gas Dryers
Comprehensive user guide for Insignia 12-Cycle Electric and Gas Dryers (NS-TDRE67W1, NS-TDRG67W1, NS-TDRE67W1-C). Includes installation instructions, venting requirements, operating procedures, maintenance tips, and troubleshooting.
Table of contents
Manual images
Click an image to enlargeQuick guide from the manual
This manual covers the installation, operation, and maintenance of Insignia 12-Cycle Electric and Gas Dryers. Key requirements include proper venting using 4-inch rigid metal ducting, a grounded electrical outlet, and professional installation for gas models. Always clean the lint filter before or after every load to ensure efficiency and safety.
Description of the dryer
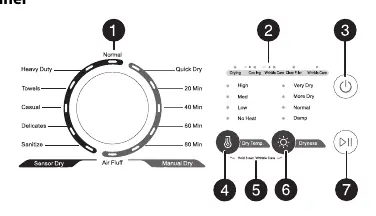
The dryer features a cycle selector for various fabric types, a status display for cycle progress, and adjustable settings for temperature and dryness. It is designed for household use and must be installed in a location with adequate clearance and ventilation.
Installation
Proper installation is critical for safety and performance:

- Location: Ensure the floor is solid and level. Maintain minimum clearances (1 inch on sides, 5 inches at rear, 24 inches on top, 2 inches in front) if installing in a closed cabinet.
- Venting: Use only 4-inch diameter rigid or semi-rigid metal ducting. Do not use plastic or thin foil flexible ducts. Keep the exhaust duct as straight and short as possible.
- Electrical: Electric models require a 120/240V, 60Hz circuit with a 30-ampere fuse or circuit breaker. Gas models require a 120V, 60Hz circuit with a 15-ampere fuse or circuit breaker.
- Gas Connection: Must be performed by a qualified professional. Use a manual shut-off valve within 6 inches of the dryer.
Operating instructions
To dry a load of clothes:
- Press the Power button to turn on the dryer.
- Load the dryer (do not overload; items need to tumble freely).
- Turn the Cycle Selector to the desired cycle (e.g., Normal, Heavy Duty, Delicates).
- Customize settings using the Dry Temp. and Dryness buttons if needed.
- Press the Start/Pause button to begin.
Maintenance
Regular maintenance ensures longevity and safety:
- Lint Filter: Clean before or after every load.
- Exterior/Drum: Clean with a soft, damp cloth and non-abrasive cleaner.
- Exhaust System: Inspect and clean the interior of the duct and exhaust hood at least once a year to prevent lint buildup.
Troubleshooting
If the dryer does not start, ensure the door is closed, the power cord is plugged in, and the circuit breaker is not tripped. If the dryer does not heat, ensure the cycle is not set to Air Fluff or No Heat. If the dryer is noisy, check for foreign objects in the load and ensure the unit is level.
Practical help
Common problems
Dryer does not start
Ensure the door is closed completely, the power cord is plugged into a working outlet, and check the circuit breaker/fuses.
Dryer does not heat or dry
Ensure the cycle is not set to Air Fluff or No Heat. Do not overload the dryer. Clean the lint filter and exhaust duct.
Clothes are unevenly dried
Separate heavy and lightweight items. Select a higher dryness level (More Dry or Very Dry) if necessary.
Dryer is noisy
Check the load for hard objects like coins or buttons. Ensure the dryer is level.
Before use
- Ensure the floor is solid and level.
- Verify the electrical outlet is grounded.
- Install 4-inch rigid or semi-rigid metal venting.
- For gas models, ensure the gas supply is connected and leak-tested.
- Clean the lint filter.
Specs in practice
- Power (Electric)
- 120V/240V AC, 60Hz
- Heating Rating (Electric)
- 4,800W
- Heating Rating (Gas)
- 16,000 BTU/hr
Images and diagrams
- Control Panel: Shows cycle selector, status indicators, and buttons for temperature/dryness.
- Back Components: Identifies wiring box, venting hole, and gas inlet.
- Venting: Shows rigid metal ducting requirements and elbow configurations.
Model compatibility
- Not suitable for mobile homes.
- Requires 4-inch rigid or semi-rigid metal ducting.
- Gas models require professional installation.

Manual page author
Emily Carter
User documentation editor
Prepares concise manual descriptions and highlights the most useful setup, operation, and maintenance information for readers.