Home Appliances / Air Fryers
User Manual for Cuisinart 15-in-1 Extra-Large Digital Air Fryer Oven TOA-112
Quick guide for the Cuisinart 15-in-1 Extra-Large Digital Air Fryer Oven (TOA-112). Includes setup, control panel operation, cooking modes, IntelliTemp probe usage, cleaning, and troubleshooting.
Table of contents
Manual images
Click an image to enlargeQuick guide from the manual
The Cuisinart 15-in-1 Extra-Large Digital Air Fryer Oven (TOA-112) is a versatile kitchen appliance. For best results, always ensure the unit is placed on a flat, level surface with 2 to 4 inches of clearance from walls or other objects. Never store items on top of the oven. Always use the provided air fryer basket inside the baking/drip pan when air frying or broiling.
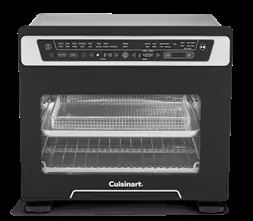
Product description
This unit features a touchscreen control panel with an LED display, an interior light, and a large viewing window. It includes an oven rack, air fryer basket, baking/drip pan, 2-in-1 pan with a removable divider, and a reversible grill/griddle plate. It also comes with an IntelliTemp Precision Temperature Probe for monitoring internal food temperatures.
Setup and first use
- Unpack the unit and remove all packaging and promotional labels.
- Place the oven on a flat, level surface.
- Ensure 2 to 4 inches of space around the unit.
- Wash all accessories in warm, soapy water and dry thoroughly.
- Slide the crumb tray into the bottom of the oven cavity.
- Plug the power cord into a wall outlet.
Control panel and operation
The control panel allows you to select from 10 functions: Air Fry, Bake, Roast, Dehydrate, Pizza, Toast, Broil, Warm, Grill, and Low. Use the Function button to cycle through these modes. Use the Preset button for specific air fry settings (Fries, Wings, Snacks, Nuggets, Vegetables). Adjust time, temperature, toast shade, and slice count using the control buttons. Press Start/Stop to begin or end the cooking cycle.

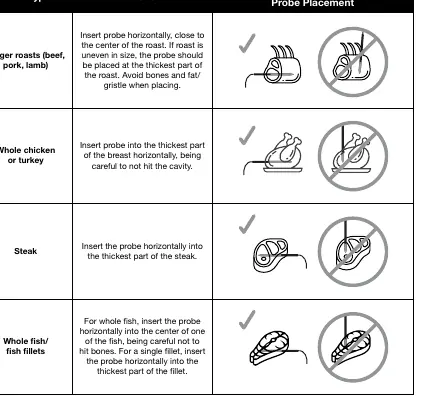
Using the IntelliTemp temperature probe
The probe monitors internal food temperature for precise cooking. Insert the probe into the thickest part of the food, avoiding bone or fat. Plug the probe into the port on the upper right side of the door frame. Select your function and food type using the Food Select button, then set the desired doneness with the Meat Temp button. The oven will alert you when the target temperature is reached.
Rack positions
The oven rack can be used in three positions:
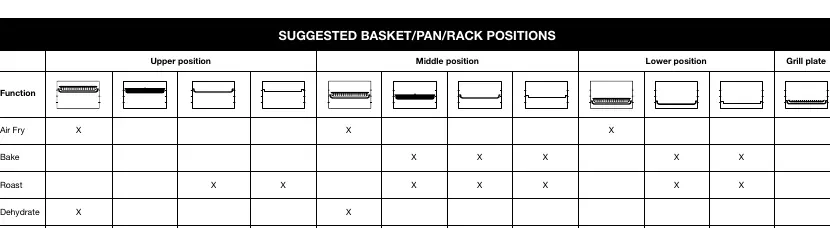
- Lower Position: Recommended for the grill function, larger foods (whole chicken, roasts), and baked goods.
- Middle Position: Recommended for toasting, air frying, and baking in the 2-in-1 pan.
- Upper Position: Recommended for broiling.
Cleaning and maintenance
- Always unplug the oven and allow it to cool completely before cleaning.
- Wipe the exterior with a clean, damp cloth.
- Clean interior walls with a damp cloth and mild soap solution. Do not use harsh abrasives or steel wool.
- Hand-wash accessories in hot, sudsy water. The grill/griddle plate and 2-in-1 pan are dishwasher safe (top rack).
- Slide out the crumb tray to remove crumbs.
Troubleshooting
- Unit won't turn on: Ensure it is plugged into a functional outlet and the door is closed.
- Fan remains on: This is normal for cooling purposes.
- Food not crispy/fried evenly: Ensure food is in a single layer without overlap. Add a light spray of oil. Flip or toss food halfway through cooking.
- Food undercooked: Try smaller batches or increase the temperature.
Manufacturer information
Cuisinart
Practical help
Common problems
Unit will not turn on
Ensure the unit is plugged into a functional outlet and the oven door is fully closed.
Fan remains on after cooking
This is normal; the fan continues to run for cooling purposes.
Food is not crispy or fried evenly
Ensure food is spread in a single layer without overlap. Add a light spray of oil. Toss or flip food halfway through the cooking cycle.
Food is undercooked
Try cooking in smaller batches or increase the cooking temperature.
Before use
- Unpack the unit and remove all promotional labels.
- Place on a flat, level surface.
- Ensure 2-4 inches of clearance from walls.
- Wash all accessories in warm soapy water.
- Slide the crumb tray into the bottom of the oven.
Images and diagrams
- Upper Position: Best for broiling.
- Middle Position: Best for toasting, air frying, and 2-in-1 pan usage.
- Lower Position: Best for grilling, large roasts, and baking.
- Probe Placement: Insert horizontally into the thickest part of the food, avoiding bone and fat.
Model compatibility
- Use only manufacturer-recommended ovenproof accessories.
- Do not cover the crumb tray or any part of the oven with metal foil.
- Do not use glass oven dishes for broiling.

Manual page author
Emily Carter
User documentation editor
Prepares concise manual descriptions and highlights the most useful setup, operation, and maintenance information for readers.