General / Accessories
Danfoss AKV 10P and AKV 10PS Electric Expansion Valve Service Guide
Essential service and maintenance instructions for Danfoss AKV 10P and AKV 10PS electric expansion valves, including orifice, armature, and filter replacement procedures.
Table of contents
Manual images
Jump to the sectionProduct Overview
This service guide covers the maintenance and spare parts replacement for Danfoss electric expansion valves, specifically types AKV 10P and AKV 10PS. These valves are designed for food retail applications. The guide provides instructions for replacing critical wear parts, including the orifice, armature, and filter.
Safety and Compatibility
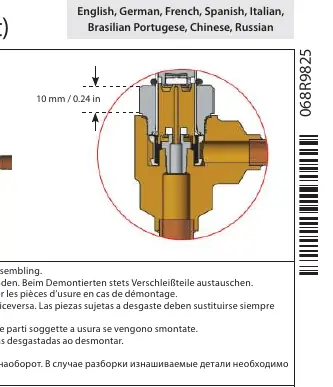
Important: Never use AKV 10P0-8 orifice or armature kits for AKV 10PS4-8 models, or vice versa. These components are not interchangeable. Always replace wear parts whenever the valve is disassembled. Ensure that the O-ring is installed as it is mandatory for proper operation.
Maintenance Procedures
Maintenance involves the replacement of internal components to ensure optimal valve performance. When replacing the orifice, always use a new one. The filter replacement requires a specific tool to extract the old filter from the valve housing. Before installing a new filter, thoroughly clean the bottom of the valve housing. Note that the filter must be inserted with the smaller hole/diameter facing downwards.

Coil Mounting
The guide details the mounting and dismounting of both standard and UL-rated coils. A critical safety instruction is to never energize the power supply before the coil is fully mounted on the valve. An optional O-ring is recommended for coil mounting to reduce vibrations, though it is not required for sealing purposes.
Torque Specifications
Proper tightening is essential for valve integrity. The guide specifies a torque of 10 Nm (7.4 ft-lbf) for armature components and 75 Nm (55 ft-lbf) for orifice and filter housing assemblies.
Manufacturer information
Danfoss A/S
Practical help
Common problems
Incompatibility between AKV 10P and AKV 10PS parts
Never swap orifice or armature kits between these two models; use only the specific kit designated for your valve type.
Incorrect filter installation
Ensure the filter is inserted with the smaller hole/diameter facing downwards into the valve housing.
Coil damage or electrical hazard
Do not connect the power supply until the coil is fully mounted on the valve.
Before use
- Verify the valve model (AKV 10P vs AKV 10PS) before selecting spare parts.
- Ensure all wear parts are replaced during disassembly.
- Clean the bottom of the valve housing thoroughly before installing a new filter.
- Confirm the O-ring is present and correctly seated.
- Use a torque wrench to tighten components to the specified values (10 Nm or 75 Nm).
Specs in practice
- 10 Nm / 7.4 ft-lbf
- Required torque for armature assembly.
- 75 Nm / 55 ft-lbf
- Required torque for orifice and filter housing assembly.
Images and diagrams
- The filter removal tool is used by pressing it gently into the filter and pulling it out.
- Standard and UL coils have specific mounting orientations indicated by A and B markings.
Model compatibility
- AKV 10P0-8 kits are not compatible with AKV 10PS4-8.
- Retrofit kits are available for older AKV 10 and AKVH 10 models.

Manual page author
Emily Carter
User documentation editor
Prepares concise manual descriptions and highlights the most useful setup, operation, and maintenance information for readers.