Electronics / Projectors
User Guide for Dell 2400MP Projector
Comprehensive user guide for the Dell 2400MP projector. Includes setup instructions, connection guides for computers and DVD players, OSD menu settings, troubleshooting tips, and lamp replacement procedures.
Quick answers from the manual
Quick answer
- The Dell 2400MP is a high-performance projector. To turn it on, remove the lens cap, connect the power and signal cables, and press the power button. Use the OSD menu to adjust image settings, input sources, and lamp management. p. 14, 18, 22
Key actions
- Turning the projector on p. 14
- Adjusting image height p. 15
- Replacing the lamp p. 35
First start
- Remove lens cap, connect cables, press power button. p. 14
Show 4 more answers Show less
Problems and fixes
No image
Check lens cap, power, cables, and graphics port settings.
p. 31
Lamp light solid orange
Replace the lamp.
p. 33Maintenance and reset
- Reset lamp timer after replacement. p. 27, 35
Technical specifications
| Parameter | Value | Meaning | Pages |
|---|---|---|---|
| Brightness | 3000 ANSI Lumens | Maximum brightness | p. 37 |
| Resolution | 1024 x 768 | Native resolution | p. 37 |
| Weight | <2.4 kg | Projector weight | p. 37 |
Where to find it in the PDF
- Setup and Connections p. 5, 8, 9, 10
- Operation p. 14, 15, 16, 17
- OSD Menus p. 22, 23, 24, 25
- Troubleshooting and Maintenance p. 31, 32, 33, 34
- Specifications p. 37, 38, 39, 40
Table of contents
Manual images
Click an image to enlargeQuick guide from the manual
The Dell 2400MP is a high-performance projector designed for both PC and video applications. To get started, ensure you have all package contents, including the power cord, VGA cable, and remote control. Connect your source device (computer or DVD player) using the appropriate cables, then power on the projector and the source. Use the control panel or remote to adjust the image, zoom, and focus. If you encounter issues, refer to the troubleshooting section or the OSD menu for settings.
Package Contents
Ensure your package includes the following items:
- Power cord (1.8m or 3.0m depending on region)
- VGA cable (D-sub to D-sub)
- USB cable
- D-sub to YPbPr cable
- S-video cable
- Composite Video cable
- RCA to Audio cable
- Mini pin to mini pin cable
- Batteries (2)
- Remote control
- Carrying case
- Documentation
Connecting Your Projector
The projector supports various input sources:
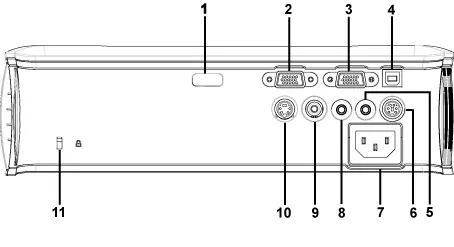
- Computer: Connect using the D-sub to D-sub cable.
- DVD Player: Connect using S-video, Composite, or Component cables.
- Professional Installation: RS232 connection is available for advanced control.
Using Your Projector
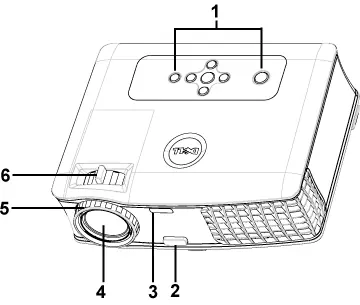
Turning the Projector On and Off
To turn on, remove the lens cap, connect cables, and press the power button. The Dell logo will display for 30 seconds. To turn off, press the power button twice. The cooling fans will run for 90 seconds after shutdown. Wait 60 seconds before turning it on again.
Adjusting the Projected Image
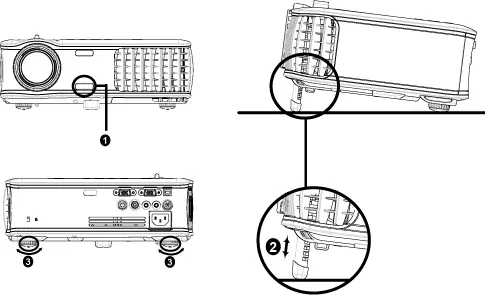
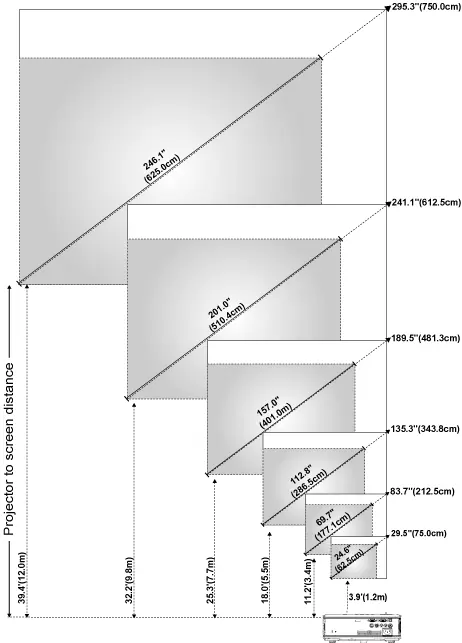
You can adjust the projector height using the elevator button and the tilt adjustment wheel. Use the zoom tab and focus ring on the top of the unit to clear the image. The projector can focus at distances from 1.2m to 12m.
Using the Control Panel and Remote
The control panel and remote allow you to:
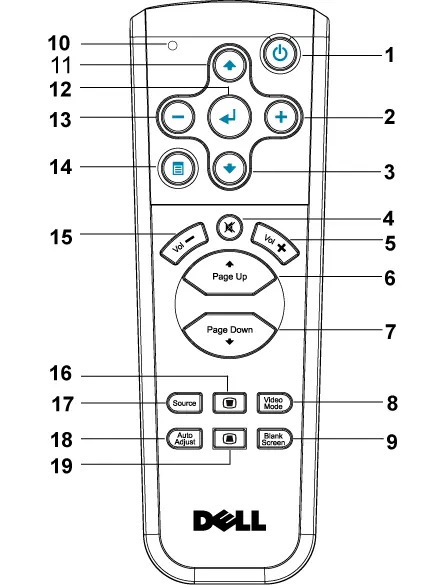
- Toggle input sources (Analog RGB, Composite, Component-i, S-video, Analog YPbPr).
- Adjust image distortion using Keystone correction (±40 degrees).
- Navigate the On-Screen Display (OSD) menu.
- Adjust volume and mute audio.
- Use the Blank screen feature to hide the image.
On-Screen Display (OSD) Settings
The OSD menu allows for detailed configuration:
- Input Select: Auto-detect or manually select input signals.
- Picture: Adjust brightness, contrast, color temperature, and color settings (PC and Video modes).
- Display: Configure zoom, white intensity, degamma, position, frequency, and tracking.
- Lamp: Monitor lamp hours, enable power saving, and reset the lamp timer.
- Preferences: Set menu lock, password protection, test patterns, and factory reset.
Troubleshooting
If you experience issues:
- No image: Check if the lens cap is removed, the projector is on, cables are secure, and the graphics port is enabled (Fn+F8 on Dell laptops).
- Unstable/flickering image: Adjust tracking or frequency in the OSD Display tab.
- Lamp issues: If the LAMP light is solid orange, the lamp needs replacement. If blinking orange, the system has failed.
Changing the Lamp
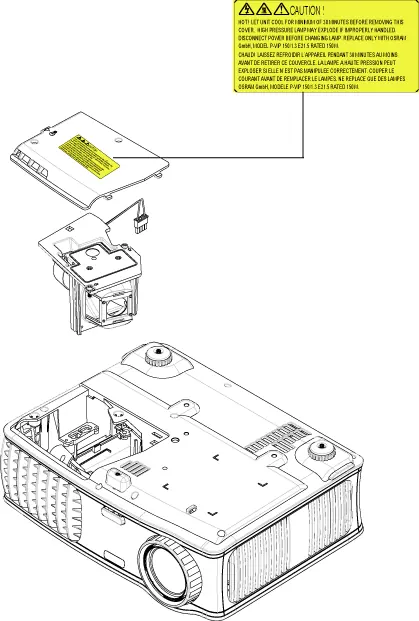
Replace the lamp when the on-screen message suggests it. Caution: The lamp is very hot. Allow the projector to cool for at least 30 minutes before attempting replacement. Turn off and unplug the unit, remove the lamp cover, loosen the lamp screws, and pull the lamp out by its metal handle. After installing the new lamp, reset the lamp usage time in the OSD Lamp tab.
Specifications
Key technical specifications include:
- Brightness: 3000 ANSI Lumens (Max.)
- Resolution: 1024 x 768 (XGA)
- Contrast Ratio: 2100:1 Typical
- Lamp Life: 2000 hours (up to 2500 in eco mode)
- Weight:<2.4 kg
- Power Supply: 100-240V AC
Manufacturer information
Dell Inc.
Practical help
Common problems
No image appears on screen
Ensure lens cap is removed, projector is on, cables are secure, and external graphics port is enabled (Fn+F8 on Dell laptops).
Image is unstable or flickering
Adjust tracking in the OSD Display tab (PC mode only).
Image has vertical flickering bar
Adjust frequency in the OSD Display tab (PC mode only).
LAMP light is solid orange
The lamp needs to be replaced.
Before use
- Remove the lens cap.
- Connect the power cord.
- Connect the appropriate signal cable (VGA, S-video, Composite, or Component).
- Ensure the projector is on a stable surface.
- Check that the projector is within the required distance (1.2m to 12m).
Show more Show less
Specs in practice
- Contrast Ratio
- 2100:1 Typical
Images and diagrams
- The control panel allows power, source selection, and menu navigation.
- The projector has an elevator button to adjust height and a tilt adjustment wheel for fine-tuning.
- The zoom tab and focus ring are located on the top of the projector.
Model compatibility
- Supports NTSC, PAL, SECAM, and HDTV (1080i, 720p, 576i/p, 480i/p).
- Compatible with various computer resolutions up to WUXGA (1920x1200).

Manual page author
Michael Turner
Technical manual editor