Home / Door Hardware
Installation Instructions for Detex 01W Advantex Trim Plate
A comprehensive installation guide for the Detex 01W Advantex Trim Plate. This manual provides essential tool requirements, step-by-step door preparation, and assembly instructions to ensure proper mounting.
Table of contents
Manual images
Click an image to enlargeQuick Guide for Installation
This document provides the necessary steps to install the Detex 01W Advantex Trim Plate. Always wear safety glasses before beginning the installation. Ensure all drilled holes are straight and level to guarantee proper fitment.
Tools and Supplies
Before starting, ensure you have the following tools available:
- Safety glasses
- Pencil
- Center punch
- Hammer
- Drill motor
- Drill bits and taps
- Phillips screwdriver
- Tape measure
Parts Breakdown
The kit includes the following components:
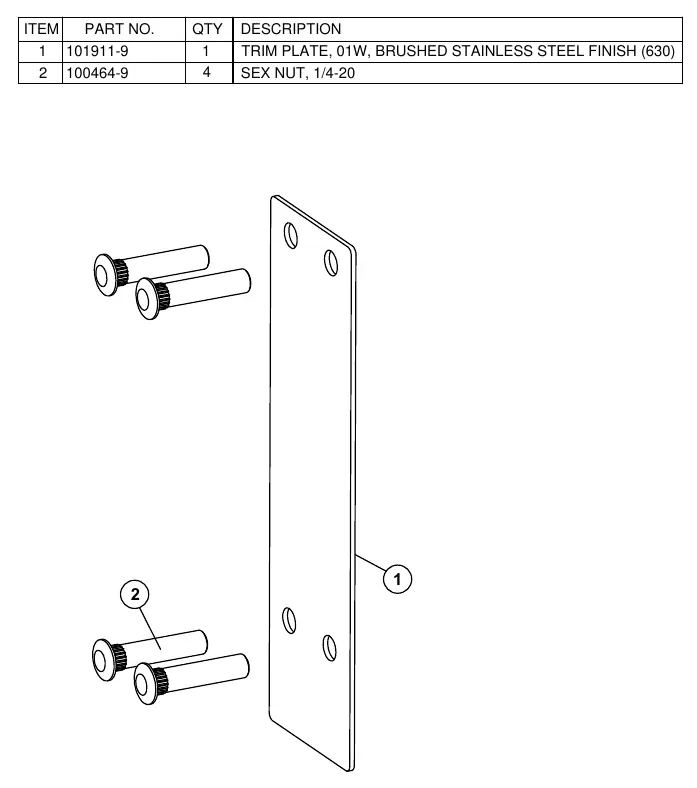
- Trim Plate (01W): Brushed stainless steel finish (Part No. 101911-9)
- Sex Nuts (1/4-20): 4 pieces (Part No. 100464-9)
Door Preparation
Follow these steps to prepare the interior door face:
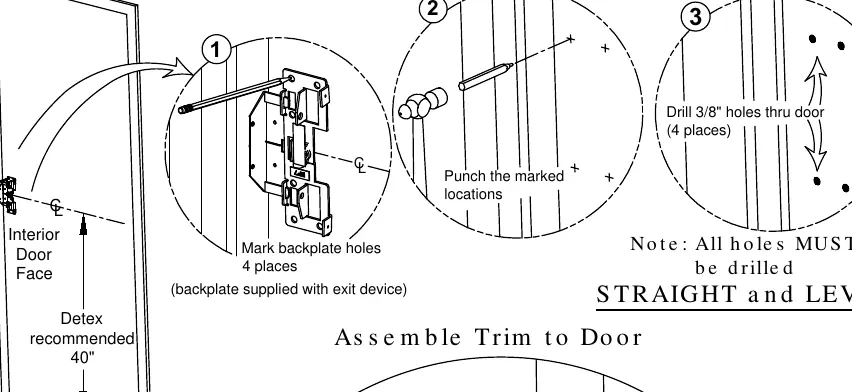
- Mark the 4 backplate holes on the interior door face. Detex recommends a height of 40 inches.
- Use a center punch to mark the locations.
- Drill 3/8" holes through the door at the 4 marked locations. Ensure all holes are drilled straight and level.
Assembly
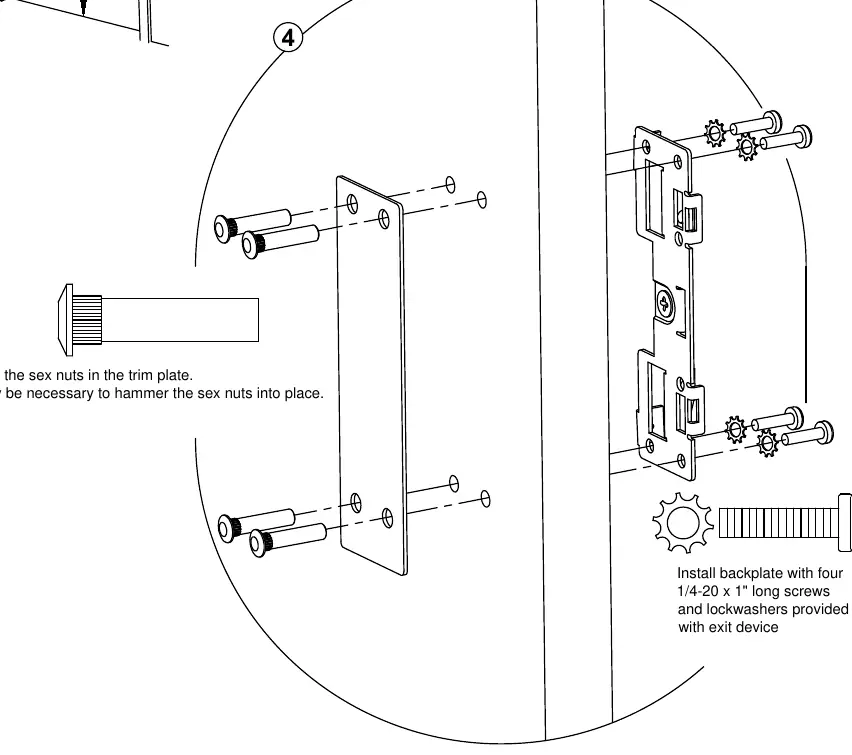
- Install the sex nuts into the trim plate. It may be necessary to use a hammer to seat the sex nuts into place.
- Install the backplate using the four 1/4-20 x 1" long screws and lockwashers provided with the exit device.
- Continue with the panic hardware installation instructions.
Manufacturer information
Detex Corporation
Practical help
Common problems
Holes are not aligned
Ensure all holes are drilled straight and level. Use a center punch before drilling to prevent the drill bit from wandering.
Sex nuts are difficult to insert
It may be necessary to gently hammer the sex nuts into the trim plate to seat them properly.
Before use
- Wear safety glasses
- Verify you have a 3/8" drill bit
- Ensure you have a Phillips screwdriver
- Check that you have the exit device backplate and screws
Specs in practice
- 1/4-20 x 1" screws
- The specific screw size provided with the exit device for securing the backplate.
Images and diagrams
- The parts breakdown shows the trim plate and the four sex nuts required for assembly.
- The door preparation diagram illustrates the marking of the four holes and the drilling process.
- The assembly diagram shows the orientation of the sex nuts in the trim plate and the attachment of the backplate.
Model compatibility
- This trim plate is designed for use with Detex Advantex exit devices.
- The backplate mentioned in the assembly steps is supplied with the exit device, not the trim plate kit.

Manual page author
David Miller
Documentation analyst
Organizes user manual content into clear summaries, with attention to model details, product context, and everyday usability.