Home / Door Hardware
Installation Instructions for Detex 03WM Trim
A comprehensive installation guide for the Detex 03WM Trim. This manual provides step-by-step procedures for door preparation, drilling, trim mounting, and mortise cylinder installation for both metal and wood doors.
Table of contents
Manual images
Click an image to enlargeImportant Information
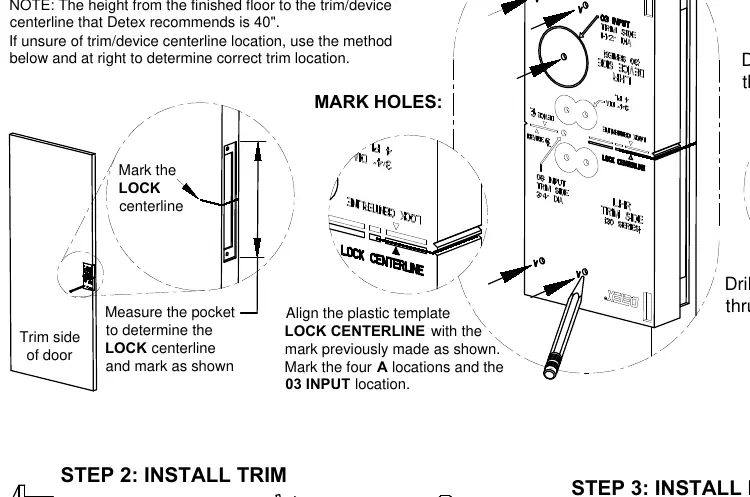
This document provides installation instructions for the Detex 03WM Trim. Always wear safety glasses prior to beginning the installation. The recommended height from the finished floor to the trim/device centerline is 40 inches. If you are unsure of the trim/device centerline location, measure the pocket to determine the lock centerline.
Tools and Supplies
Ensure you have the following tools before starting the installation:
- Safety glasses
- Pencil
- Center punch
- Hammer
- Drill motor
- Drill bits and taps
- Phillips screwdriver
- Tape measure
Device Parts Breakdown
The 03WM Trim kit includes the following components:

- Trim plate (03WM, brushed stainless steel finish)
- Mortise cylinder (5 pin)
- Cylinder collar (tall)
- Sex nuts (1/4-20)
Note: The mortise cylinder and cylinder collar are sold separately.
Installation Instructions
Step 1: Prep Door
Use the plastic template to mark the trim holes. Ensure the LHR (Left Hand Reverse) orientation is correct if applicable. Align the plastic template LOCK CENTERLINE with the mark previously made. Mark the four mounting locations and the 03 INPUT location. Drill a 1-1/4 inch diameter hole through the trim side only, and four 3/8 inch diameter holes through the trim side only.
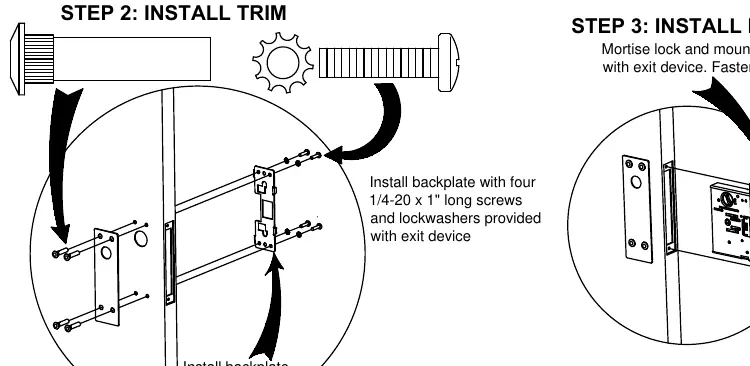
Step 2: Install Trim
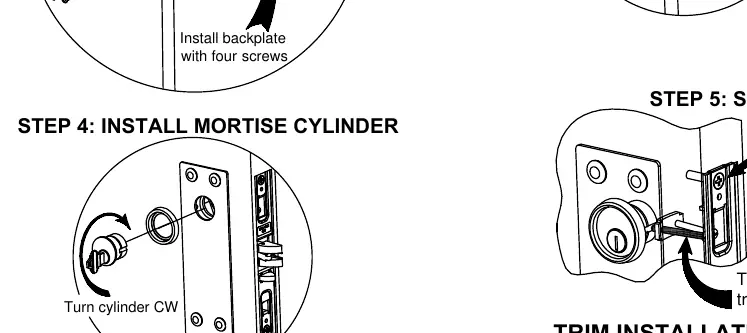
Install the backplate using the four 1/4-20 x 1 inch long screws and lockwashers provided with the exit device.
Step 3: Install Mortise Lock
Install the mortise lock and mounting hardware provided with the exit device. Fasten the hardware loosely. Use 12-24 x 1/2 inch screws for metal doors or #12 x 1 inch screws for wood doors.
Step 4: Install Mortise Cylinder
Insert the mortise cylinder and turn it clockwise (CW) to install.
Step 5: Secure Cylinder
Tighten the screws (referenced in step 3) to secure the assembly. Tighten the screw nearest the trim side of the door only. Continue the installation using the specific device instructions.
Manufacturer information
Detex Corporation
Practical help
Common problems
Unsure of trim/device centerline location
Measure the pocket to determine the LOCK centerline and mark it on the door as shown in the instructions.
Before use
- Wear safety glasses.
- Verify you have all required tools: pencil, center punch, hammer, drill, and tape measure.
- Confirm the 40-inch height from the finished floor to the trim/device centerline.
- Identify if the door is metal or wood to select the correct mounting screws.
- Ensure the plastic template is aligned correctly with the LOCK CENTERLINE.
Specs in practice
- Drill hole (trim side)
- 1-1/4 inch diameter hole.
- Drill holes (mounting)
- 3/8 inch diameter holes, 4 places.
- Recommended height
- 40 inches from finished floor to trim/device centerline.
Images and diagrams
- The template alignment is critical for marking the 03 INPUT location and the four mounting holes.
- The mortise lock should be fastened loosely before securing the cylinder.
- The cylinder must be turned clockwise (CW) during installation.
Model compatibility
- Compatible with both metal and wood doors (different screws required: 12-24 x 1/2" for metal, #12 x 1" for wood).

Manual page author
David Miller
Documentation analyst
Organizes user manual content into clear summaries, with attention to model details, product context, and everyday usability.