Home / Door Hardware
Installation Manual for Detex 03WS Outside Lever Trim Device
Installation guide for the Detex 03WS Outside Lever Trim Device on 2-inch narrow stile glass doors. Includes drilling templates, hole specifications, and mounting procedures.
Table of contents
Manual images
Click an image to enlargeImportant Information
This document is an addendum for installing the Detex 03WS Outside Lever Trim Device on 2-inch narrow stile glass doors. Caution: Do not use the provided strike locator when installing this trim on a 2-inch narrow stile glass door. All other narrow trims may use the strike locator provided in the Strike Kit.
This manual covers the drilling and mounting process. For the complete installation, this document must be used in conjunction with Detex P/N 101257 (03WS Installation Instructions).
Installation Preparation
Ensure the door is blocked shut before beginning the installation. The device is recommended to be mounted 40 inches above the finished floor.
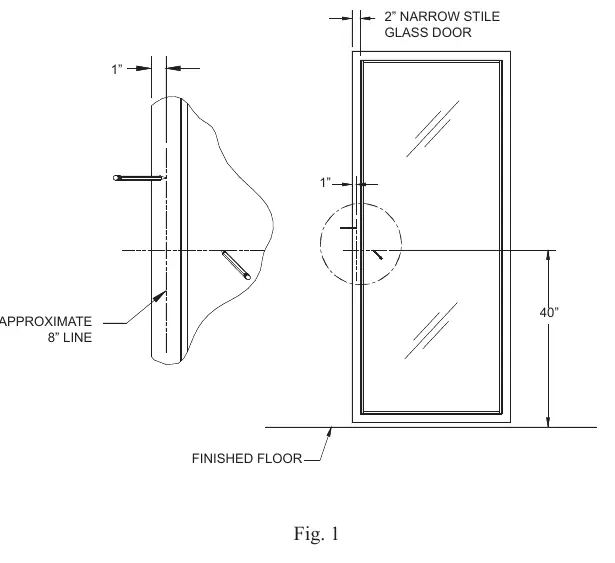
- Mark a line 1 inch from the edge of the door.
- Mark the 40-inch centerline of the device across the door and frame.
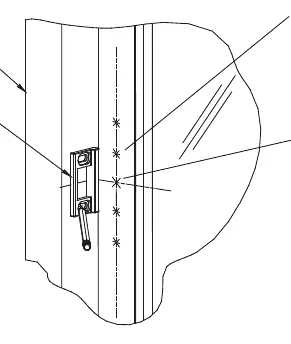
- Place the back plate on the door stile, aligning it with the 1-inch line and the center holes.
- Mark and center punch the 5 holes (a, d, and e).
Inside Door Face Installation
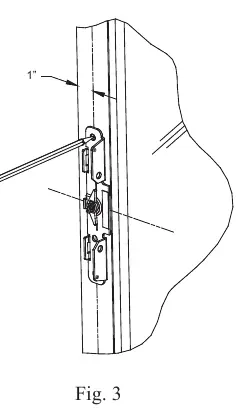
Perform the following steps on the inside face of the door:
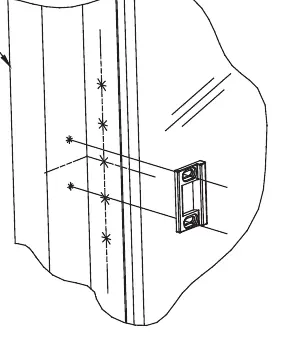
- Slide the strike against the blocked door.
- Mark and center punch the 2 strike holes.
- Drill one pilot hole 'e' through the door. Ensure you drill straight and level.
Outside Door Face Installation
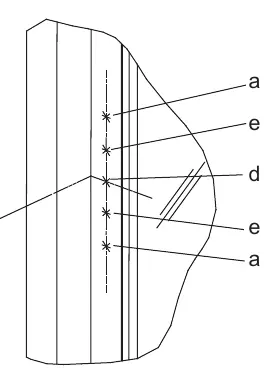
- Place the back plate on the door using it as a template.
- Center the back plate on pilot hole 'e' and align it vertically.
- Mark the cam center 'd' and center punch the other hole 'e'.
- Make a new mark 1/4 inch higher than the cam center; this is the mark for the 1 3/4 inch outside cylinder hole 'f'.
- Drill pilot holes for 'e' and 'f'.
- Use a 1 3/4 inch hole saw to cut through the outside door face at 'f'. Note: Use extreme caution when drilling this hole; there is a tight tolerance with no margin for error.
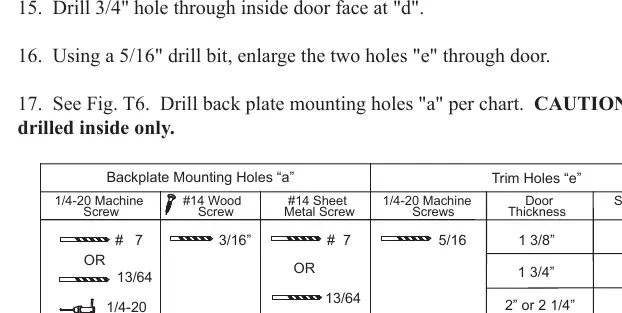
- Drill a 3/4 inch hole through the inside door face at 'd'.
- Enlarge the two holes 'e' using a 5/16 inch drill bit.
- Drill back plate mounting holes 'a' according to the drilling chart.
Manufacturer information
Detex Corporation
Practical help
Common problems
Using the provided strike locator
Do not use the provided strike locator on 2-inch narrow stile glass doors.
Drilling the 1 3/4 inch cylinder hole
Use extreme caution. There is a tight tolerance and no margin for error when drilling this hole.
Drilling accuracy
Always drill straight and level to ensure proper alignment of the trim device.
Before use
- Verify the door is a 2-inch narrow stile glass door.
- Ensure you have the 03WS trim device.
- Have a 1 3/4 inch hole saw available.
- Have a 3/4 inch drill bit available.
- Have a 5/16 inch drill bit available.
- Have a center punch and drill ready.
Specs in practice
- Mounting Height
- Recommended 40 inches from the finished floor.
- Edge Distance
- Mark a line 1 inch from the edge of the door.
- Cylinder Hole
- Requires a 1 3/4 inch hole saw.
Model compatibility
- This addendum is specifically for 2-inch narrow stile glass doors.
- Requires Detex P/N 101257 (03WS Installation Instructions) for the remainder of the installation process.

Manual page author
Michael Turner
Technical manual editor
Reviews PDF manuals for structure, safety notes, and practical product details so readers can find the right information quickly.