Home / Door Hardware
Installation Instructions for Detex 03A(N), 02A(N), 01A(N) Pullplate Trim
Comprehensive installation guide for Detex 03A(N), 02A(N), and 01A(N) Pullplate Trim. Includes tools required, door preparation steps, cylinder tailpiece adjustment, and mounting procedures.
Table of contents
Manual images
Click an image to enlargeImportant Installation Information
This document provides installation instructions for the Detex 03A(N), 02A(N), and 01A(N) Pullplate Trim. Please note that the 03A function requires specific cylinder preparation, whereas the 02 and 01 trims do not. All holes must be drilled straight and level to ensure proper function.
Tools Required
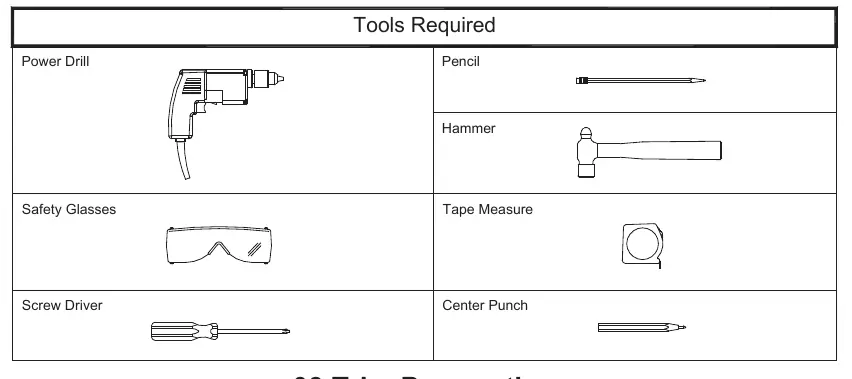
- Power Drill
- Pencil
- Hammer
- Safety Glasses
- Tape Measure
- Center Punch
- Screw Driver
03 Trim Preparation
This section applies only to the 03A function. The cylinder tailpiece must be cut to the correct length based on the door thickness:
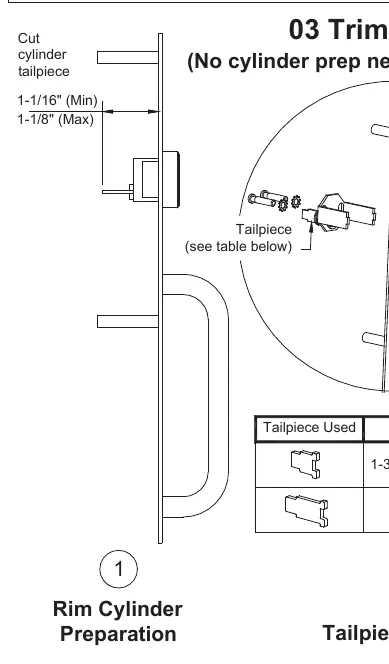
- 1-3/4" and 2" Thick Doors: Use the standard tailpiece.
- 2-1/4" Thick Doors: Use the appropriate tailpiece for this thickness.
Ensure the tailpiece is cut to 1-1/16" (Min) to 1-1/8" (Max) length. Assemble the tailpiece to the cylinder before installing the trim unit on the door.
Door Preparation
Follow these steps to prepare the door for installation:
- Interior Prep: Mark the center hole for the 03 function and mark the mounting plate holes. Use a center punch to mark the holes.
- Drilling: Drill pilot holes through the door. For the 03 function, drill a 3/8" hole through the door.
- Interior Face: For the 03 function only, drill a 3/4" hole through the interior door face.
- Exterior Prep: Mark 1/4" up from the center mark. For the 03 function only, drill a 1-1/2" hole through the exterior door face only.
Installing the Trim
- Mark the bottom hole for the thru-bolt. For 01 trims, measure from the device centerline.
- Drill a 3/8" hole once marked.
- Fasten the top of the pull to the trim plate using the provided screw.
- Position the trim unit onto the exterior door face. Ensure the tailpiece is vertical.
- For the 03 function, ensure the cam engages with the tailpiece on the mounting plate.
- Fasten the mounting plate to the pullplate.
- Fasten the bottom of the pull with the PFH screw, ensuring the finished washer is used.
Manufacturer information
Detex Corporation
Practical help
Common problems
Trim does not sit flush or mechanism binds
Ensure all holes were drilled straight and level. Re-check alignment of the mounting plate.
Tailpiece is too long or too short
Verify door thickness. Use the correct tailpiece for 1-3/4"/2" doors or 2-1/4" doors, and ensure it is cut to the specified 1-1/16" to 1-1/8" range.
Before use
- Verify door thickness (1-3/4", 2", or 2-1/4").
- Ensure you have the correct trim function (03A, 02A, or 01A).
- Gather all required tools: Power drill, pencil, hammer, safety glasses, tape measure, center punch, screwdriver.
- Confirm the device centerline for 01 trim installation.
Specs in practice
- 03A Function
- Requires cylinder preparation and specific tailpiece cutting.
- 02A/01A Function
- Does not require cylinder preparation.
- Tailpiece Cut Length
- Must be between 1-1/16" (min) and 1-1/8" (max) for proper operation.
Images and diagrams
- Page 2 shows the tailpiece assembly and required tools.
- Page 3 details the interior and exterior door drilling locations.
- Page 4 illustrates the final trim mounting and screw fastening locations.
Model compatibility
- 03A function requires cylinder prep; 02 and 01 trims do not.
- Mounting plate BP2 is used for 01 and 02 functions.

Manual page author
Emily Carter
User documentation editor
Prepares concise manual descriptions and highlights the most useful setup, operation, and maintenance information for readers.