Home / Door Hardware
Installation Manual for Detex 02D, 02DT, 02DU, 02Dx2W Outside Lever Trim
Installation guide for Detex 02D, 02DT, 02DU, and 02Dx2W outside lever trims. Includes instructions for switching handing, drilling requirements, and mounting procedures.
Table of contents
Manual images
Click an image to enlargeQuick Installation Guide
This document provides installation instructions for the Detex 02D series outside lever trim. Before beginning, ensure your door thickness is between 1-3/4" and 2-1/4". Note that this product is not designed for 2" stile doors. Always verify the handing of your door (Left Hand or Right Hand) before installation, as the trim may require adjustment.
Switching Handing
If the trim handing needs to be changed from Right Hand (RHR) to Left Hand (LHR), follow these steps:
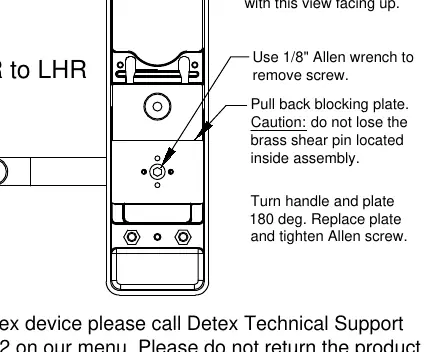
- Place the trim on a clean surface with the back facing up.
- Use a 1/8" Allen wrench to remove the screw.
- Pull back the blocking plate. Caution: Do not lose the brass shear pin located inside the assembly.
- Turn the handle and plate 180 degrees.
- Replace the plate and tighten the Allen screw.
Installation Steps
Ensure you have the following tools: safety glasses, power drill, tape measure, center punch, pencil, hammer, screwdriver, and a drill bit set.
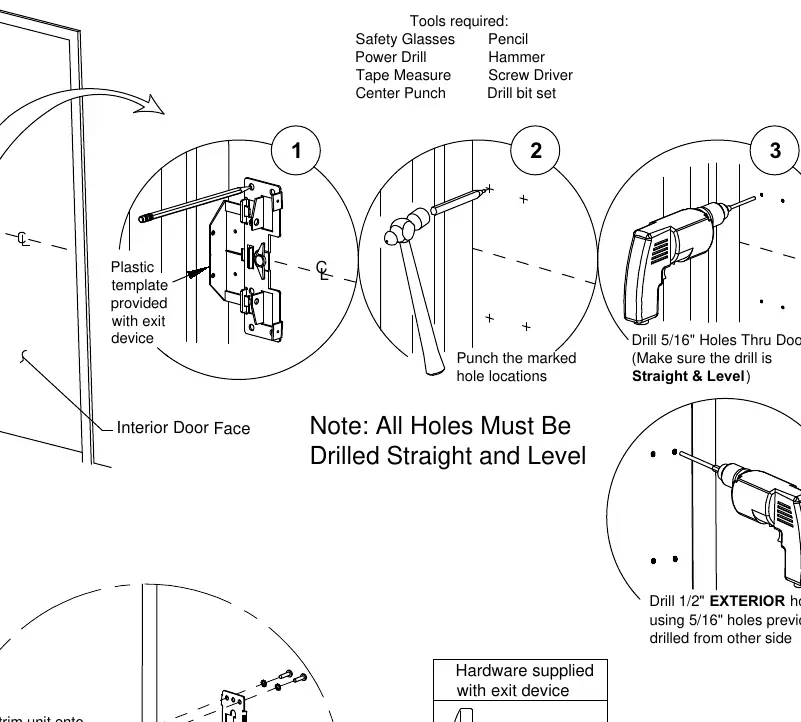
- Template: Use the plastic template provided with the exit device to mark hole locations on the door.
- Punching: Use a center punch to mark the hole locations.
- Drilling: Drill 5/16" holes through the door. Ensure the drill is straight and level.
- Exterior Holes: Drill 1/2" exterior holes using the 5/16" holes previously drilled from the other side.
- Mounting: Place the trim unit onto the exterior door face and fasten the backplate to the trim using the provided machine screws and lock washers.
Technical Support
If you have questions or problems with your Detex device, call Detex Technical Support from the job site at 1-800-729-3839 and choose option 2. Do not return the product to the distributor.
Manufacturer information
Detex Corporation
Practical help
Common problems
Handing is incorrect for the door
Switch from RHR to LHR by removing the Allen screw, pulling back the blocking plate, rotating the handle and plate 180 degrees, and re-tightening the screw.
Brass shear pin lost during disassembly
Exercise extreme caution when pulling back the blocking plate; the brass shear pin is loose inside the assembly and can easily fall out.
Before use
- Verify door thickness is between 1-3/4" and 2-1/4".
- Confirm the door stile is not 2" (not compatible).
- Identify if you have a Wide Stile (4 mounting studs) or Narrow Stile (2 mounting studs) model.
- Gather required tools: Safety glasses, power drill, tape measure, center punch, pencil, hammer, screwdriver, drill bit set.
- Ensure the exit device is available, as the plastic template and mounting hardware are included with the exit device, not the trim.
Specs in practice
- Door Thickness
- Compatible with doors 1-3/4" to 2-1/4" thick.
- 02D, 02DT, 02DU
- Wide stile models requiring 4 mounting studs.
Images and diagrams
- The handing diagram illustrates the removal of the Allen screw and the 180-degree rotation of the handle/plate assembly.
- The drilling diagram shows the 4-step process: template alignment, punching, 5/16" through-hole drilling, and 1/2" exterior hole drilling.
Model compatibility
- Not designed for 2" stile doors.
- Mounting hardware and plastic template are supplied with the exit device, not the trim kit.

Manual page author
Michael Turner
Technical manual editor
Reviews PDF manuals for structure, safety notes, and practical product details so readers can find the right information quickly.